reverse voltage for boat
Printed From: the12volt.com
Forum Name: Marine Electronics
Forum Discription: Boat Stereos, Security, Navigation, Lights, Switches, Gauges, etc.
URL: https://www.the12volt.com/installbay/forum_posts.asp?tid=95217
Printed Date: May 08, 2026 at 5:47 AM
Topic: reverse voltage for boat
Posted By: nathan909
Subject: reverse voltage for boat
Date Posted: June 29, 2007 at 4:18 PM
Ok, I have a boat... On it there is a hatch that is motor driven. This motor works off of 2 wires (reverse polarity for down). The system works fine but slow... The voltages runs up to a switch and then back to the motor, about 18'.
The battery is right next to the motor. I would like to add a relay or two, grabbing fused power from the battery 6" away and use that to power the motor. The relays would need to be switch using 2 wires (with reverse polarity for down).
In a nut shell i just want to reproduce the same voltage at the back of the boat, 2 wire, normal polarity or reversed polarity.
Thanks for your help.
-Nathan
Replies:
Posted By: KarTuneMan
Date Posted: June 29, 2007 at 5:45 PM
I'm confused.... but look here. https://www.the12volt.com/relays/relays.asp -------------
Posted By: nathan909
Date Posted: June 29, 2007 at 6:45 PM
I have 2 wires with both reg and rev polarity...
I would like to run a higher amp by using relays.
How can i get a relay(s) to supply a motor with both reg and rev polarity.
The Trigger for the relay is 2 wires... sending both reg and rev polarity.
Posted By: dualsport
Date Posted: June 29, 2007 at 8:55 PM
Start with this
Start with Hotwaterwizard's diagram, supplying the key switch input with one side of your two wires (pick whichever one gives you the right polarity on the output.)
Then add another relay to break the 12V input, with the coil connected to your two wires, so that it only closes when you have either a reg or rev polarity signal going in (make sure your relay doesn't have any built in suppression diodes, since it needs to work with both directions.
Posted By: hotwaterwizard
Date Posted: June 30, 2007 at 12:23 AM
 ------------- John DeRosa (Hotwaterwizard)
Stockton California
When in doubt, try it out !
Posted By: hotwaterwizard
Date Posted: June 30, 2007 at 12:32 AM
The circuit Above will only work if there are Limit switches built into the Actuators.
-------------
John DeRosa (Hotwaterwizard)
Stockton California
When in doubt, try it out !
Posted By: hotwaterwizard
Date Posted: June 30, 2007 at 12:42 AM
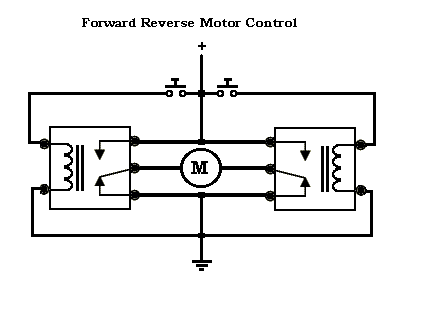
Here is a circuit that you can use push button switches and 3 wires. This one will work with motors that do not have limit switches. 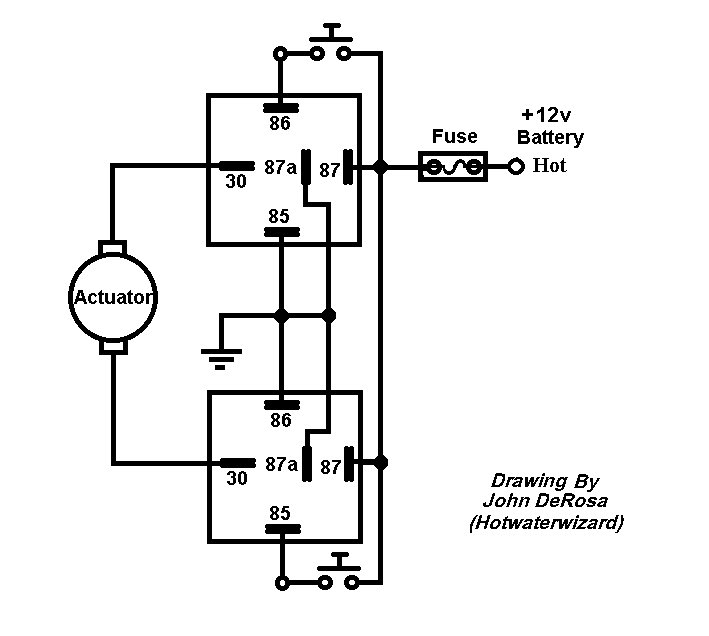
------------- John DeRosa (Hotwaterwizard)
Stockton California
When in doubt, try it out !
Posted By: dualsport
Date Posted: June 30, 2007 at 9:11 AM

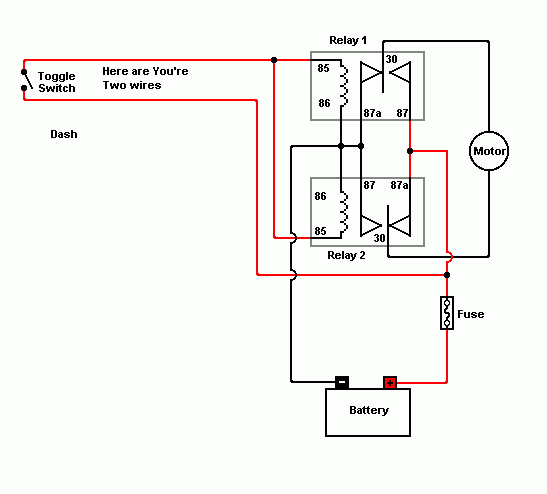
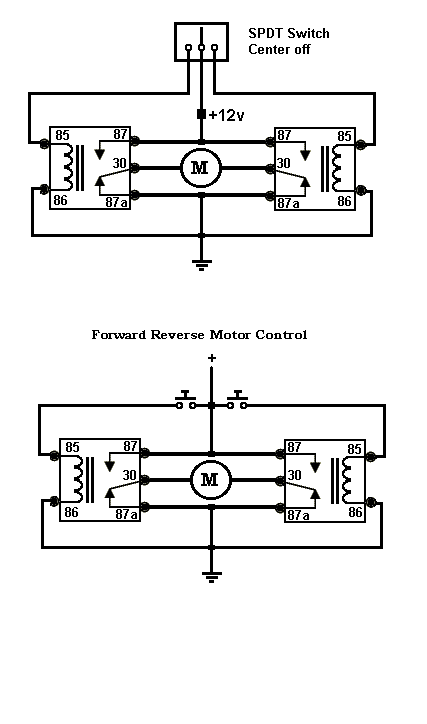
This is what I had in mind, using the two existing wires for controlling the relays.
Posted By: hotwaterwizard
Date Posted: June 30, 2007 at 11:48 AM
Oh just cut the power to the circuit to stop the motor but how do you make the switch from open to close with this setup? ------------- John DeRosa (Hotwaterwizard)
Stockton California
When in doubt, try it out !
Posted By: dualsport
Date Posted: June 30, 2007 at 12:31 PM
The two wires he already has running to the motor are reversing polarity wires. During the off condition, there's no voltage on any of the wires, all the relays are deenergized, and nothing is powered up. He just needs a boost in power using relays, because there's currently a big drop from the long length of wires he's running. The Input (+) and Input (-) become inverted when he closes the hatch, and result in the two relays going into the reverse polarity configuration. - Standby: Input(+) = 0V, Input(-) = 0V Relays off, no power to motor
- Open Hatch: Input(+) = 12V, Input(-) = GND Polarity configuration relays ON, 12V power relay ON, Positive polarity power to motor
- Close Hatch: Input(+) = GND, Input(-) = 12V Polarity configuration relays OFF, 12V power relay ON, Negative polarity power to motor
Posted By: dualsport
Date Posted: June 30, 2007 at 12:53 PM
When I did the cut and paste when I copied your diagram, forgot to change the name of the third relay from Relay 2 to Relay 3; the bottom relay is the 12V power relay (Relay 3). The two top relays are the polarity configuration relays (Relay 1 and Relay 2). The top of the motor is the (+) and the bottom connection is (-), and in the original setup were connected to Input (+) and Input (-) respectively. With the use of relays, the two control wires don't need to be heavy gauge or anything, since they're just driving the relay coils, but if they're already run, there's no need to change them. The 12V power shown should be fused as in HWW's diagram; I didn't draw that in-
Posted By: dualsport
Date Posted: June 30, 2007 at 1:28 PM

Thick lines need to be heavy gauge since they carry power for the motor-
Posted By: hotwaterwizard
Date Posted: June 30, 2007 at 5:14 PM
I can not understand how the actuator will go up then stop and then down and stop in your diagram. What if there are no limit switches? ------------- John DeRosa (Hotwaterwizard)
Stockton California
When in doubt, try it out !
Posted By: hotwaterwizard
Date Posted: June 30, 2007 at 5:22 PM
 ------------- John DeRosa (Hotwaterwizard)
Stockton California
When in doubt, try it out !
Posted By: INSTALLER_MSS
Date Posted: June 30, 2007 at 5:33 PM
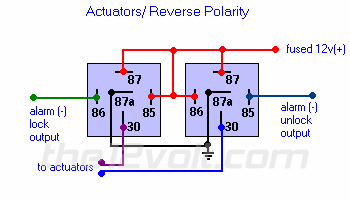
are there 5 terminals or 3 on the swtich currently being used? all that needs to be done is wire up the thing like an actuator in a door of a car | Actuators / Reverse Polarity | This is practically identical to the 5 wire alternating 12V(+) system above. The only difference is there's no switch! Both motor legs rest at ground at the relays. To lock or unlock the vehicle, polarity is changed on one motor leg.
 |
------------- "If a man made it, another can modify it...it just takes some thinking."
"If you ask questions, you're a fool for 5 minutes; if you don't, you're a fool for a lifetime."
Posted By: hotwaterwizard
Date Posted: June 30, 2007 at 5:36 PM
 ------------- John DeRosa (Hotwaterwizard)
Stockton California
When in doubt, try it out !
Posted By: hotwaterwizard
Date Posted: June 30, 2007 at 5:40 PM
We have no Remote and only 2 wires in the dash for switching a low current load. It is a boat so there is no common ground. ------------- John DeRosa (Hotwaterwizard)
Stockton California
When in doubt, try it out !
Posted By: dualsport
Date Posted: June 30, 2007 at 7:40 PM
hotwaterwizard wrote:
I can not understand how the actuator will go up then stop and then down and stop in your diagram.
What if there are no limit switches?
The limit switch is the guy at the helm operating the switch, which is how he is doing it now. Same as a power window, he'll have to just switch it open or closed, and I assume he can see the hatch as he does it. He didn't mention needing automatic limit switching, though I'm sure it'd be a nice feature.
My take on it was that he's just trying to solve the problem of the slow motor, which was due to the voltage drop across the very long wire run that was carrying the the actual power for the motor.
By using relays right at the hatch motor, he can now run 6" heavy gauge wiring from the battery to the motor, and control it with the two existing wires that is being used now.
If he wants to add more features like limit switching or auto up/down action, it can be done easily enough (actually they were already done in some previous posts), but maybe we ought to see if he's still reading and wants that kind of thing first. Whether it's worth the extra complexity and possible extra failure points is up to him.
Keeping it simple for better reliability-
Posted By: dualsport
Date Posted: June 30, 2007 at 7:46 PM
hotwaterwizard wrote:
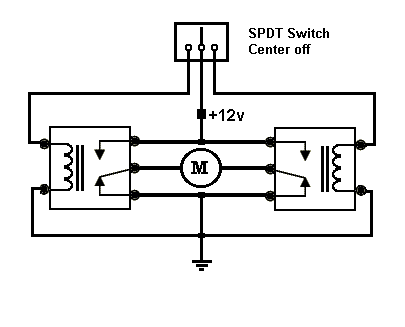
That's the way to go, think it's a winnah! 
You know, that's actually the same setup you already posted in your second diagram, I guess what threw me was the two separate switches shown in that one. Your latest one with the SPDT switch made me see the light-  Good job-
Posted By: hotwaterwizard
Date Posted: July 04, 2007 at 3:41 PM
 ------------- John DeRosa (Hotwaterwizard)
Stockton California
When in doubt, try it out !
Posted By: hotwaterwizard
Date Posted: July 04, 2007 at 3:50 PM
 ------------- John DeRosa (Hotwaterwizard)
Stockton California
When in doubt, try it out !
|