2005 Chevrolet Silverado, Viper 5706v
Printed From: the12volt.com
Forum Name: Car Security and Convenience
Forum Discription: Car Alarms, Keyless Entries, Remote Starters, Immobilizer Bypasses, Sensors, Door Locks, Window Modules, Heated Mirrors, Heated Seats, etc.
URL: https://www.the12volt.com/installbay/forum_posts.asp?tid=136770
Printed Date: May 14, 2026 at 8:41 PM
Topic: 2005 Chevrolet Silverado, Viper 5706v
Posted By: physiphreak
Subject: 2005 Chevrolet Silverado, Viper 5706v
Date Posted: June 08, 2014 at 3:13 PM
I have a Viper 5706v that I am going to install on my 2005 crew cab Chevy Silverado. I understand that the information for this is limited. I have the connector pinout list that came with the 5706 as well as the vehicle wiring information obtained from this site. I am looking for any information anyone can provide that will assist in this install. Also, which module would be best for my situation?
Replies:
Posted By: kreg357
Date Posted: June 08, 2014 at 3:53 PM
Limited info? Heck, you came to right place. Here is a link to the full Viper 5706 install guide :
https://www.the12volt.com/installbay/file.asp?ID=1250
The Silverado is similar to many other GM vehicles. Here is a link to a Pictorial on a 2003 Tahoe :
https://www.the12volt.com/installbay/forum_posts.asp?tid=133000 The wires are the same.
As for the bypass module, there are many excellent ones to choose from. I'm still a bit old school, so I prefer to go
W2W with the connections between the R/S and the bypass module instead of using the D2D port. Going with W2W
and assuming you don't have a XLoader2 cable to flash a bypass module, I would suggest a taking a look at the
DLPKGM or the Fortin OEM piece, the INT-SL+. Here is a link to the DLPKGM bypass module's install guide :
https://www.xpresskit.com/DocumentDownload.aspx?documentid=6027&productid=125&firmwareid=1633
Here is a link to the Fortin INT-SL+ module : https://fortin.ca/download/3966/int-sl%2B_installation_guide.rev-20120308.pdf
With an alarm system, the bypass module does not supply the rear door trigger(s), so that will have to be hard wired. ------------- Soldering is fun!
Posted By: physiphreak
Date Posted: June 08, 2014 at 6:41 PM
Thanks for the quick response!!
so it looks like both modules are about the same and they will allow to take full advantage of the options such as heated seats, rear defrost, in addition to the passlock bypass. I thought these newer modules would allow full door control? would I need to go with another module such as the 457G?
Also, a bit confused on the "advantages" of D2D vs W2W. what would be the benefit of having the ability to flash the module?
Posted By: kreg357
Date Posted: June 08, 2014 at 7:11 PM
I have never used a 457G module, so I am not sure if it will supply the rear door triggers. I use iDatalink modules like
the one listed in the Pictorial. ( This install was for a R/S w/keyless entry only - no alarm functions - and did not need or
use door triggers. The iDatalink bypass modules install guide specifically states that they do not supply the rear door
triggers for that application. I am not positive about the INT-SL+ or DLPKGM modules but think they are the same as the
iDatalink modules in that respect. You would have to test after installation to be sure.
If you don't have the XKLoaded2 cable, you would not be able to flash certain XpressKit bypass modules ( DB-ALL, etc )
and would need to get a pre-flashed module like the INT-SL+ or DLPKGM suggested. You might be able to find a dealer
that would sell you the module after flashing the correct firmware.
If you found a bypass module for your application that used Directed's DBI communication protocol on it's D2D port, you
could make the install easier ( less wire connections between the bypass module and the Viper ) going with D2D. As you
can see in the Pictorial, the W2W method was used and all the R/S to bypass connections were hardwired. This takes
longer but provides excellent reliability and makes troubleshooting easy. Many installers use D2D and swear by it.
Personally, the few times I have tried D2D, I was disappointed. ------------- Soldering is fun!
Posted By: blanx218
Date Posted: June 09, 2014 at 11:02 PM
I have yet to find a module that detects the rear door triggers on any GM full size truck or SUV. But I agree with Kreg that buying a module that doesnt need flashed will make things easier for you. and I also agree that W2W is more reliable.
Posted By: physiphreak
Date Posted: July 03, 2014 at 4:12 PM
thanks for the great info! I think I will go with the DLPKGM module and hard wire it w2w, that sounds more reliable. Now with that setup how will I wire in the 24-pin connector? that part still confuses me. Will all that be controlled through the DLPKGM module on pin 2 of the OBD2 connector?
Posted By: kreg357
Date Posted: July 03, 2014 at 8:01 PM
The DLPKGM does a lot for you, but not everything. In W2W mode, follow the wiring diagram marked "without D2D" on
the lower half of the DLPKGM Install Guide page. You won't need Trunk and Unlock Driver2. Remember to set the Viper's
Parking Light Output to (-) via the internal jumper/fuse to correctly interface with the DLPKGM.
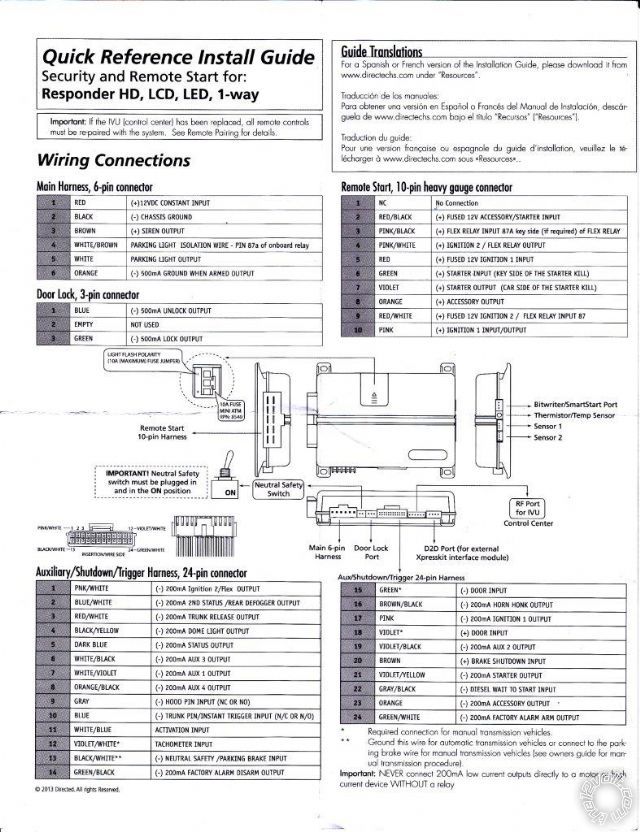
Harness, 24-pin connector
1 PNK/WHITE (-) 200mA Ignition 2/Flex OUTPUT Not Used
2 BLUE/WHITE (-) 200mA 2ND STATUS /REAR DEFOG OUTPUT Not Used
3 RED / WHITE (-) 200mA TRUNK RELEASE OUTPUT Not Used
4 BLACK / YELLOW (-) 200mA DOME LIGHT OUTPUT Not Used
5 DARK BLUE (-) 200mA STATUS OUTPUT DLPKGM Blue/White
6 WHITE/ BLACK (-) 200mA AUX 3 OUTPUT Not Used
7 WHITE/ VIOLET (-) 200mA AUX 1 OUTPUT Not Used
8 ORANGE / BLACK (-) 200mA AUX 4 OUTPUT Not Used
9 GRAY (-) HOOD PIN INPUT (NC OR NO) Viper Kit supplied Hood Pin
10 BLUE (-) TRUNK PIN/INSTANT TRIGGER INPUT (N/C OR N/O) *Use for REAR Door Pins
11 WHITE/ BLUE ACTIVATION INPUT Not Used
12 VIOLET/WHITE* TACHOMETER INPUT White (AC) @ Rear of Instrument Panel or DLPKGM Violet/White
13 BLACK/ WHITE** (-) NEUTRAL SAFETY /PARKING BRAKE INPUT Chassis Ground ( if Auto Trans )
14 GREEN/ BLACK (-) 200mA FACTORY ALARM DISARM OUTPUT Not Used
15 GREEN* (-) DOOR INPUT DLPKGM Green
16 BROWN / BLACK (-) 200mA HORN HONK OUTPUT Black (-) BCM, gray plug, pin B9 (optional)
17 PINK (-) 200mA IGNITION 1 OUTPUT Not Used
18 VIOLET* (+) DOOR INPUT Not Used
19 VIOLET/BLACK (-) 200mA AUX 2 OUTPUT Not Used
20 BROWN (+) BRAKE SHUTDOWN INPUT White (+) brake switch
21 VIOLET / YELLOW (-) 200mA STARTER OUTPUT Not Used
22 GRAY/BLACK (-) DIESEL WAIT TO START INPUT Not Used
23 ORANGE (-) 200mA ACCESSORY OUTPUT Not Used
24 GREEN / WHITE (-) 200mA FACTORY ALARM ARM OUTPUT Not Used
LR Latch LIGHT GREEN/ BLACK (-) IN PASSENGERS DOOR MODULE
RR Latch LIGHT BLUE/BLACK (-) IN PASSENGERS DOOR MODULE
or
On 4-Door Trucks the LEFT REAR Door is a LT BLUE/BLACK (-) PIN A3 and the RIGHT REAR Door is a
LT GREEN/ BLACK (-) PIN A2, located in a PURPLE PLUG at the BCM, use both wires and diode isolate
when installing an alarm system ( 1N4001 diode with band away from the Viper ). ------------- Soldering is fun!
Posted By: derrik86
Date Posted: November 25, 2016 at 11:39 PM
so if one is using the gmdlbp with the viper 5706. should you hook the rear door triggers from the bcm directly to the viper alarm ? or hook the rear door triggers to the GMDLBP pink wire then use the GMDLBP pink and white wire connected to the viper door trigger input wire ? I just installed the 5706 in my 06 Silverado and my dome lights do not get triggered by the doors anymore. they will turn on manually or when the alarm is disabled but turn off after a timed delay and with all 4 door open lights are still off.. this alarm install has kicked my rear for weeks now
Posted By: dirty619
Date Posted: October 30, 2024 at 8:01 PM
To the first link image in this post. The 10 pin heavy duty wires, what wire goes to what wire in the truck?
-------------
07 lbz ccsb
Posted By: lee.lopez
Date Posted: October 31, 2024 at 4:57 AM
|