the12volt.com spacer
icon

repairing my amplifier


Post ReplyPost New Topic
< Prev Topic Next Topic >
201.034 
Member - Posts: 5
Member spacespace
Joined: March 06, 2011
Location: California, United States
Posted: March 06, 2011 at 5:06 PM / IP Logged  
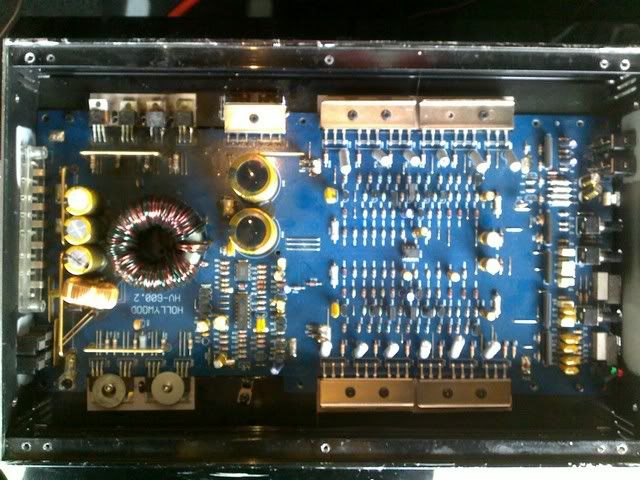
Hello I am new to this site, I hope I can get enough help to repair my fried amp. Heres the background on the amp, Ive had it for about 6 years. Its a Hollywood digital amp, I believe they went out of business. When I got the amp it was already fried(I already knew it was bad to begin with) So I took it in for repair. $80 later its fixed and has worked fine for over 5 years. A couple months ago my younger brother got a hold of it and I'm not sure what he did to it but when I got it back It worked for about a couple days then it stopped working. I open it up And see 4 transistors and 4 resistors are fried. I order new parts and put them in, I go to turn it on and its the 4th of july inside my amplifier. I open it up again and see the same transistors fried(this time resistors aren't burnt) What the heck?! Im not an electronics guru but I do have basic knowledge of electrical circuits. (I'm an auto tech)
The parts were less than $10 so thats no big deal.
Parts I replaced:
4- transistors
4- 47 OHM resistors
When I go to power(in its fried state) it on the Green power light on the amp turns on and I can feel the subs producing a very small amount of sound.
repairing my amplifier -- posted image.
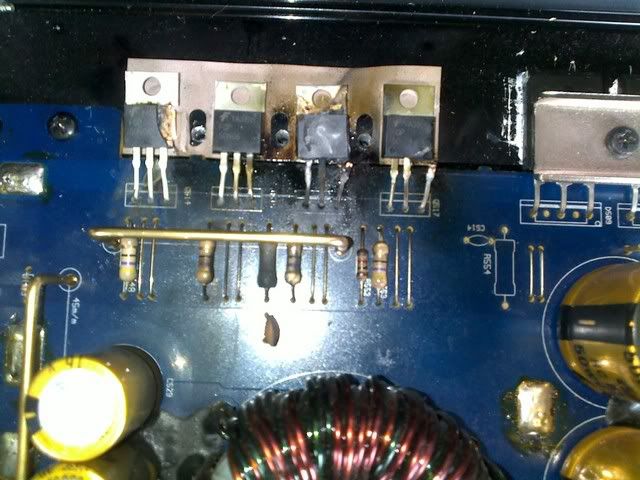
Fried parts are replaced and fried again on the upper left corner (4 transistors) Why are they frying again? Am I forgetting something? I will gladly post more pics when requested. Im just not sure of what to take yet.
201.034 
Member - Posts: 5
Member spacespace
Joined: March 06, 2011
Location: California, United States
Posted: March 06, 2011 at 5:25 PM / IP Logged  
repairing my amplifier -- posted image.
i am an idiot 
Platinum - Posts: 13,674
Platinum spaceThis member consistently provides reliable informationspace
Joined: September 21, 2006
Location: Louisiana, United States
Posted: March 06, 2011 at 6:02 PM / IP Logged  
The 4 resistors that you replaced should all be connected to 2 driver transistors.  The driver transistor that is connected to ground is probably defective.  Both of the driver transistors will also be connected to the at least 16 pin Pulse Width Modulation control chip.
lspker 
Silver - Posts: 503
Silver spacespace
Joined: November 23, 2003
Location: Canada
Posted: March 06, 2011 at 9:36 PM / IP Logged  
Check your output Transisters, you will some of them are fried also.
sparkgap 44 
Member - Posts: 1
Member spacespace
Joined: March 07, 2011
Location: Scotland
Posted: March 07, 2011 at 4:52 AM / IP Logged  
< language=> if you have changed the load on the output stage ie ran the amp into destortion level or wrongly conected the out- put speakers you will have to replace all input pre amp cct same components as first time after this ie out put driver tranistors then the bigger out put stage ie looks a bigger part  will have a large heat shield ,some amps couple  via a tx trasformer to the load some use the speakers as a load ie impeadance + speaker in ohms /chassis   - ground mind current is carried by the car body always make shure you have a  good clean earth or the radiio will act as the fuse and burn up accross the load? id you use the correct fuse rateing for the amp all checks must be done b/4 reintalling 1 ground 2 fuse 3 output stage +speakering wireing  good luck .
sparkgap 85

Sorry, you can NOT post a reply.
This topic is closed.

  Printable version Printable version Post ReplyPost New Topic
You cannot post new topics in this forum
You cannot reply to topics in this forum
You cannot delete your posts in this forum
You cannot edit your posts in this forum
You cannot create polls in this forum
You cannot vote in polls in this forum

  •  
Search the12volt.com
Follow the12volt.com Follow the12volt.com on Facebook
Sunday, May 19, 2024 • Copyright © 1999-2024 the12volt.com, All Rights Reserved Privacy Policy & Use of Cookies
Disclaimer: *All information on this site ( the12volt.com ) is provided "as is" without any warranty of any kind, either expressed or implied, including but not limited to fitness for a particular use. Any user assumes the entire risk as to the accuracy and use of this information. Please verify all wire colors and diagrams before applying any information.

Secured by Sectigo
the12volt.com spacer
Support the12volt.com
Top
the12volt.com spacer