the12volt.com spacer
icon

2000 chrysler town and country


Post ReplyPost New Topic
< Prev Topic Next Topic >
offroadzj 
Gold - Posts: 2,043
Gold spaceThis member has made a donation to the12volt.com. Click here for more info.spaceThis member has been recognized as an authority in Mobile Security and Convenience. Click here for more info.spacespace
Joined: June 03, 2005
Location: New York, United States
Posted: February 19, 2012 at 5:41 PM / IP Logged  
No... do NOT use connectors. Those especially will eventually vibrate and cut right through the wires and then you will be in a world of hurt. Strip back the factory wire (about 1/4" - 1/2" depending on size of the wire), poke a hole through the center of the stripped wire, strip back about 1/2" of the wire to be connected, insert it through the hole of the factory wire, twist the wire tightly, solder, then tape with a HIGH quality tape (3M Super 33 or better). If the roll of tape doesn't cost around $2.50 - $3.00 per roll then its no good.
The only connector you should use in the entire installation is a ring terminal on the ground. Then use a factory bolt to ground it. Don't use a screw b/c a screw will eventually vibrate loose. If you ground it somewhere on the metal dash support, make sure that the dash support is either welded to the vehicle at the sides or directly bolted. Some vehicles will have a small rubber mount where the dash support is attached at the sides to help cut down on vibration. If that is the case, the dash support is not a solid ground and cannot be used.
Kenny
Owner / Technician
KKD Garage LLC
Albany, NY 12205
antman1 
Copper - Posts: 121
Copper spacespace
Joined: February 13, 2012
Location: Tennessee, United States
Posted: February 20, 2012 at 12:17 AM / IP Logged  
Ok, I removed the quick connectors I placed on 5 of the wires and soldered them like you described. I also got the diodes and the relay and got it prepped and ready. I think I am all set to get this installed in the vehicle.
Do you have a recommendation on were I should put the LED?
tedmond 
Gold - Posts: 4,610
Gold spaceThis member has been recognized as an authority in Mobile Security and Convenience. Click here for more info.spacespace
Joined: January 06, 2007
Location: Ontario, Canada
Posted: February 20, 2012 at 9:38 AM / IP Logged  
i usually put them at the top of the steering shroud. highly visible when flashing.
Ted
2nd Year Tier 1 Medical School
Still installing as a hobby...pays for groceries
Compustar Expert
offroadzj 
Gold - Posts: 2,043
Gold spaceThis member has made a donation to the12volt.com. Click here for more info.spaceThis member has been recognized as an authority in Mobile Security and Convenience. Click here for more info.spacespace
Joined: June 03, 2005
Location: New York, United States
Posted: February 20, 2012 at 9:41 AM / IP Logged  
Yup. Top of the steering shroud works great. Or somewhere on the top of the dash.
Kenny
Owner / Technician
KKD Garage LLC
Albany, NY 12205
antman1 
Copper - Posts: 121
Copper spacespace
Joined: February 13, 2012
Location: Tennessee, United States
Posted: February 21, 2012 at 10:49 AM / IP Logged  
ok. I took the kick panel and stuff off exposing the wiring under the dash and began probing last night. I found the wiring for the headlamps and BROWN / white wire and stuff, but the BLACK / YELLOW wire is a small guage wire I have to cut and the wire from the relay to connect is heavy guage. lol. gonna take some playing with and they wrapped it around another harness making it short. I also found the ignition wiring (easy to get to). Got the break wire at break panel but the wire I am having a hard time finding is the WHITE/ green for door locks. Cant find that sucker. Also have been trying to find an opening for the firewall and were it is.
offroadzj 
Gold - Posts: 2,043
Gold spaceThis member has made a donation to the12volt.com. Click here for more info.spaceThis member has been recognized as an authority in Mobile Security and Convenience. Click here for more info.spacespace
Joined: June 03, 2005
Location: New York, United States
Posted: February 21, 2012 at 10:55 AM / IP Logged  
The difference in wire size won't affect the connection too much. You just have to be careful and make sure you get a good solder joint between the 2. What's nice is that since you have to cut that wire, you can usually unwrap it / untangle it from the harness to free up a little space. Its a different story for wires that you don't have to cut.. haha. The door lock wire can be tough to find. It should be in the far left plug of the BCM / fuse box.
Kenny
Owner / Technician
KKD Garage LLC
Albany, NY 12205
flobee4 
Silver - Posts: 585
Silver spacespace
Joined: January 02, 2004
Location: United States
Posted: February 21, 2012 at 3:30 PM / IP Logged  
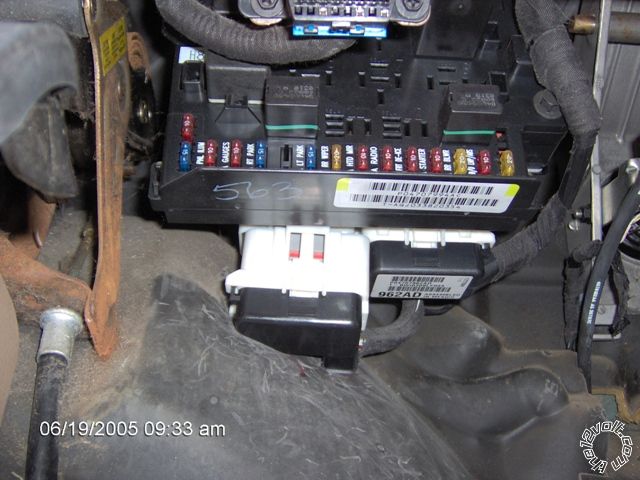
Here is the picture of the connector it is at the bottom of the the BCM. Its hard to unplug. While Unplugging, You kinda have to push in on the black rubber stuff on the floor.When you get it unplugged, you can pop off the black top and make your connection. There are 3 WHITE/ green. You can actually use 2 of the 3 wires. 1 tests off the drivers door key cylinder the other tests off the passenger door key cylinder. The one you do NOT want is located on the edge, kinda in a corner. The 2 you do want are more centered on the plug next to each other.
2000 chrysler town and country - Page 4 -- posted image.
antman1 
Copper - Posts: 121
Copper spacespace
Joined: February 13, 2012
Location: Tennessee, United States
Posted: February 22, 2012 at 1:04 PM / IP Logged  
OK. Finally. I spent 4 hours on this last night soldering and hiding wires and got this done. However. Everything works but I can't get remote start to even act like it is going to try to start. The manual is poorly written in my opinion. Does anyone know why remote start on the ICBM 7071 system doesn't seem to be working or what I can check?
Thank you again everyone for your help. I don't know how I would have done it if it wasn't for the12volt.com and all of you guys and your support.
antman1 
Copper - Posts: 121
Copper spacespace
Joined: February 13, 2012
Location: Tennessee, United States
Posted: February 22, 2012 at 1:53 PM / IP Logged  
I figured it out. It was the hood pin switch. It was making the alarm go off too.
antman1 
Copper - Posts: 121
Copper spacespace
Joined: February 13, 2012
Location: Tennessee, United States
Posted: February 24, 2012 at 10:10 AM / IP Logged  
Just wanted to post a quick update on this. I am very pleased with this alarm so far. Been working great. Only issue I have had was the hood pin switch and I may have to either get a different kind of hood pin switch or something cause this one has been spotty were I have it mounted and there isn't a lot of places on this van to mount it.
Thank you guys a lot for all the help on it. My wife (tha boss) has been very pleased with the remote start and alarm and the range for the keyless entry and the 2way communications on both the keyless remotes.
Page of 6

  Printable version Printable version Post ReplyPost New Topic
You cannot post new topics in this forum
You cannot reply to topics in this forum
You cannot delete your posts in this forum
You cannot edit your posts in this forum
You cannot create polls in this forum
You cannot vote in polls in this forum

  •  
Search the12volt.com
Follow the12volt.com Follow the12volt.com on Facebook
Wednesday, May 15, 2024 • Copyright © 1999-2024 the12volt.com, All Rights Reserved Privacy Policy & Use of Cookies
Disclaimer: *All information on this site ( the12volt.com ) is provided "as is" without any warranty of any kind, either expressed or implied, including but not limited to fitness for a particular use. Any user assumes the entire risk as to the accuracy and use of this information. Please verify all wire colors and diagrams before applying any information.

Secured by Sectigo
the12volt.com spacer
Support the12volt.com
Top
the12volt.com spacer