the12volt.com spacer
icon

anti-theft setup help


Post ReplyPost New Topic
< Prev Topic Next Topic >
adamd_1 
Member - Posts: 8
Member spacespace
Joined: April 22, 2003
Location: Puerto Rico
Posted: April 22, 2003 at 1:14 PM / IP Logged  
 

Need help with this diagram. I came across it in a search for

Theft Prevention. What alludes me is the DPDT relay, what’s

the proper resistance it needs for this job?

anti-theft setup help -- posted image.

This is whats needed

12 volt heavy duty car relay;
 
12 volt Double Pole Double Throw (DPDT) relay;
 
12 volt flashing LED;
 
reed switch that closes when a magnet is nearby;
 
pushbutton that opens when pushed;
 
broken remote from a car alarm;
 
and a magnet.

Like all immobilisers, this one shuts down the car's EFI or ignition system. But what's different about ours is that if the thief steals your keys (with the remote control attached), he still can't drive away with your car. That makes it just about unique!

The guts of the remote transmitter case are removed and the magnet is placed inside. The circular magnet from a tiny speaker has been used here. When you enter the car, you casually swipe the transmitter case past a special place within the car's cabin. This place might be on the centre console, a part of the dashboard - pretty well anywhere. Hidden behind the area that you swipe is the reed switch - a switch that is sensitive to magnetic fields. The swiping triggers the reed switch that in turn switches off the immobiliser.

Because the reed switch is located behind the plastic of the dash or centre console, there's nothing to see. The swiping movement can be quite natural - part of your hand movement as you put on your seatbelt or settle yourself in the seat. That means that even if a potential thief is watching you closely, he doesn't get any clues.The remote (at right) triggers the reed switch (left) whenever it comes close. Only you know the location of the reed switch!

When you want to arm the immobiliser, you press the button. The pushbutton can be in complete view - the thief gains nothing by ripping it out and either disconnecting the wires or bridging them. When you press the button, the on-dash LED starts to flash, indicating the car is now immobilised. It also reminds you to switch off the system when you re-enter the car.

When this DPDT relay is not pulled-in (ie has no voltage applied to the coil), it connects the LED to 12 volts, causing it to flash. At the same time it also stops power flow to the heavy-duty automotive relay, in turn disabling a vital car starting circuit. The car won't start - the immobiliser is activated. Disconnecting the car battery switches off the flashing LED but makes no difference to the position of the DPDT relay. (Note that the LED is polarised and so must be connected the right way.)
You want to go somewhere, so you swipe past the open reed switch with your transmitter case. This momentarily closes the reed switch, allowing power to flow through the DPDT relay's coil. It pulls in, with the second coil power supply path through the top contact causing it to latch - that is, stay pulled in, even after the reed switch has opened. The bottom contact of the DPDT relay then feeds power to the heavy-duty relay, causing it to pull in and complete the car starting circuit.
You drive to your chosen location and want to disable the car. A single push of the normally closed pushbutton breaks the latching circuit of the DPDT relay, causing the relay to open. In turn, this stops the power feed to the automotive relay, and so it also opens, disabling the car. The LED starts to flash showing the immobiliser is set.

The most complex part of the system is the wiring of the DPDT relay. We built the complete system on the bench so that we could easily check that everything worked. With the system mocked up, the flashing LED should work as soon as power is connected. Swiping the hand control past the reed switch should switch off the LED, causing the DPDT and heavy-duty relays to click. Pressing the button should cause the relays to again click and the LED to start flashing.


adamd_1 
Member - Posts: 8
Member spacespace
Joined: April 22, 2003
Location: Puerto Rico
Posted: April 22, 2003 at 1:19 PM / IP Logged  
adamd_1 wrote:
 

Need help with this diagram. I came across it in a search for

Theft Prevention. What alludes me is the DPDT relay, what’s

the proper resistance it needs for this job? 

___Maybe you cant see the image get the pritable version for how this works_
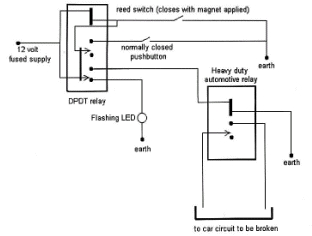
anti-theft setup help -- posted image.

This is whats needed

12 volt heavy duty car relay;
 
12 volt Double Pole Double Throw (DPDT) relay;
 
12 volt flashing LED;
 
reed switch that closes when a magnet is nearby;
 
pushbutton that opens when pushed;
 
broken remote from a car alarm;
 
and a magnet.

Like all immobilisers, this one shuts down the car's EFI or ignition system. But what's different about ours is that if the thief steals your keys (with the remote control attached), he still can't drive away with your car. That makes it just about unique!

The guts of the remote transmitter case are removed and the magnet is placed inside. The circular magnet from a tiny speaker has been used here. When you enter the car, you casually swipe the transmitter case past a special place within the car's cabin. This place might be on the centre console, a part of the dashboard - pretty well anywhere. Hidden behind the area that you swipe is the reed switch - a switch that is sensitive to magnetic fields. The swiping triggers the reed switch that in turn switches off the immobiliser.

Because the reed switch is located behind the plastic of the dash or centre console, there's nothing to see. The swiping movement can be quite natural - part of your hand movement as you put on your seatbelt or settle yourself in the seat. That means that even if a potential thief is watching you closely, he doesn't get any clues.The remote (at right) triggers the reed switch (left) whenever it comes close. Only you know the location of the reed switch!

When you want to arm the immobiliser, you press the button. The pushbutton can be in complete view - the thief gains nothing by ripping it out and either disconnecting the wires or bridging them. When you press the button, the on-dash LED starts to flash, indicating the car is now immobilised. It also reminds you to switch off the system when you re-enter the car.

When this DPDT relay is not pulled-in (ie has no voltage applied to the coil), it connects the LED to 12 volts, causing it to flash. At the same time it also stops power flow to the heavy-duty automotive relay, in turn disabling a vital car starting circuit. The car won't start - the immobiliser is activated. Disconnecting the car battery switches off the flashing LED but makes no difference to the position of the DPDT relay. (Note that the LED is polarised and so must be connected the right way.)
You want to go somewhere, so you swipe past the open reed switch with your transmitter case. This momentarily closes the reed switch, allowing power to flow through the DPDT relay's coil. It pulls in, with the second coil power supply path through the top contact causing it to latch - that is, stay pulled in, even after the reed switch has opened. The bottom contact of the DPDT relay then feeds power to the heavy-duty relay, causing it to pull in and complete the car starting circuit.
You drive to your chosen location and want to disable the car. A single push of the normally closed pushbutton breaks the latching circuit of the DPDT relay, causing the relay to open. In turn, this stops the power feed to the automotive relay, and so it also opens, disabling the car. The LED starts to flash showing the immobiliser is set.

The most complex part of the system is the wiring of the DPDT relay. We built the complete system on the bench so that we could easily check that everything worked. With the system mocked up, the flashing LED should work as soon as power is connected. Swiping the hand control past the reed switch should switch off the LED, causing the DPDT and heavy-duty relays to click. Pressing the button should cause the relays to again click and the LED to start flashing.


Sorry, you can NOT post a reply.
This topic is closed.

  Printable version Printable version Post ReplyPost New Topic
You cannot post new topics in this forum
You cannot reply to topics in this forum
You cannot delete your posts in this forum
You cannot edit your posts in this forum
You cannot create polls in this forum
You cannot vote in polls in this forum

  •  
Search the12volt.com
Follow the12volt.com Follow the12volt.com on Facebook
Wednesday, May 15, 2024 • Copyright © 1999-2024 the12volt.com, All Rights Reserved Privacy Policy & Use of Cookies
Disclaimer: *All information on this site ( the12volt.com ) is provided "as is" without any warranty of any kind, either expressed or implied, including but not limited to fitness for a particular use. Any user assumes the entire risk as to the accuracy and use of this information. Please verify all wire colors and diagrams before applying any information.

Secured by Sectigo
the12volt.com spacer
Support the12volt.com
Top
the12volt.com spacer