the12volt.com spacer
icon

firing direction for subs


Post ReplyPost New Topic
< Prev Topic Next Topic >
stevdart 
Platinum - Posts: 5,816
Platinum spaceThis member has made a donation to the12volt.com. Click here for more info.spaceThis member has been recognized as an authority in Mobile Audio and Video. Click here for more info.spaceThis member consistently provides reliable informationspace
Joined: January 24, 2004
Location: Pennsylvania, United States
Posted: February 16, 2005 at 9:14 PM / IP Logged  

the bottom of the rear box i put as 16 inches though

That would leave you only 16" OD for the front box, and you won't get enough volume.  The ratio of front/rear is going to be approx. 3 to 2, as far as depth goes.  The front has to be larger because the subs will take up some of the volume.

Do you have specs for those subs that give the displacement?  Something from the manufacturer? 

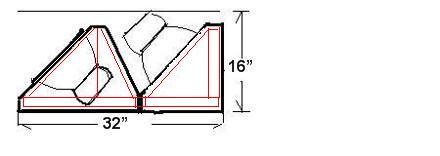
Go over these posts in this thread again to pick up all the details gone over so far.  Get the measurements on paper.  Work the measurements of the two boxes, making changes where needed,  so you end up with the rear box approx. 0.25 ft^3 (check manufacturer specs) smaller than the front box interior air volume.  Once you get it looking right on paper, draw a true-to-life outline on a large piece of cardboard or paper similar to the drawing I posted.  Hold a sub in place and see if it fits. 

Build the box so that it performs well in the worst case scenario and, in return, it will reward you at all times.
projectprotege 
Copper - Posts: 112
Copper spacespace
Joined: February 13, 2005
Location: United States
Posted: February 16, 2005 at 9:42 PM / IP Logged  

Displacement - 141.70 cu in - but thats from a P3 which i guess is like the equivelant of the HE2 DVC....

heres all the have for the HE2 DVC

http://www.rockfordfosgate.com/ez2/ModelInfo/ModelInfo.asp?ItemKey=10062923&CategoryDesc=Speakers%20-%20Raw%20Drivers%20/%20Separates

projectprotege 
Copper - Posts: 112
Copper spacespace
Joined: February 13, 2005
Location: United States
Posted: February 16, 2005 at 9:53 PM / IP Logged  

i took a stab at the math for the bottom length for these(not good with math so bare with me lol)

front bottom=21"

rear bottom 11"

am i doing this all wrong or does this look right? lol

stevdart 
Platinum - Posts: 5,816
Platinum spaceThis member has made a donation to the12volt.com. Click here for more info.spaceThis member has been recognized as an authority in Mobile Audio and Video. Click here for more info.spaceThis member consistently provides reliable informationspace
Joined: January 24, 2004
Location: Pennsylvania, United States
Posted: February 16, 2005 at 10:27 PM / IP Logged  

Those subs look like about .08 displacement, so count that as solid fill and add that much more volume to the front on each side.  Total .16 air space added to the front.  The rears will be actual air volume plus about .02 for each inverted sub, total .04 for the rear.  Figure the difference in air volume front to rear is 0.2 ft^3 (the front needs .2 ft more than the rear). 

Your OD numbers look like a good start.  If the front OD depth is 21" and there is 3/4" MDF on each end, subtract 1.5" to make depth 19.5". 

When doing a problem like this there is a lot of trial and error involved.  Becoming familiar with the math will happen for you because you will be doing the same math over and over.  Be sure to use the printed pic...

firing direction for subs - Page 2 -- posted image.

...or draw a pic, label all the sections (wedges and rectangles) I showed you above, make notes and lots of them.  I believe you should end up with about 1.5 ft^3 for the front for each sub and the equivalent for the rear, which would be 1.4 ft^3 for each sub chamber.

Good luck with it.  I believe you have info or links to all the tools you need along with the info I gave you.  You should be able to come up with a good working diagram and measurements.

Build the box so that it performs well in the worst case scenario and, in return, it will reward you at all times.
stevdart 
Platinum - Posts: 5,816
Platinum spaceThis member has made a donation to the12volt.com. Click here for more info.spaceThis member has been recognized as an authority in Mobile Audio and Video. Click here for more info.spaceThis member consistently provides reliable informationspace
Joined: January 24, 2004
Location: Pennsylvania, United States
Posted: February 17, 2005 at 9:14 AM / IP Logged  

Here's a good calculator for finding the length of the slanted side (hypotenuse) of a right triangle.  It will also give you the angle of the cuts at the ends.

http://www.1728.com/pythgorn.htm

For this project you want the faces of both boxes to be the same angle.  You can use this calculator to find the exact length of the angled side and the angles of the cuts you have to make.

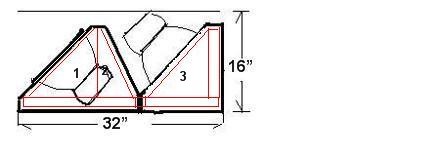
Call the face of box front "wedge 1", and call the face of box rear "wedge 3".  In my current workup (which isn't complete), I have the rear box depth at 11.6".  The height at 11.5" (these are inside measurements).  Input those two numbers for "sides" and find hypotenuse.  It comes up as 16.33".

firing direction for subs - Page 2 -- posted image.

If you copy wedge 1 with the same sides 1 and 2 lengths as wedge 3, the angles and hypotenuse lengths will be identical.  The difference in the front box volume can then be made up in the wedge 2 space.

The angle of wedge 2 is not important other than that the inverted sub has to clear it, and you find its base by using the remaining available space after wedges 1 and 3 have been figured.  (Wedge 1 + 2 bases will equal the interior dimensions of depth for box front.)

(Add additional height (air volume) to both boxes by increasing the height of the rectangles on the bottoms.  It is here where you will get the most added air space.  Keep the same height on both boxes.  You are only limited by the available room in your car, and the inverted sub at its highest point will dictate how high you can go. 

Build the box so that it performs well in the worst case scenario and, in return, it will reward you at all times.
stevdart 
Platinum - Posts: 5,816
Platinum spaceThis member has made a donation to the12volt.com. Click here for more info.spaceThis member has been recognized as an authority in Mobile Audio and Video. Click here for more info.spaceThis member consistently provides reliable informationspace
Joined: January 24, 2004
Location: Pennsylvania, United States
Posted: February 17, 2005 at 2:15 PM / IP Logged  
After looking at the pics and specs of the subs you are using, according to the link you posted, I see that the scale of the subs in my pic are too large.  That's good, because that gives you more room to work with.  I'll tweak it a little to try to get them in the right scale, and I'll try to work up box measurements for you tonight if I can make the time.  I'll post results when I get it done.
Build the box so that it performs well in the worst case scenario and, in return, it will reward you at all times.
stevdart 
Platinum - Posts: 5,816
Platinum spaceThis member has made a donation to the12volt.com. Click here for more info.spaceThis member has been recognized as an authority in Mobile Audio and Video. Click here for more info.spaceThis member consistently provides reliable informationspace
Joined: January 24, 2004
Location: Pennsylvania, United States
Posted: February 17, 2005 at 10:25 PM / IP Logged  

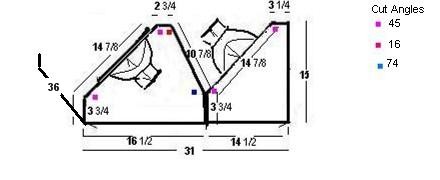
Here are the results.  I figured out volumes and measurements for this project (may do this some day myself...) and I will outline it here.  All dimensions here are OD (outside dimensions).  The two boxes have the same common height at 15", the same common width at 36", and have a common base height of 3 3/4".  The face angle of each is 45 degrees, and saw angle cuts are listed here for the angles.  The face angle cuts are 45 degrees, but the angle on the rear of the front box has angle cuts of 16 and 74 degrees.  The lengths of the hypotenuses are 14 7/8" for each face and 10 7/8" for the backward angle.  There is a center top flat depth of 2 3/4" on the front box (I figured the air space directly below it at 1 1/2", so let the final size be determined when you assemble the angled sides), and a rear top flat depth of 3 1/4" on the rear box.  The depth of the front box is 16 1/2"; the depth of the rear box is 14 1/2".  The two boxes combined make 31" depth.

Volumes were determined using 3/4" MDF.  A solid 3/4" MDF center baffle is placed dead center of each box to separate the subs.  I figured subwoofer displacement ( or lack of, in the rear box) with these measurements.  Each sub will have 1.2 cubic feet of air space (displacement already figured in).  Build the boxes exactly to these specs and you will be good to go...(but check for fit in your car first).  Just an inch different somewhere will throw the balance off....and in your case where you are powering all subs with one amp channel, we want the volumes to be the same for each sub.

In this new pic, the subs have been resized to be truer to scale and the base has been raised.  But I didn't redraw the boxes entirely, so the rear will actually extend forward a bit more than is shown, and the front will be somewhat compacted.

firing direction for subs - Page 2 -- posted image.

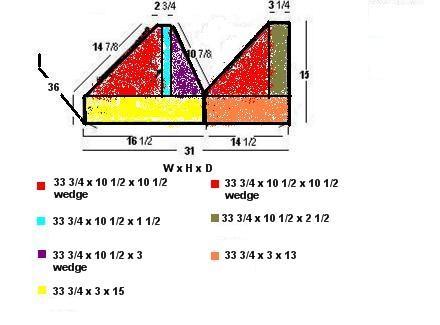
Using the same side view, the interior space is divided into rectangles and wedges and calculated to get total volume for each box.  Measurements below the pic are interior, and the results are listed below.

firing direction for subs - Page 2 -- posted image.

                   1.0766                                           1.0766

                     .307                                                .5127

                     .307                                                .76

              ___.879___                                    _________

                  2.569   ft^3                                     2.35   ft^3

         -   ___.16___  sub displacement  +__.04___   cone area

                  2.41  ft^3                                          2.39  ft^3

The middle divider and all sides have already been deducted, so you just divide these box volume totals by two to get 1.2 ft^3 per sub.

Calculators used:

https://www.the12volt.com/caraudio/boxcalcs.asp#wed

https://www.the12volt.com/caraudio/boxcalcs.asp#rec

http://www.1728.com/pythgorn.htm

Enjoy the build and do a damn fine job on it.  I have a lot of hours in on this project!   lol

DYohn 
Moderator - Posts: 10,741
Moderator spaceThis member has made a donation to the12volt.com. Click here for more info.spaceThis member has been recognized as an authority in Electrical Theory. Click here for more info.spaceThis member has been recognized as an authority in Mobile Audio and Video. Click here for more info.spacespace
Joined: April 22, 2003
Location: Arizona, United States
Posted: February 18, 2005 at 6:59 PM / IP Logged  
That my friend is a righteous design.  Good work.
Support the12volt.com
forbidden 
Platinum - Posts: 5,353
Platinum spaceThis member has made a donation to the12volt.com. Click here for more info.spaceThis member has been recognized as an authority in Mobile Audio and Video. Click here for more info.spacespace
Joined: November 01, 2003
Location: Alberta, Canada
Posted: February 18, 2005 at 9:08 PM / IP Logged  
Now if only it had a half twist....
Top Secret, I can tell you but then my wife will kill me.
stevdart 
Platinum - Posts: 5,816
Platinum spaceThis member has made a donation to the12volt.com. Click here for more info.spaceThis member has been recognized as an authority in Mobile Audio and Video. Click here for more info.spaceThis member consistently provides reliable informationspace
Joined: January 24, 2004
Location: Pennsylvania, United States
Posted: February 19, 2005 at 5:42 PM / IP Logged  

Rob, lol  I scratched my head for awhile on that one...and then it finally dawned on me how much you admire Bose...audio engineering with a twist!

And thanks for the nod, DYohn.  I know you aren't a fan of inverted sub setups, and neither am I....this one evolved from a challenge in the first post "How can I cram 4 subs into a space 37 x 16 x 32?Instead of a don't-do-it reaction, I thought why not, if he's going to do it anyway with them all facing up (blehhh!), let's see if we can make something workable.  So I threw an idea in there.  Then I eventually needed to find out if it would really work, and that involves real figuring instead of guessing....

This project was extra difficult because of the two-box design and the fact that one would have inverted subs... and that all subs would have to have the same air volume after displacement.  But once figured out, it's a very versatile system.  Just one of the enclosures could be used, for example, or the volume in either could be easily adapted to different subs by changing base heght without having to change the angles.  They are easier to load into the car than one bigger box would be.  And the setup is adaptable to further customization like putting a neon on the backside of the front box to light up the inverted bling factor.

Anyway, I hope someone who is just starting and wants to build his own setup sees this and uses it.  One could pretty much just use the post above and have all the details he needs to put it all together.  And of course he'll be on this forum for any other questions, too!  If it gets built, post up some pics.

Page of 3

  Printable version Printable version Post ReplyPost New Topic
You cannot post new topics in this forum
You cannot reply to topics in this forum
You cannot delete your posts in this forum
You cannot edit your posts in this forum
You cannot create polls in this forum
You cannot vote in polls in this forum

  •  
Search the12volt.com
Follow the12volt.com Follow the12volt.com on Facebook
Thursday, October 31, 2024 • Copyright © 1999-2024 the12volt.com, All Rights Reserved Privacy Policy & Use of Cookies
Disclaimer: *All information on this site ( the12volt.com ) is provided "as is" without any warranty of any kind, either expressed or implied, including but not limited to fitness for a particular use. Any user assumes the entire risk as to the accuracy and use of this information. Please verify all wire colors and diagrams before applying any information.

Secured by Sectigo
the12volt.com spacer
Support the12volt.com
Top
the12volt.com spacer