the12volt.com spacer
icon

adding a replacement remote viper


Post ReplyPost New Topic
< Prev Topic Next Topic >
jsdeprey 
Member - Posts: 5
Member spacespace
Joined: December 09, 2010
Location: North Carolina, United States
Posted: December 16, 2010 at 9:44 AM / IP Logged  

The instructions that came witht he new fob, do not say to hold the button down the whole time, it says to hear the chirp ONCE sice I want the first menu, then hold the LOCK button down and I do hear another chirp from the alarm at that time.

When I try to do it like you suggest above when I hold the botton down (on second press), it seems like it keep cycling through menus, like I will hear 1 chirp, then 2 chirps then 3 chirps etc, while I am then hold the LOCK button down. MY fob has a LOCK and also a UNLOCK button, and the manual says to hit the LOCK button.

I have the Viper 5701 system.

Thanks for replys guys.

smokeman1 
Platinum - Posts: 1,588
Platinum spaceThis member has made a donation to the12volt.com. Click here for more info.spaceThis member has been recognized as an authority in Mobile Security and Convenience. Click here for more info.spacespace
Joined: September 14, 2009
Location: Wisconsin, United States
Posted: December 16, 2010 at 11:55 AM / IP Logged  

Are you setting the new remote into the pairing mode?

the transmitter needs to be paired to the control module as described in step 1 and step 2.

How to program remote controls:

Step 1: Press and hold the FUNCTION button for 10 seconds until remote emits one long beep and the amber transmit LED lights up solid.

Step 2: Press and hold REMOTE START button until the remote beeps three times and the amber transmit LED lights up.

Step 3: Open car door. (Green H1/8 wire or Violet H1/6 must be connected).

Step 4: Turn ignition key ON. (Heavy gauge Pink wire must be connected).

Step 5: Within 10 seconds, press and release the valet switch once.

Step 6: Press valet switch and hold. LED flashes once and siren chirps once.

Step 7: While still holding valet switch, press the LOCK button of the remote. Siren chirps once to confirm.

Step 8: Release valet switch. Turn ignition key OFF

When all else fails, Read the Instructions
Support the12volt.com Make a Donation
jsdeprey 
Member - Posts: 5
Member spacespace
Joined: December 09, 2010
Location: North Carolina, United States
Posted: December 16, 2010 at 3:37 PM / IP Logged  

Thanks for help, I tried like you stated above but for some reason it just keeps beeping threw menus when you hold the valet button down the second time, I gave up and took it to the place that installed it, they let me watch while that did it, and the guy did not hold it down at all, he hit it once then held it down until he herd the single beep then let go of the valet button, he had already held the F button down on the remote and then the Engine Start button, so then when he hit the LOCK button on the remote the horn sounded and he then exited and it seemed to work fine for him.

Not sure what he did that I did not do! kind of upsetting, cause I tried that way also, the instructions that came with the remote do not say to hold the valet button down, they state just like he did it, to hit the valet button once then let go then hit it again till you hear a chirp and a flash, then let go of the valet button.

One thing he did different was he left the car running, and I had started the car then moved the key to the ON postion but turned the engin off, not sure if that matters.

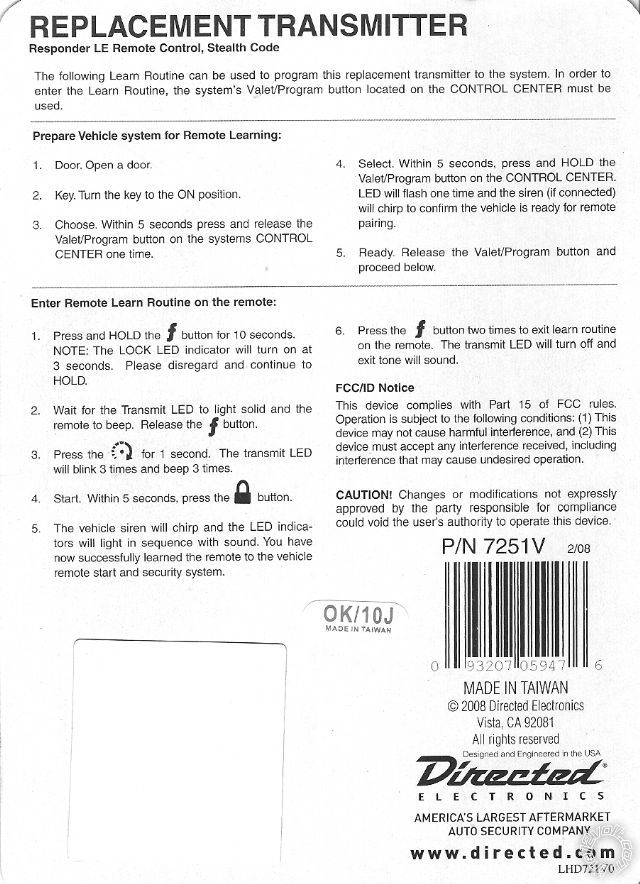
I can scan the instruction that came with the new remote if you want to see it, it is the same that comes with any new 7251V replacement fob I guess.

jsdeprey 
Member - Posts: 5
Member spacespace
Joined: December 09, 2010
Location: North Carolina, United States
Posted: December 16, 2010 at 4:23 PM / IP Logged  

Here is the back of the package the new remote fob came in.

adding a replacement remote viper - Page 2 -- posted image.

Page of 2

Sorry, you can NOT post a reply.
This topic is closed.

  Printable version Printable version Post ReplyPost New Topic
You cannot post new topics in this forum
You cannot reply to topics in this forum
You cannot delete your posts in this forum
You cannot edit your posts in this forum
You cannot create polls in this forum
You cannot vote in polls in this forum

  •  
Search the12volt.com
Follow the12volt.com Follow the12volt.com on Facebook
Sunday, May 5, 2024 • Copyright © 1999-2024 the12volt.com, All Rights Reserved Privacy Policy & Use of Cookies
Disclaimer: *All information on this site ( the12volt.com ) is provided "as is" without any warranty of any kind, either expressed or implied, including but not limited to fitness for a particular use. Any user assumes the entire risk as to the accuracy and use of this information. Please verify all wire colors and diagrams before applying any information.

Secured by Sectigo
the12volt.com spacer
Support the12volt.com
Top
the12volt.com spacer