the12volt.com spacer
icon

2009 dodge diagram r/s diagram


Post ReplyPost New Topic
< Prev Topic Next Topic >
tianot 
Copper - Posts: 155
Copper spaceThis member has made a donation to the12volt.com. Click here for more info.spacespace
Joined: November 25, 2009
Location: Alberta, Canada
Posted: October 25, 2010 at 1:42 PM / IP Logged  

hello guys, i need a wiring diagram for 2009 dodge caravan.

is it easy to do? im using the idatalink ads-dl-ca bypass module.

thanks

tianot
kreg357 
Platinum - Posts: 7,787
Platinum spaceThis member has made a donation to the12volt.com. Click here for more info.spaceThis member has been recognized as an authority in Electrical Theory. Click here for more info.spaceThis member has been recognized as an authority in Mobile Security and Convenience. Click here for more info.spacespace
Joined: January 30, 2009
Location: Pennsylvania, United States
Posted: October 25, 2010 at 3:37 PM / IP Logged  

It is very easy to do with the iDatalink bypass module.  If you are using the ADS AL CA make sure it is flashed with the CH4 firmware.

From the bypas, there are only 4 wires to connect at the ignition harness and one to the parking light wire.  From the remote start you only need +12v constant, ground, horn and hood pin. 

I usually go W2W and use the bypass' Tach and brake outputs.

Soldering is fun!
tianot 
Copper - Posts: 155
Copper spaceThis member has made a donation to the12volt.com. Click here for more info.spacespace
Joined: November 25, 2009
Location: Alberta, Canada
Posted: October 25, 2010 at 4:13 PM / IP Logged  

hey kreg, thanks for the response.

do you have the wire diagram for the 2009 dodge diagram?

what type do i need to use to wire the bypass? is it type 1 or type 2? do i need the ads-hrn-chtip assembly?

tianot
kreg357 
Platinum - Posts: 7,787
Platinum spaceThis member has made a donation to the12volt.com. Click here for more info.spaceThis member has been recognized as an authority in Electrical Theory. Click here for more info.spaceThis member has been recognized as an authority in Mobile Security and Convenience. Click here for more info.spacespace
Joined: January 30, 2009
Location: Pennsylvania, United States
Posted: October 25, 2010 at 4:23 PM / IP Logged  

The wires are very accessible and there is plenty of room under the dash.  You don't even have to remove the ignition switch assy.  I don't use the HRN harness, just solder it right in using Type 2.  I can post some  pictures later.

Soldering is fun!
tianot 
Copper - Posts: 155
Copper spaceThis member has made a donation to the12volt.com. Click here for more info.spacespace
Joined: November 25, 2009
Location: Alberta, Canada
Posted: October 25, 2010 at 6:57 PM / IP Logged  
thanks bro, ill wait for the picture
tianot
kreg357 
Platinum - Posts: 7,787
Platinum spaceThis member has made a donation to the12volt.com. Click here for more info.spaceThis member has been recognized as an authority in Electrical Theory. Click here for more info.spaceThis member has been recognized as an authority in Mobile Security and Convenience. Click here for more info.spacespace
Joined: January 30, 2009
Location: Pennsylvania, United States
Posted: October 25, 2010 at 7:29 PM / IP Logged  

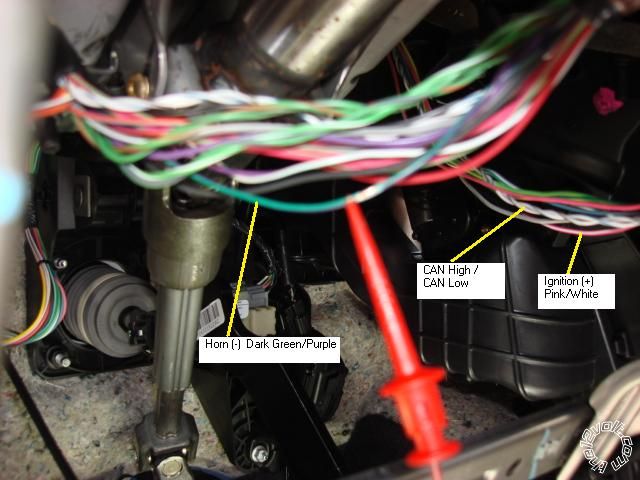
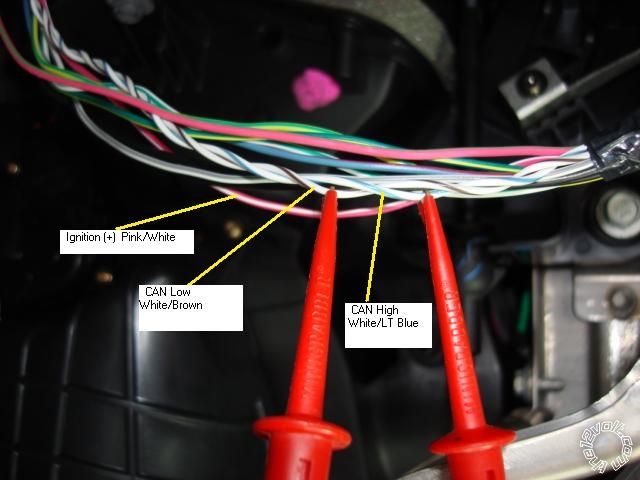
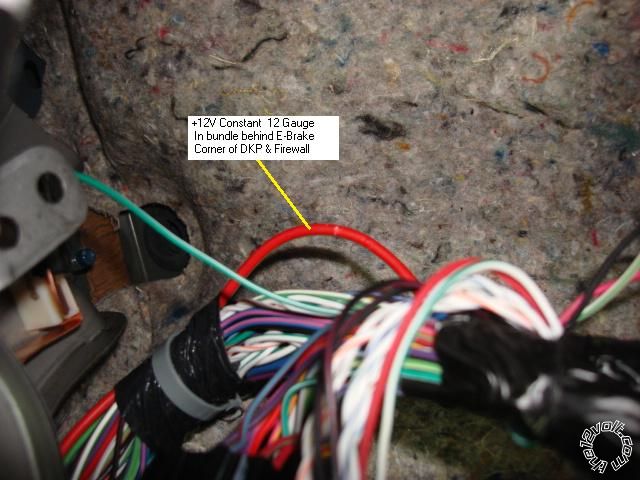
The ADS CH4 install guide has the wires / color.  The 2008- 2010 are the same.  Here are some pictures from a 2010 Dodge Grand Caravan.

Just remove the lower dash panel and the metal knee plate to gain access to these wires.

2009 dodge diagram r/s diagram -- posted image.

2009 dodge diagram r/s diagram -- posted image.

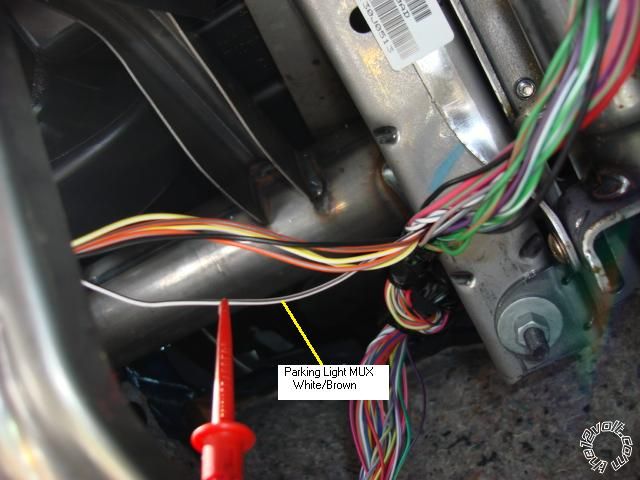
The Parking Light MUX is in a bundle coming from the back of the light switch.

2009 dodge diagram r/s diagram -- posted image.

2009 dodge diagram r/s diagram -- posted image.

Soldering is fun!
tianot 
Copper - Posts: 155
Copper spaceThis member has made a donation to the12volt.com. Click here for more info.spacespace
Joined: November 25, 2009
Location: Alberta, Canada
Posted: October 25, 2010 at 11:28 PM / IP Logged  

hey kreg, thanks for the pictures.

one more question, base on the type 2 diagram of the bypass module, if i have a 1.23 version or newer i will eliminate the use of relay. how can i connect now the parking light wire from the remote starter unit? the yellow wire from the bypass is connected to the mux parkinglight right? how about the parkinglight from the remote starter unit?

do i need to connect the starter, accessory and brake wire from the remote starter unit to the vehicle?

how about the rearm output of the remote starter unit, do i need to connect that into the door pin of the vehicle?

thanks

tianot
kreg357 
Platinum - Posts: 7,787
Platinum spaceThis member has made a donation to the12volt.com. Click here for more info.spaceThis member has been recognized as an authority in Electrical Theory. Click here for more info.spaceThis member has been recognized as an authority in Mobile Security and Convenience. Click here for more info.spacespace
Joined: January 30, 2009
Location: Pennsylvania, United States
Posted: October 26, 2010 at 6:36 AM / IP Logged  

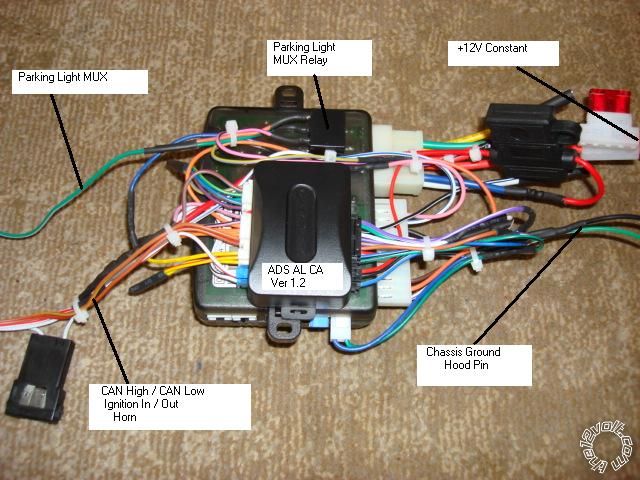
Most of your connections from the remote start unit ( brain ) will go to the iDatalink bypass module.  I prefer using the W2W method.  As shown in the Type 2 diagram, the R/S parking light wire will connect to the White Parking Light wire of the bypass only.  The same for Lock, UnLock, and the sliding doors.  The bypass controls most everything thru Data.

The only connections from the remote start brain directly to the car are +12v constant power, ground, Horn and your Hood pin switch.  The posted pictures show the power and horn connections.  The bypass supplies the remote start brain with the Brake pedal signal, an EBrake signal and a Tach signal.  If the remote start unit is also an alarm, the bypass supplies Door and Trunk status.

The only connections from the iDatalink bypass are the CAN High and CAN Low wires, the Ignition In & Out wires, and the Parking Light Mux wire.  The RAP shutdown wire is optional and the Drivers Door Pin wire is pretty easy to find.

The iDatalink module makes the install almost too easy...

Here is an Ultra Start remote starter and iDatalink module connected in the W2W mode almost ready for install.

2009 dodge diagram r/s diagram -- posted image.

If you haven't used the ADS AL CA before, remember to set the Mode as described in the install guide top of Page 6 before trying to program it to the vehicle ( bottom of Page 6 ).  Unless the remote start unit you are using can be programmed to a fixed 3 second starter output, set it to Tach mode and do the Tach Learn before attempting a remote start.

Soldering is fun!
awdeclipse 
Copper - Posts: 285
Copper spacespace
Joined: August 05, 2007
Location: Michigan, United States
Posted: October 26, 2010 at 7:22 AM / IP Logged  
Nice write up. If I didn't have factory RS on my 2009 Dodge Grand Caravan I would of been all over this!
john_supra1990 
Member - Posts: 4
Member spacespace
Joined: December 19, 2004
Location: Canada
Posted: December 04, 2010 at 10:06 PM / IP Logged  

thank guys i was worried about tring one of these vans but u guys make it a bit easier.


Sorry, you can NOT post a reply.
This topic is closed.

  Printable version Printable version Post ReplyPost New Topic
You cannot post new topics in this forum
You cannot reply to topics in this forum
You cannot delete your posts in this forum
You cannot edit your posts in this forum
You cannot create polls in this forum
You cannot vote in polls in this forum

  •  
Search the12volt.com
Follow the12volt.com Follow the12volt.com on Facebook
Friday, May 17, 2024 • Copyright © 1999-2024 the12volt.com, All Rights Reserved Privacy Policy & Use of Cookies
Disclaimer: *All information on this site ( the12volt.com ) is provided "as is" without any warranty of any kind, either expressed or implied, including but not limited to fitness for a particular use. Any user assumes the entire risk as to the accuracy and use of this information. Please verify all wire colors and diagrams before applying any information.

Secured by Sectigo
the12volt.com spacer
Support the12volt.com
Top
the12volt.com spacer