the12volt.com spacer
icon

2012 Hyundai Accent Remote Start Pictorial


Post ReplyPost New Topic
< Prev Topic Next Topic >
kreg357 
Platinum - Posts: 7,781
Platinum spaceThis member has made a donation to the12volt.com. Click here for more info.spaceThis member has been recognized as an authority in Electrical Theory. Click here for more info.spaceThis member has been recognized as an authority in Mobile Security and Convenience. Click here for more info.spacespace
Joined: January 30, 2009
Location: Pennsylvania, United States
Posted: October 04, 2012 at 9:55 PM / IP Logged  

2012 Hyundai Accent Remote Starter with Keyless Entry DIY Install Pictorial

This was a U.S. domestic 4 door sedan vehicle with automatic transmission and Factory Remote Keyless Entry ( power locks ).  This was not a Push to Start Vehicle and the ignition key did not have a transponder immobilizer chip.   No Factory Alarm was present.  An Ultra Start U1272 system was installed.  Any quality R/S system that has an extra selectable "ignition" output for ACC2, supports (-) Parking Lights & (-) Door Locks and can learn and reliably use a single spark plug coil as a Tach source will work. 

Special thanks to fellow 12Volt Forum member Howie II for the 2012 Hyundai Accent wiring guide posted in the Downloads section.

( https://www.the12volt.com/installbay/file.asp?ID=1146  )

Disassembly:

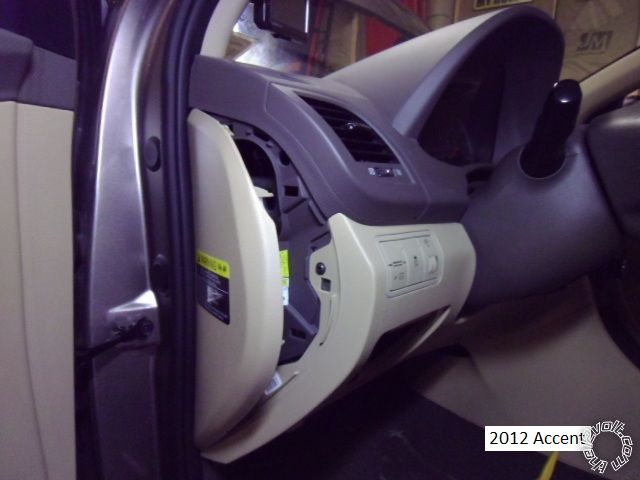
Remove the fuse box cover and driver side dash panel ( 3 snap fasteners ).   There is a removal slot in the side panel cover at 4 O'clock for use with a non-marring tool ( or screwdriver blade with the tip covered in black tape ).

2012 Hyundai Accent Remote Start Pictorial -- posted image.

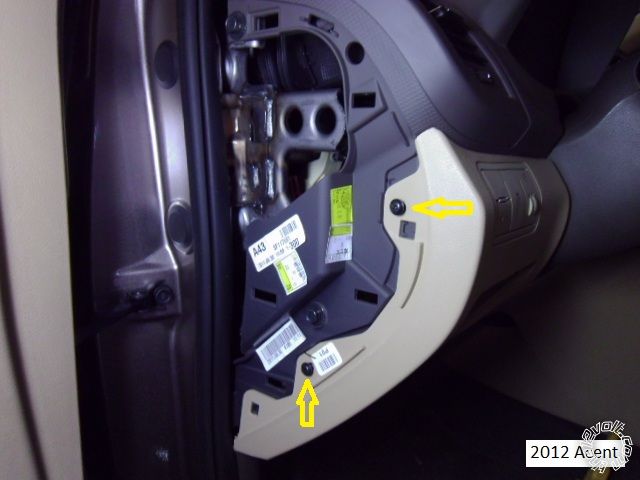
Remove the two Phillips screws marked in the photo below.  Note the square cut-outs in the lower dash panel for the next step.

2012 Hyundai Accent Remote Start Pictorial -- posted image.

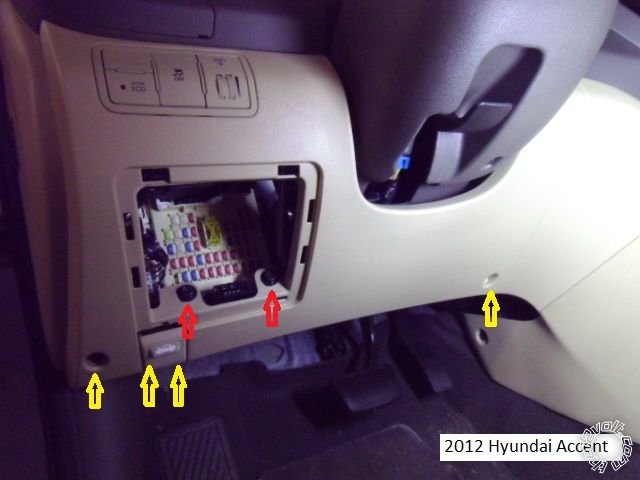
Remove the four Phillips screws marked in Yellow ( two are retaining the Hood Release Lever ) and the two 10mm bolts marked in Red.  Release the retaining latches in the side dash opening and then pull the lower dash panel straight away.  There are three snap fasteners along the top edge.

2012 Hyundai Accent Remote Start Pictorial -- posted image.

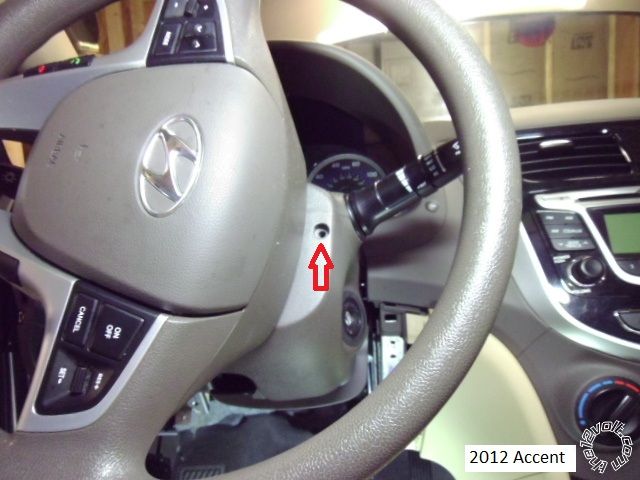
Remove the four 10mm bolts marked in Yellow and then the knee brace.  Remove the one Phillips screw marked in Red that retains the lower steering column cover.

2012 Hyundai Accent Remote Start Pictorial -- posted image.

Remove the two steering column cover Phillips screws at 9 and 3 O'Clock ( 3 O'Clock shown ).  Separate the upper and lower halves of the steering column cover and

remove the lower cover.

2012 Hyundai Accent Remote Start Pictorial -- posted image.

Not shown is the Driver Kick Panel.  To remove, first remove the drivers door sill trim and then pull the lower 6 inches of the door molding away from the frame.  Then

pull the DKP straight back and away.

Wiring:

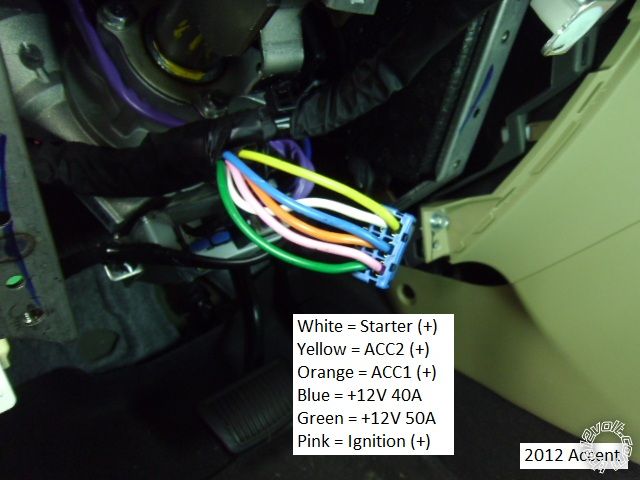
Below is a photo of the main Ignition connector ( removed from ignition switch - left side of steering column ).

2012 Hyundai Accent Remote Start Pictorial -- posted image.

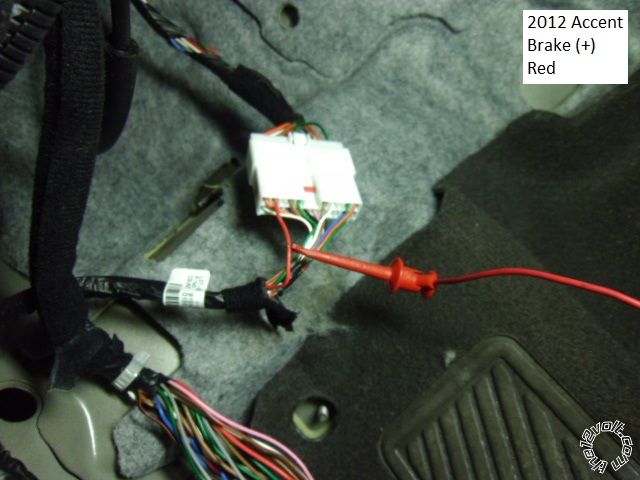
This is a picture of the (+) Brake wire found in a White 18 Pin connector above the dead pedal.

2012 Hyundai Accent Remote Start Pictorial -- posted image.

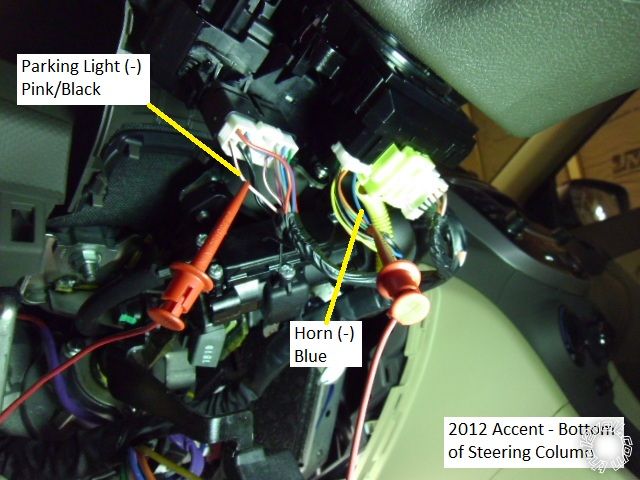
This is a shot of the (-) Parking Light and (-) Horn wire found in connectors in the steering column.

2012 Hyundai Accent Remote Start Pictorial -- posted image.

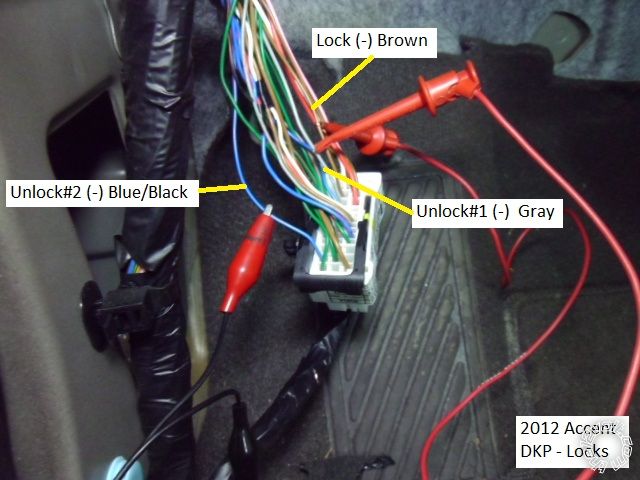
This is a photo of the lock wires.  These are found in a White 39 Pin plug in the Drivers Kick Panel.  The wire marked Unlock#2 is also known as Unlock Wake-Up.  You can use the R/S Unlock output, split and diode isolated ( bands towards the R/S brain ), for these unlock wires.

2012 Hyundai Accent Remote Start Pictorial -- posted image.

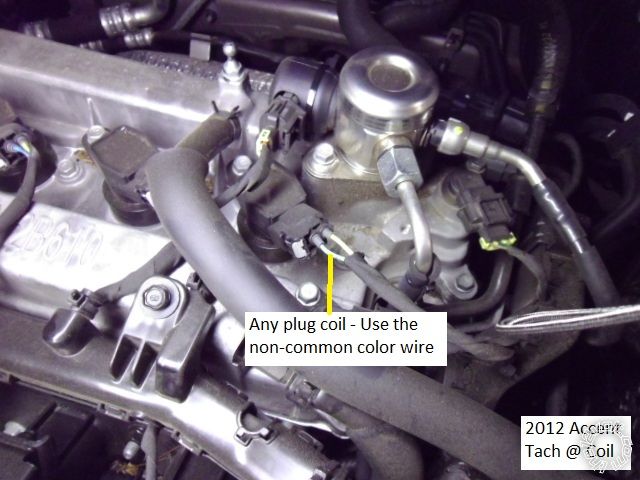
This is a picture of a Tach source at the #4 Spark Plug Coil.  Additionally, the Accent does not have "one-touch-starting" and is a candidate for Starter Kill and/or Anti-Grind. 

2012 Hyundai Accent Remote Start Pictorial -- posted image.

There is plenty of room under the dash to locate the brain and easy firewall pass thru for the Tach and Hood Pin wires using the Hood Release cable grommet.   Lack of a transponder immobilizer means less time and expense.  There are other locations for many of the wires shown above.  Always locate and verify all connection points with a Digital Multi Meter.  All connections should be soldered and properly insulated for best reliability.

Soldering is fun!
waspie 
Member - Posts: 1
Member spacespace
Joined: October 23, 2005
Location: United States
Posted: December 13, 2012 at 5:21 PM / IP Logged  
thanks!
eastenderz 
Member - Posts: 1
Member spacespace
Joined: November 08, 2013
Location: North Carolina, United States
Posted: November 09, 2013 at 9:06 AM / IP Logged  
I have this vehicle with a remote start/alarm in particular the Code-Alarm CA6551SST. The issue I have is with a feature in which if you leave the headlights on they cutoff with the ignition followed by the parking lights cutting off when you open the door to exit. Unfortunately if you remote start the vehicle and just let the time expire the parking lights remain on. I could trigger the door light to simulate open and close but two things. For one I can't get a axxess trigger module to recognize code-alarms pulse after shut down. Second if I was successful I believe the alarm would be triggered as an unauthorized entry. I had a 2002 Hyundai Sonata with the same feature but with a Python Remote Start/Alarm 872P but didn't have this issue. Also unlike the code-alarm I didn't install the Python on the Sonata. Please tell me if you know of any solution and/or if you've seen this problem before. Thank You for time.
spookiestylez 
Silver - Posts: 531
Silver spaceThis member has made a donation to the12volt.com. Click here for more info.spacespace
Joined: September 23, 2005
Location: Virginia, United States
Posted: March 03, 2015 at 10:17 AM / IP Logged  
directechs was down and I was being lazy looking for wire colors. Great write up Kreg357
rtfm

Sorry, you can NOT post a reply.
This topic is closed.

  Printable version Printable version Post ReplyPost New Topic
You cannot post new topics in this forum
You cannot reply to topics in this forum
You cannot delete your posts in this forum
You cannot edit your posts in this forum
You cannot create polls in this forum
You cannot vote in polls in this forum

  •  
Search the12volt.com
Follow the12volt.com Follow the12volt.com on Facebook
Friday, March 29, 2024 • Copyright © 1999-2024 the12volt.com, All Rights Reserved Privacy Policy & Use of Cookies
Disclaimer: *All information on this site ( the12volt.com ) is provided "as is" without any warranty of any kind, either expressed or implied, including but not limited to fitness for a particular use. Any user assumes the entire risk as to the accuracy and use of this information. Please verify all wire colors and diagrams before applying any information.

Secured by Sectigo
the12volt.com spacer
Support the12volt.com
Top
the12volt.com spacer