the12volt.com spacer
icon

Relay Wiring, Power Off, Send Negative


Post ReplyPost New Topic
< Prev Topic Next Topic >
ewingr 
Copper - Posts: 60
Copper spacespace
Joined: February 21, 2007
Location: United States
Posted: June 11, 2019 at 1:04 PM / IP Logged Link to Post Post Reply Quote ewingr
Goal
I want to send a negative signal when power goes off on brake wire (ie. fuse blows on brakes). Also, accomplish this w/o having the relay active all the time pulling juice from battery. I had been told this setup would accomplish it, but it's not working.
Currently wired like this
30 - Wired to brake warning light in dash, needs negative
85 - Hot
86 - Wire feeding hot side of brake switch - When this loses power I want the negative sent to 30
87 - Ground
87a - Empty
It's wired up. When I test it by pulling the fuse on the wire that feeds 86 I expect the negative to come out 30 which turns on a warning light in the dash. Not happening.
Any suggestions?
Thanks
Roger
i am an idiot 
Platinum - Posts: 13,695
Platinum spaceThis member consistently provides reliable informationspace
Joined: September 21, 2006
Location: Louisiana, United States
Posted: June 11, 2019 at 1:13 PM / IP Logged Link to Post Post Reply Quote i am an idiot
Ground to 85. Not power.
Move the wire from 87 to 87a
geepherder 
Platinum - Posts: 3,668
Platinum spaceThis member consistently provides reliable informationspace
Joined: October 27, 2003
Posted: June 11, 2019 at 3:38 PM / IP Logged Link to Post Post Reply Quote geepherder
Your relay setup will draw constant power, draining the battery.
If you want a light to come on when the fuse is blown, connect a resistor/LED in parallel with your fuse (much like the "smart glow" fuses work). When you step on the brake, the LED will only come on if the fuse is blown, (since otherwise the fuse would bypass the LED/resistor). Mount your LED in the dash wherever you want. You want to connect your resistor (typically around 560 or 680 ohms) to constant power. (Add your own fuse at your connection point.) From your resistor, connect to your LED (make sure to observe proper polarity). From the LED, go to the "hot" side of your brake light switch.
Alternatively, if you already have a light you want to use, simply wire a relay coil (85 and 86) in parallel with the fuse. Terminal 30 goes to ground and 87 is negative out. Now, whenever you step on the brakes, if your fuse is blown, your relay will trigger and 87 will give you a ground.
My ex once told me I have a perfect face for radio.
ewingr 
Copper - Posts: 60
Copper spacespace
Joined: February 21, 2007
Location: United States
Posted: June 11, 2019 at 4:41 PM / IP Logged Link to Post Post Reply Quote ewingr
i am an idiot wrote:
Ground to 85. Not power.
Move the wire from 87 to 87a
It was originally wired that way. It was constant power which would drain the battery. I received this suggestion:
The person wrote:
Move 85 to another constant power source and ground 87 instead of 87a. Then, the indicator will come on when the fuse is blown and the brake pedal is pressed - the relay coil will be grounded by the brake lights when the brake pedal is pressed. It's a one relay solution and the relay is only energized when the pedal is pressed while the fuse is blown.
But it's not working.
geepherder wrote:
Your relay setup will draw constant power, draining the battery.
...
Alternatively, if you already have a light you want to use, simply wire a relay coil (85 and 86) in parallel with the fuse. Terminal 30 goes to ground and 87 is negative out. Now, whenever you step on the brakes, if your fuse is blown, your relay will trigger and 87 will give you a ground.
I DO have an existing light...it is a Brake warning light that requires a ground...in my dash gauges. (It was originally for a brake light indicator from the emer brake, which I don't have that switch).
While I can follow wiring diagrams and do OK, I am not schooled in the design and lingo. So, I'm not sure what wire a relay coil in parallel means. I would need specific instructsions similar to how I documented my wiring in the op.
I do have a question about this though: When you say "...whenever you step on the brakes, if your fuse is blown, your relay will trigger and 87 will give you a ground." does that mean I get the ground ONLY when I press the brake, or would it then be ground constantly until the fuse is replaced?
Re-reading the suggestion I had followed, I had missed that the light only came on when the brake is pressed (although it is not). That is not what I'm looking for. When I'm pressing the brake, I'll probably be watching traffic and won't see the indicator. I want it constantly on when the fuse is blown.
Someone else had recommended a second relay, like this:
The person wrote:
A second relay to provide a ground to 85 of the first relay.
Second relay: 85 to switched power
86 to ground
30 to 85 of 1st relay
87 to ground.
This will keep the 1st relay from energizing until the key is turned on, then both relays will energize. When 86 of the 1st relay looses power, 30 will go to ground and turn on the indicator light.
So, I'm considering rewiring the relay as i am an idiot suggests, then adding the second relay per above. I'd rather not have to use a second relay though.
Thanks
Roger
ewingr 
Copper - Posts: 60
Copper spacespace
Joined: February 21, 2007
Location: United States
Posted: June 11, 2019 at 4:51 PM / IP Logged Link to Post Post Reply Quote ewingr
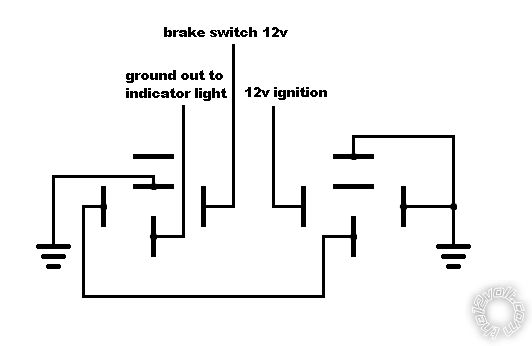
So to recap, maybe this will work?
Relay 1
85 and 87a -> Ground
86 -> Power (Same power supplying the brake
   switch)
30 -> Output (to negative required port on dash
   light)
Relay 2
85 to switched power
86 to ground
30 to 85 of 1st relay
87 to ground.
This will keep the 1st relay from energizing until the key is turned on, then both relays will energize. When 86 of the 1st relay looses power, 30 will go to ground and turn on the indicator light.
Thanks
Roger
geepherder 
Platinum - Posts: 3,668
Platinum spaceThis member consistently provides reliable informationspace
Joined: October 27, 2003
Posted: June 11, 2019 at 6:53 PM / IP Logged Link to Post Post Reply Quote geepherder
I modified your two relay diagram and it should now work. 85 of the first relay must not be connected to ground directly, only to 30 of the second relay.
Relay Wiring, Power Off, Send Negative -- posted image.
P.S. I mixed up 85 and 86, but as long as there's no diodes on the relay coils they're interchangeable.
My ex once told me I have a perfect face for radio.
ewingr 
Copper - Posts: 60
Copper spacespace
Joined: February 21, 2007
Location: United States
Posted: June 12, 2019 at 6:27 AM / IP Logged Link to Post Post Reply Quote ewingr
Thanks!
I'll be giving it a go and will report back...success I'm sureRelay Wiring, Power Off, Send Negative -- posted image.
Thanks
Roger
ewingr 
Copper - Posts: 60
Copper spacespace
Joined: February 21, 2007
Location: United States
Posted: June 12, 2019 at 8:46 AM / IP Logged Link to Post Post Reply Quote ewingr
Success!
Thanks everyone. I appreciate it very much.
Thanks
Roger

If you wish to post a reply to this topic, you must first login.
If you are not already registered, you must first register.

  Printable version Printable version Post ReplyPost New Topic
You cannot post new topics in this forum
You cannot reply to topics in this forum
You cannot delete your posts in this forum
You cannot edit your posts in this forum
You cannot create polls in this forum
You cannot vote in polls in this forum

  •  
Search the12volt.com
Follow the12volt.com Follow the12volt.com on Facebook
Saturday, December 14, 2024 • Copyright © 1999-2024 the12volt.com, All Rights Reserved Privacy Policy & Use of Cookies
Disclaimer: *All information on this site ( the12volt.com ) is provided "as is" without any warranty of any kind, either expressed or implied, including but not limited to fitness for a particular use. Any user assumes the entire risk as to the accuracy and use of this information. Please verify all wire colors and diagrams before applying any information.

Secured by Sectigo
the12volt.com spacer
Support the12volt.com
Top
the12volt.com spacer