the12volt.com spacer
icon

1995 Mercedes E320 Keyless Entry


Post ReplyPost New Topic
< Prev Topic Next Topic >
nehuge 
Member - Posts: 6
Member spacespace
Joined: November 04, 2013
Location: Arizona, United States
Posted: August 31, 2019 at 6:16 PM / IP Logged Link to Post Post Reply Quote nehuge
Okay, I saw discussion somewhere here from like a decade ago and I think it died off, I'm getting no replies. This is very long winded, so I apologize but I'm so frustrated that this should be so damn hard!
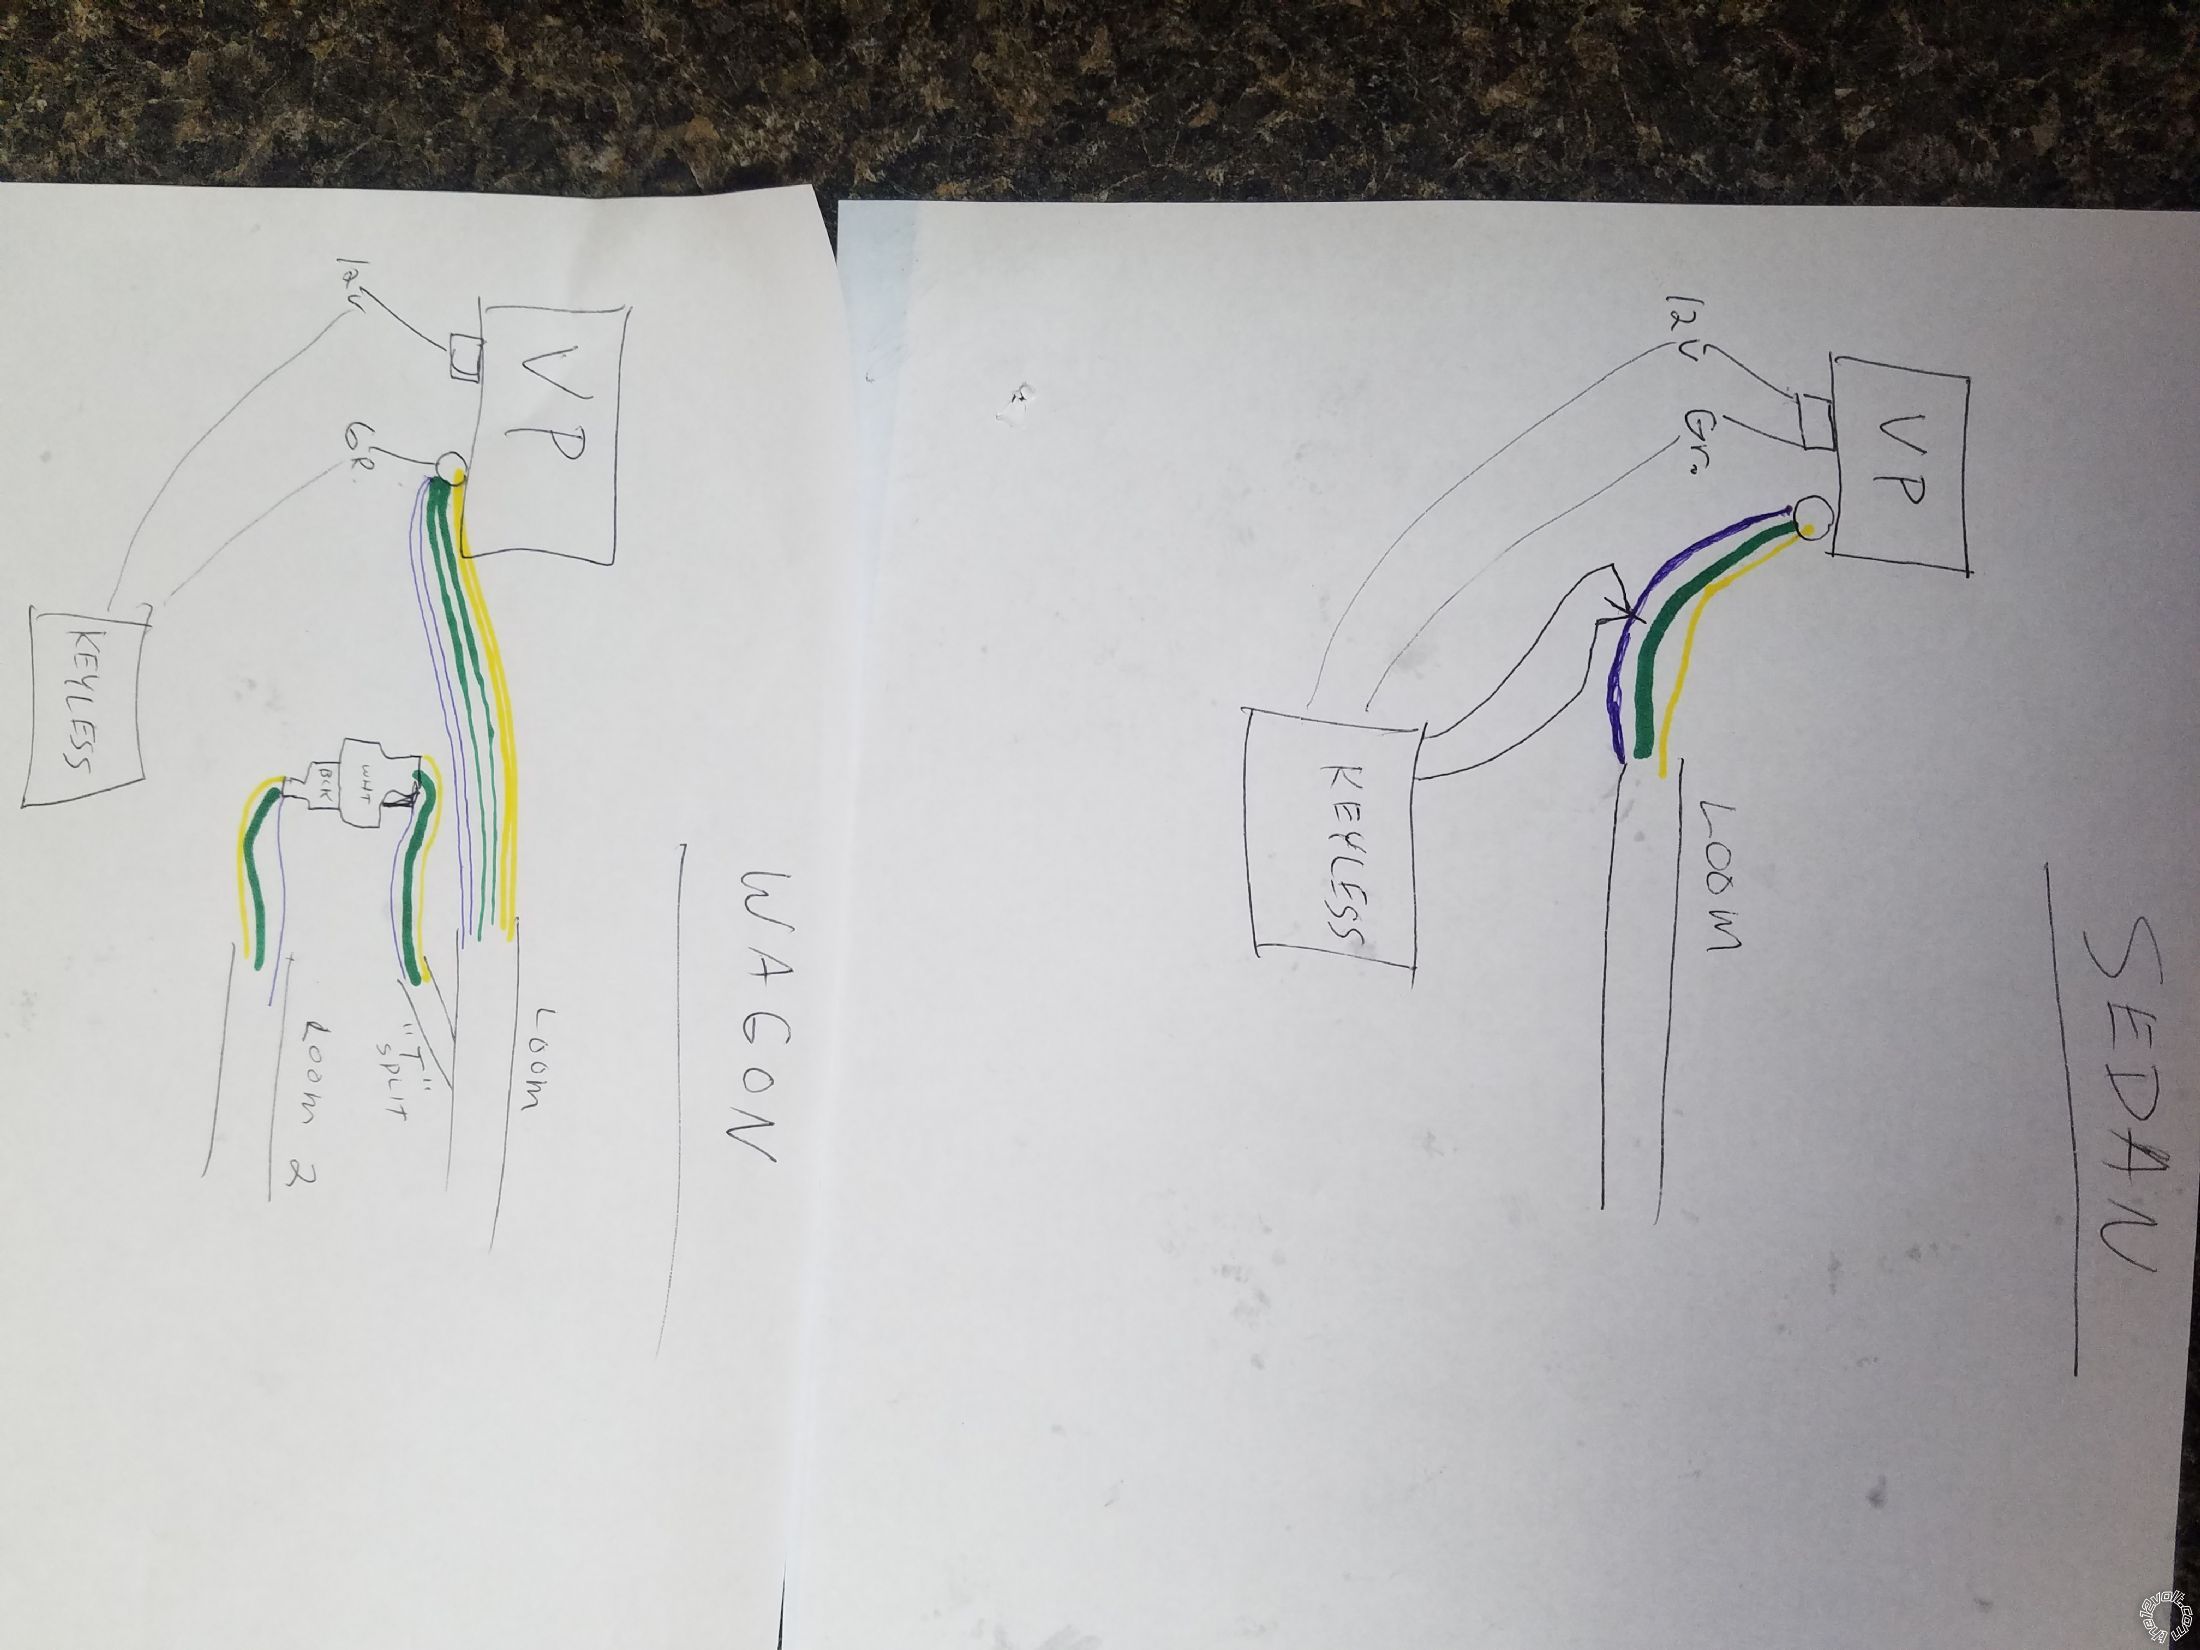
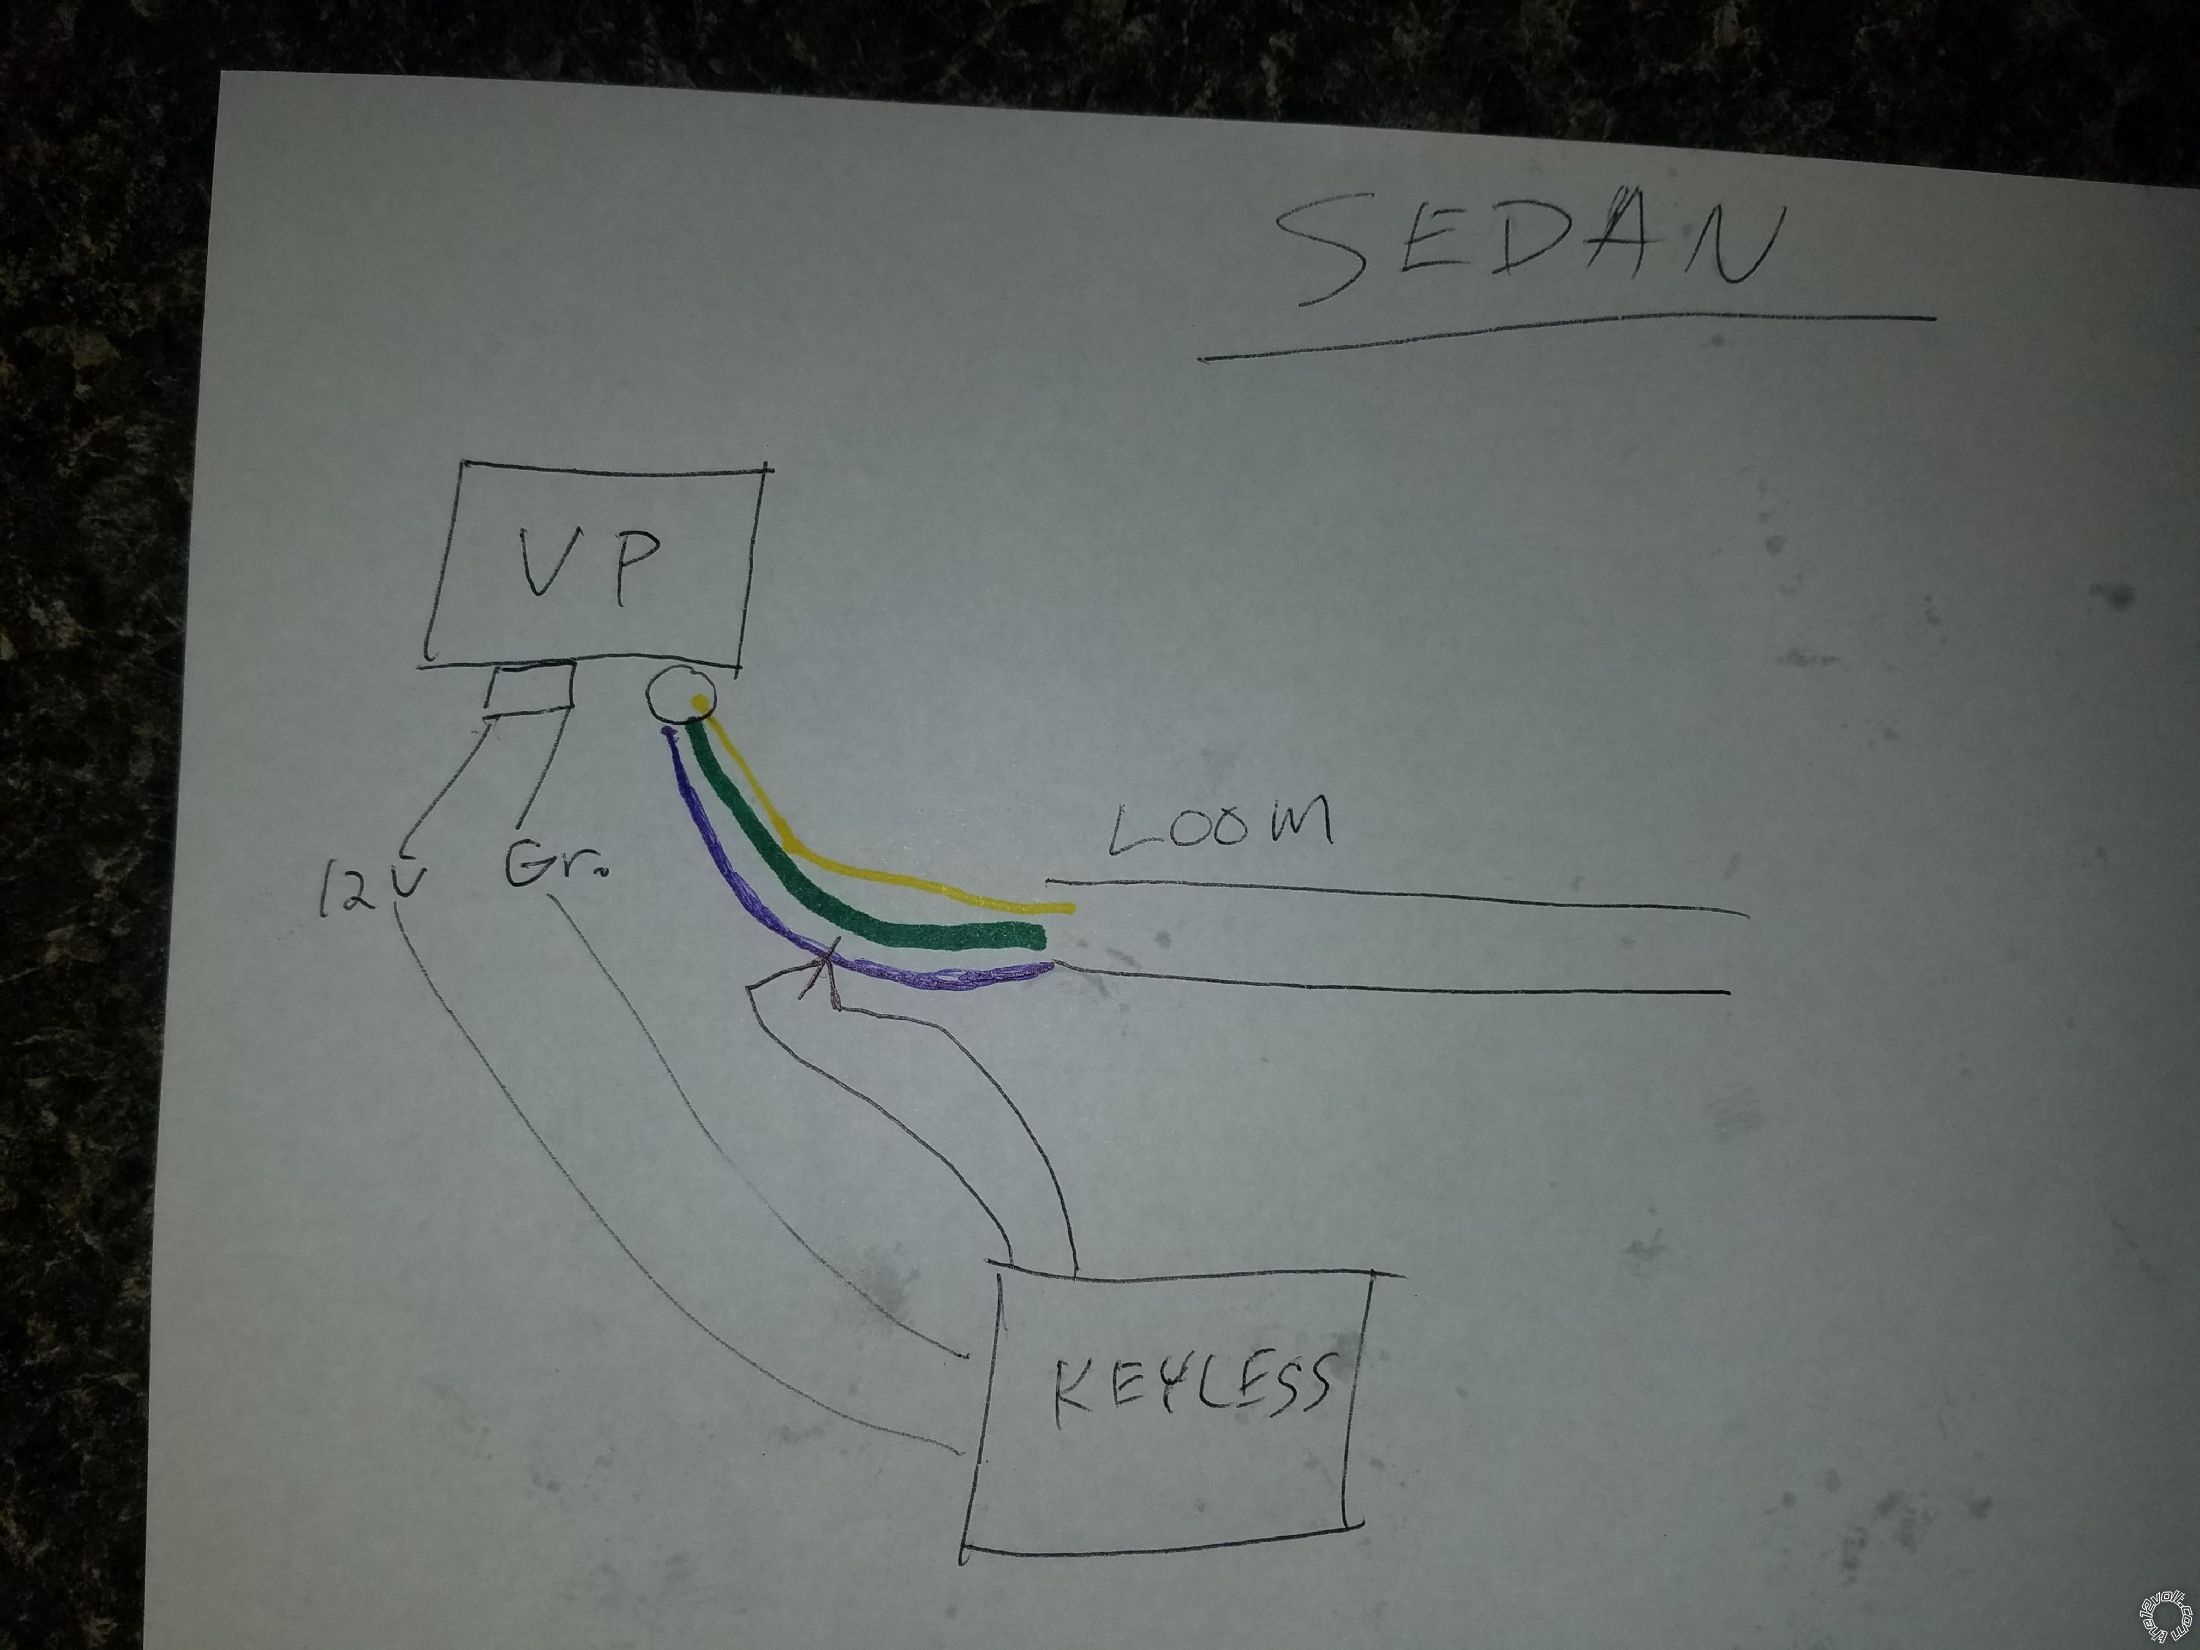
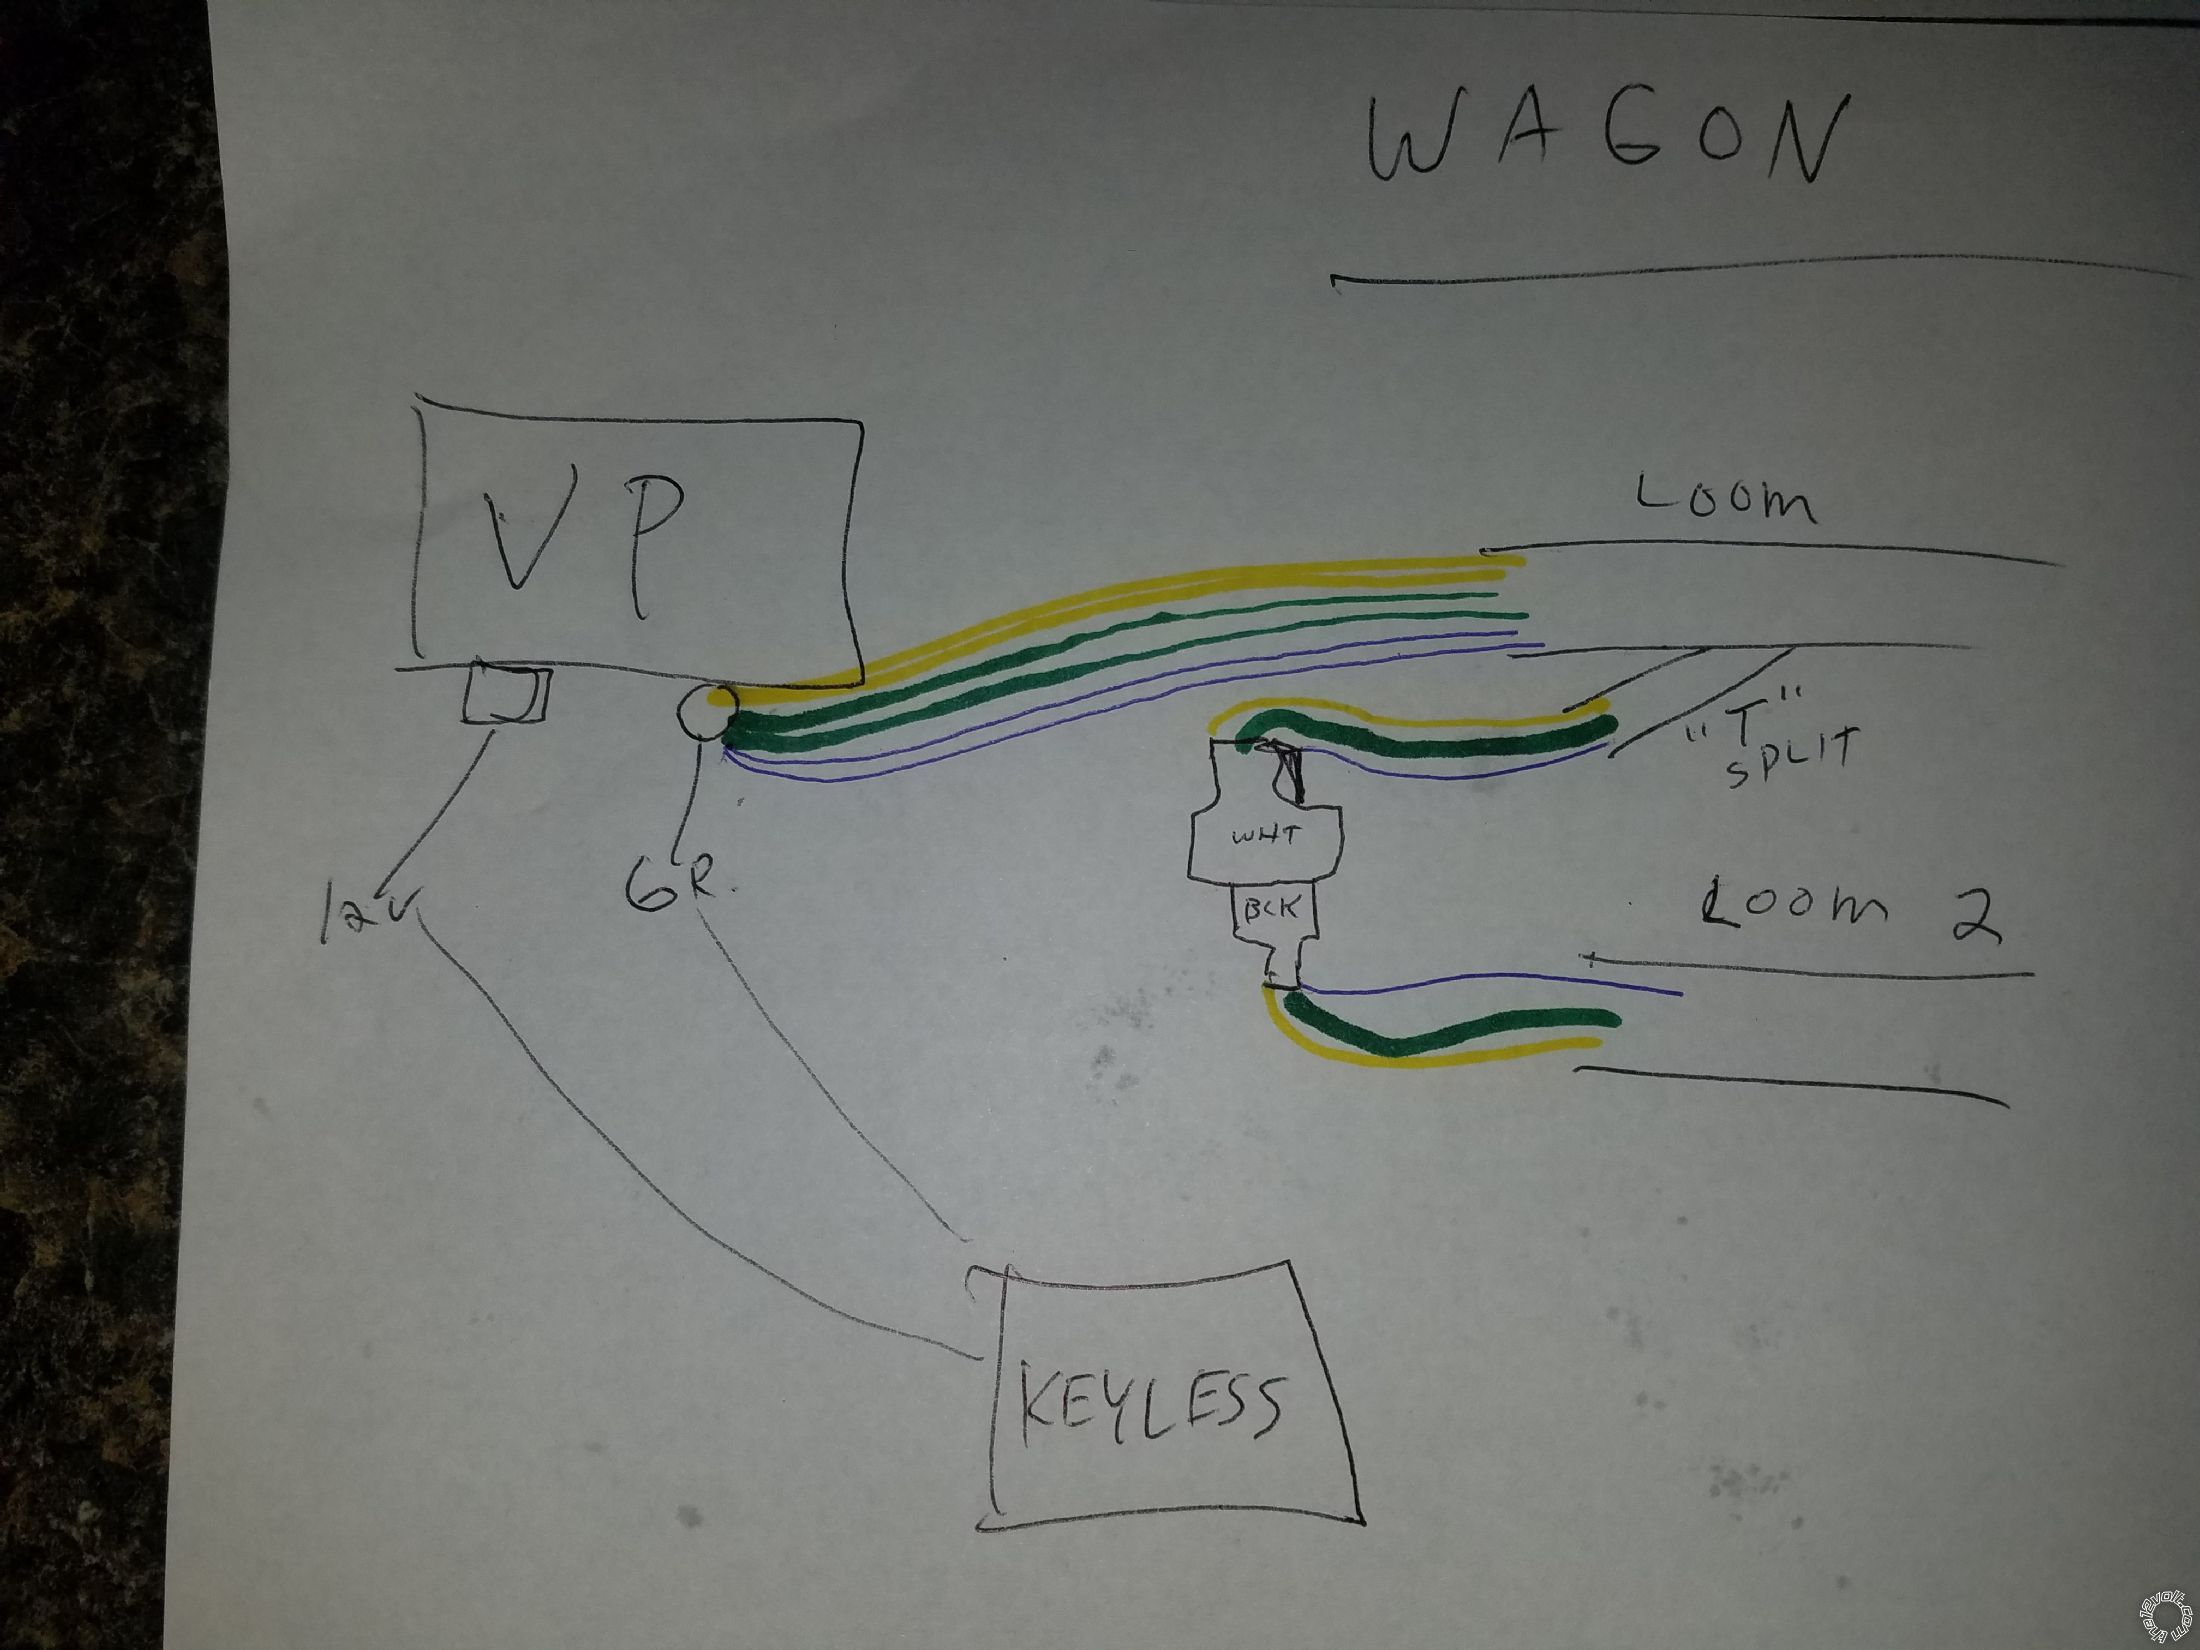
1995 W124 WAGON with a brand new Audiovox AA25 keyless entry. I also have a good known working keyless entry (from United Auto Security) for my other W124 sedan that works just fine.
Note that on this wagon the door locks work perfectly up and down with the key in either the drivers door or passenger door.
Before I start, here is how I hooked it up to my other W124 sedan that works just fine. It is just a 3 wire deal. That's it. Blue, Green, Yellow (Driver door, passenger door, trunk). The three colors come in from the loom and right to the round connector at the vacuum pump. I cut the blue wire, put the input and output wires from the keyless on each end of the cut blue wire, and it works in the sedan just fine. Of course you put its 12v to the red wire on the square connector going to the pump, and its black wire to the brown ground wire on the square connector on the pump, etc.
So ONTO THE WAGON:
I put the 12v power wire from the Audiovox (or United Auto Security) to the red/white wire on the square plug of the vacuum pump like usual
I put the black ground wire from the Audiovox (or United Auto Security) to the brown wire on the square plug of the vacuum pump like usual
When I hit the remote, the module (both Audiovox and the United Auto Security one when I tried it seperately) clicks just fine, so I know both are getting power.
Well, the Wagon doesn't have just 3 in from the loom going from front of the car to the round connector at the vacuum pump. It has six. Ya. It has 3 blue, 3 green, and 3 yellow. Also, it has a split 't' from that same loom that doesn't have 2 of each color, but just one of each color and it goes to a connector that is white on one end and black on the other. It then does a u-turn and goes into a second loom back towards the front of the car.
If I do the same method on one blue wire going to the vacuum pump round connector, the remote won't do anything. Again, remind you that it does click so its getting power. One thing to note is that when the keyless is tied in between the two cut ends of the blue wire, even though the remote doesn't do anything, the key in the door still will run the pump. If I leave those cut blue wire ends exposed, the key won't even work. So at least I know that the keyless module is completing the loop of the two broken ends of the blue wire.
Neither keyless module (audiovox or United Auto Security) works, yet they both work in my sedan W124.
Can anybody let me know what the hell I'm supposed to do with this wiring? I did try making the 2 blues that come out of the round connector tie together, and every other blue coming from the loom(s) sides together with the keyless going to each of those sides of the equation, but still nothing.
I saw other forums with people talking about a yellow wire, but I've done this exact scenario in this writeup on the green and yellow wires as well. As you can see I have quite some TIME into this and I'm beyond frustrated. Can someone please advise before I jump to the moon? Pics attached of my current factory setups.
Thank you!
1995 Mercedes E320 Keyless Entry - Last Post -- posted image.1995 Mercedes E320 Keyless Entry - Last Post -- posted image.1995 Mercedes E320 Keyless Entry - Last Post -- posted image.
iskidoo 
Silver - Posts: 1,040
Silver spaceThis member has made a donation to the12volt.com. Click here for more info.spacespace
Joined: December 08, 2002
Location: Maine, United States
Posted: August 31, 2019 at 8:31 PM / IP Logged Link to Post Post Reply Quote iskidoo
Tie the blue back together and try one of the green wires instead. Wiring diagrams show that it will be either blue or green. The other car may be same year but that doesn’t necessarily mean it’s the exact same color. I’d try the green for the hell of it since the wiring chart suggests green as an option.
http://diagrams.marktoonen.nl/printlist.aspx?MakeID=30&ModelID=19132
http://diagrams.marktoonen.nl/DOWNLOADS/14301_E-320_VACUUM%20LOCKS.pdf
Steve G
nehuge 
Member - Posts: 6
Member spacespace
Joined: November 04, 2013
Location: Arizona, United States
Posted: September 08, 2019 at 4:34 PM / IP Logged Link to Post Post Reply Quote nehuge
Well, I'll put it this way. The United Auto Security instructions say to place the jumpers for a single pulse 3.5 second time. I moved the jumpers to that. Unit clicks, no door locks.
Again, I'm putting the white wire on the pump side of the cut wire, and the white with black stripe on the other side of the cut wire away from the pump. Also their instructions said that with the doors unlocked the "green" wire should have 12 volts. And with the doors locked, zero volts. So I tested that with a meter. When used the key to lock and unlock the door, yup, the green wire behaved exactly as such with 12v at unlock, and zero v at lock.
Since I'm NEVER one to mutilate my car, this had me wizzed off so I tried every....single.....wire.
I know I can just solder them back and put heat shrink tubing around each one individually to make it permanent again.
I tried the yellow wire at the Y split, blue wire at the Y split, green wire at the Y split. I tried the yellow wire at the pump plug, blue wire at the pump plug, green wire at the pump plug.
I tried all the greens tied together from the frame side with the white/black wire from the keyless, and all the greens tied together on the plug side with the white wire.. Did that with the yellow and blues too. Nothing.
At this point I have no clue. This shouldn't be this hard.

If you wish to post a reply to this topic, you must first login.
If you are not already registered, you must first register.

  Printable version Printable version Post ReplyPost New Topic
You cannot post new topics in this forum
You cannot reply to topics in this forum
You cannot delete your posts in this forum
You cannot edit your posts in this forum
You cannot create polls in this forum
You cannot vote in polls in this forum

  •  
Search the12volt.com
Follow the12volt.com Follow the12volt.com on Facebook
Friday, May 17, 2024 • Copyright © 1999-2024 the12volt.com, All Rights Reserved Privacy Policy & Use of Cookies
Disclaimer: *All information on this site ( the12volt.com ) is provided "as is" without any warranty of any kind, either expressed or implied, including but not limited to fitness for a particular use. Any user assumes the entire risk as to the accuracy and use of this information. Please verify all wire colors and diagrams before applying any information.

Secured by Sectigo
the12volt.com spacer
Support the12volt.com
Top
the12volt.com spacer