This is a pictorial on a basic Remote Start installation on a 2021 Chevrolet Silverado 3500, gas & Auto Trans. It should cover the 2020 thru 2023 Silverado 2500 & 3500 models, similar vehicles such as the 2020-2023 GMC Sierra 2500 & 3500 and 2019 thru 2022 Silverado and Sierra 1500 models.
This truck was a fleet unit and did not have ON-Star or a Factory Alarm system. While there are R/S w/T-Harness units available they do not handle all the necessary wire connections. For this install a Compustar CS4900-s with Blade-AL was selected. There are no T-Harness options with the CS4900-s units. While a one button R/S unit would be fine, as a work truck the Factory remotes were showing a lot of wear so a 4 button remote system was used to give the user new working remotes. All vehicle wire connections must be hardwired at the trucks BCM.
Please note that the Blade-AL bypass module must be flashed with the correct firmware (BLADE-AL(DL)-GM12). This requires iDatalink registration/access and the ADS-USB cable ($45.00). Additionally, the KLON process is used during R/S to vehicle programming and is another step needing the ADS-USB cable.
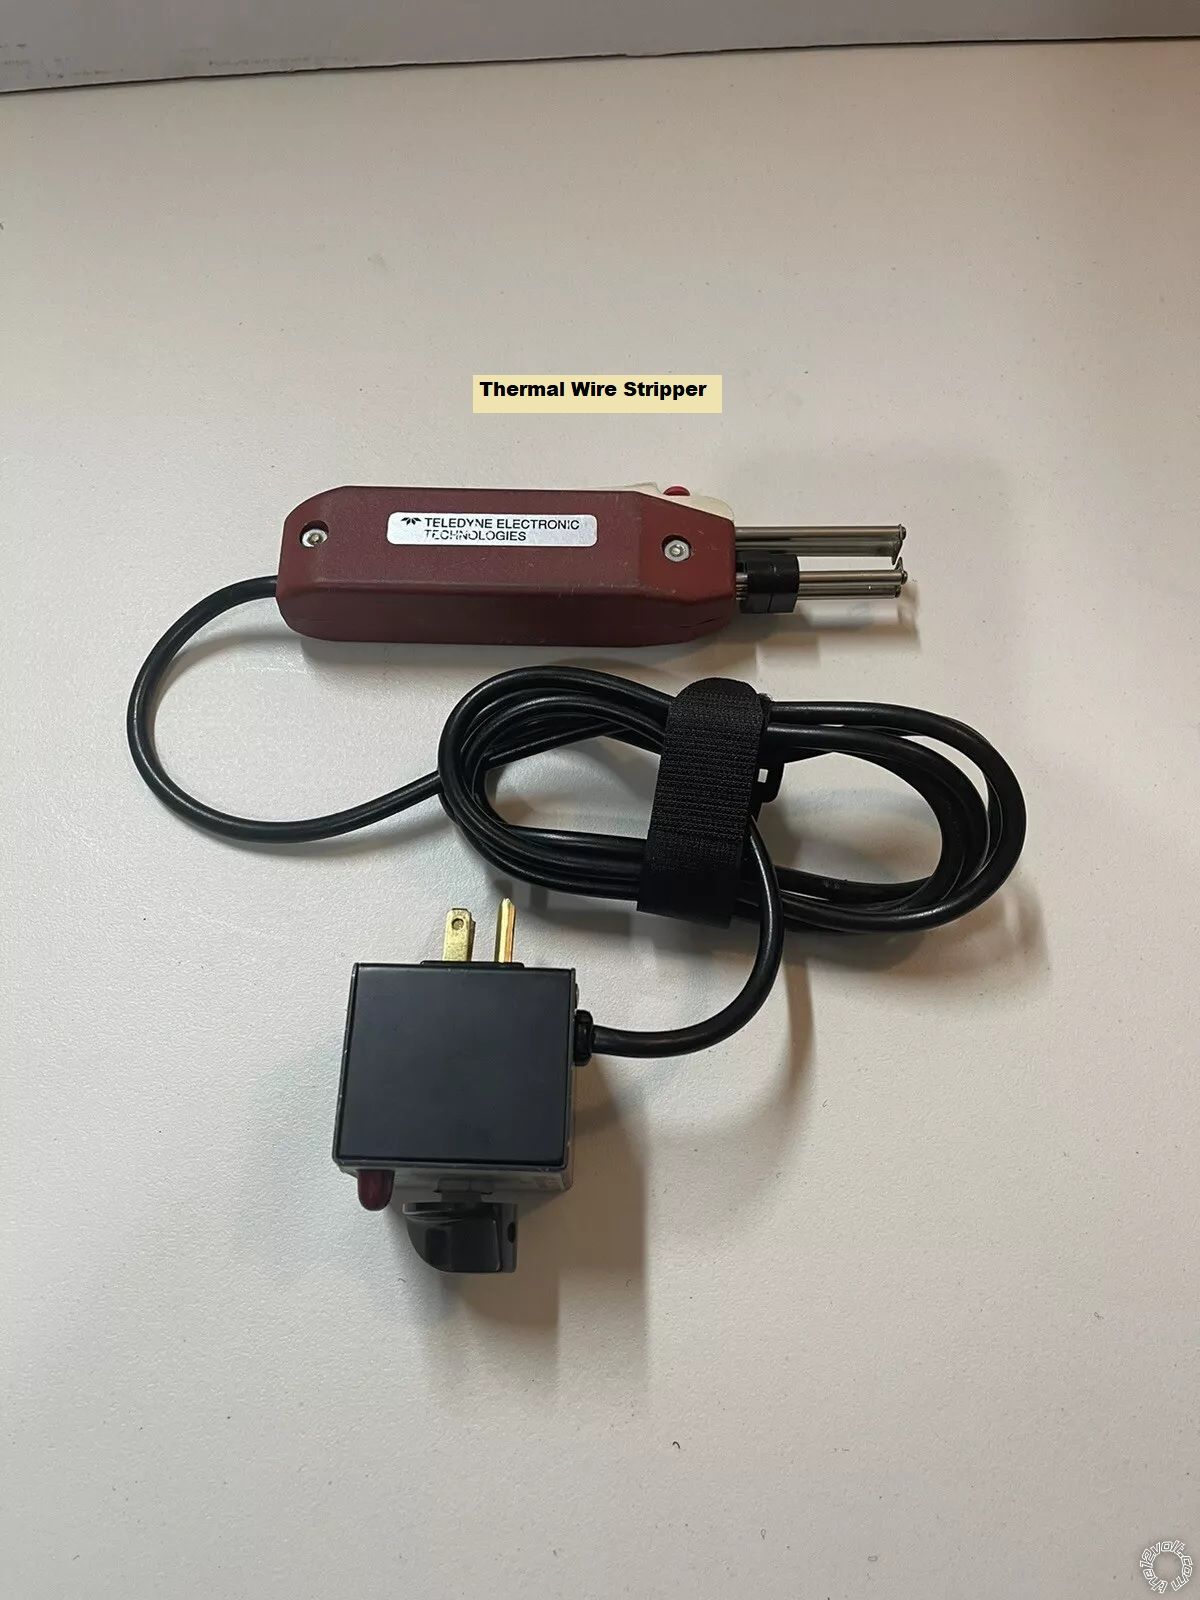
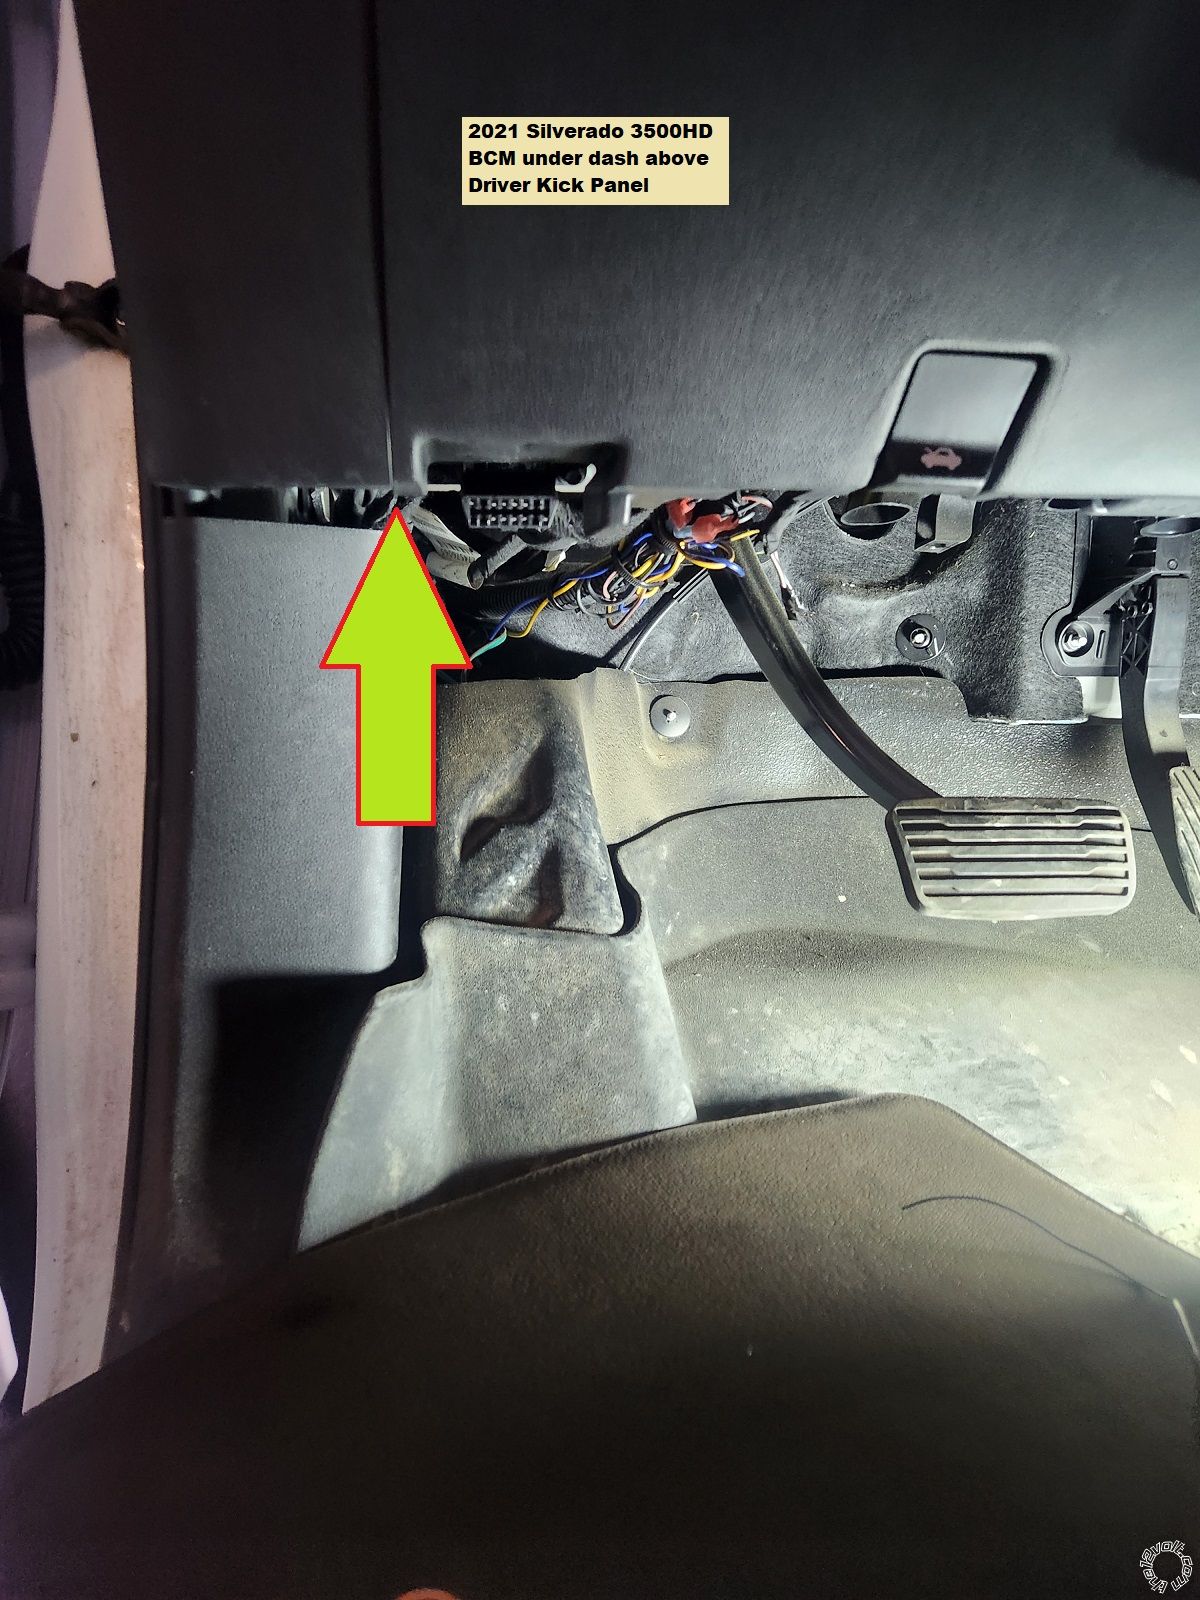
This install is a bit tedious due to the location of the BCM above the Drivers Kick Panel. No trim needs to be removed but BCM connector cable length is limited. I still refuse to use T-Taps so all wire connections are soldered and taped. Wire stripping would be a painful chore without a thermal wire stripper. Teledyne STRIPALL TWC-1 Thermal Wire Stripper shown below. Not cheap but a great tool, especially with the very thin gauge wires on newer cars (Toyota/Lexus, etc).
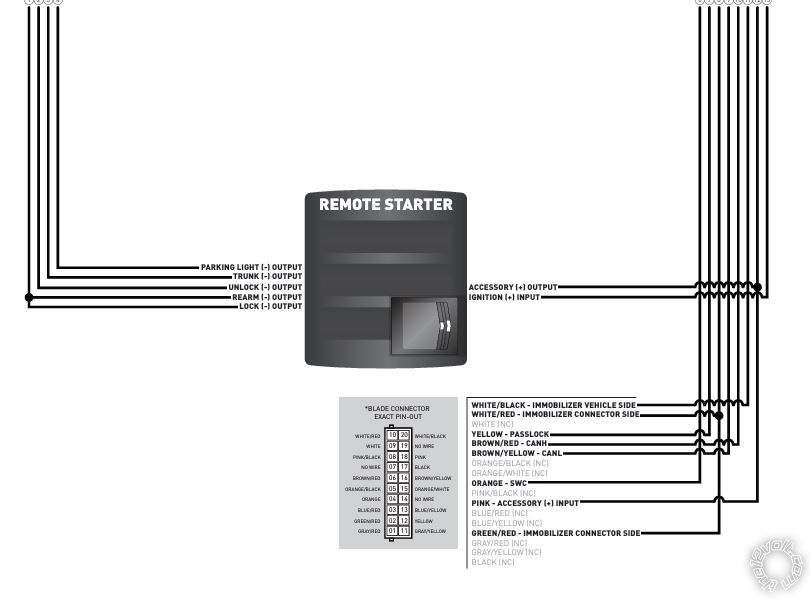
iDatalink install guide #84492 was followed for the Blade GM-12 wiring. This truck without ON-Star and no Factory Alarm system used the Type 13 diagrams. There are a total of 14 wire connections needed at 5 of the 7 BCM plugs. Blade install diagrams below :
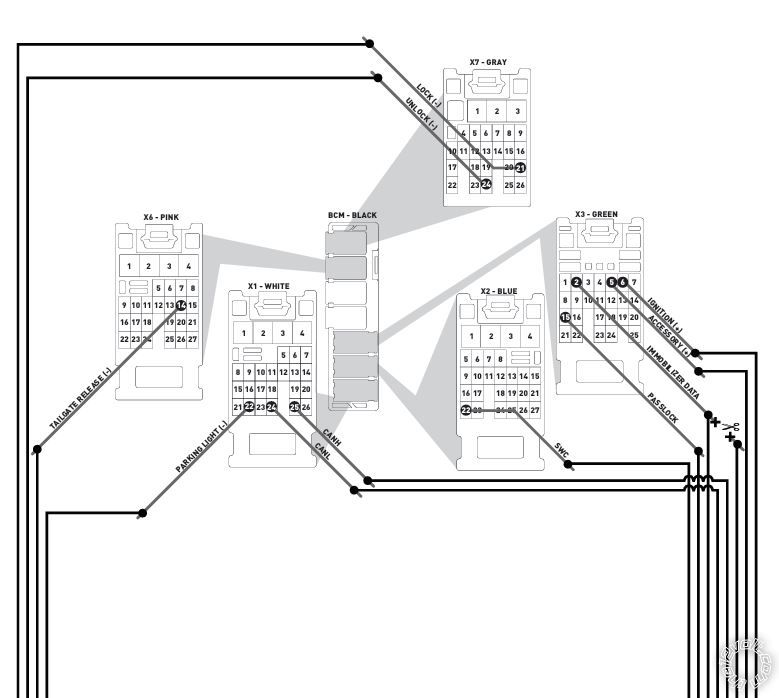
For best BCM connector access the plugs can be removed from the BCM. It is recommended to pull the negative battery cable before disconnecting the BCM harnesses. BCM location and photo below :
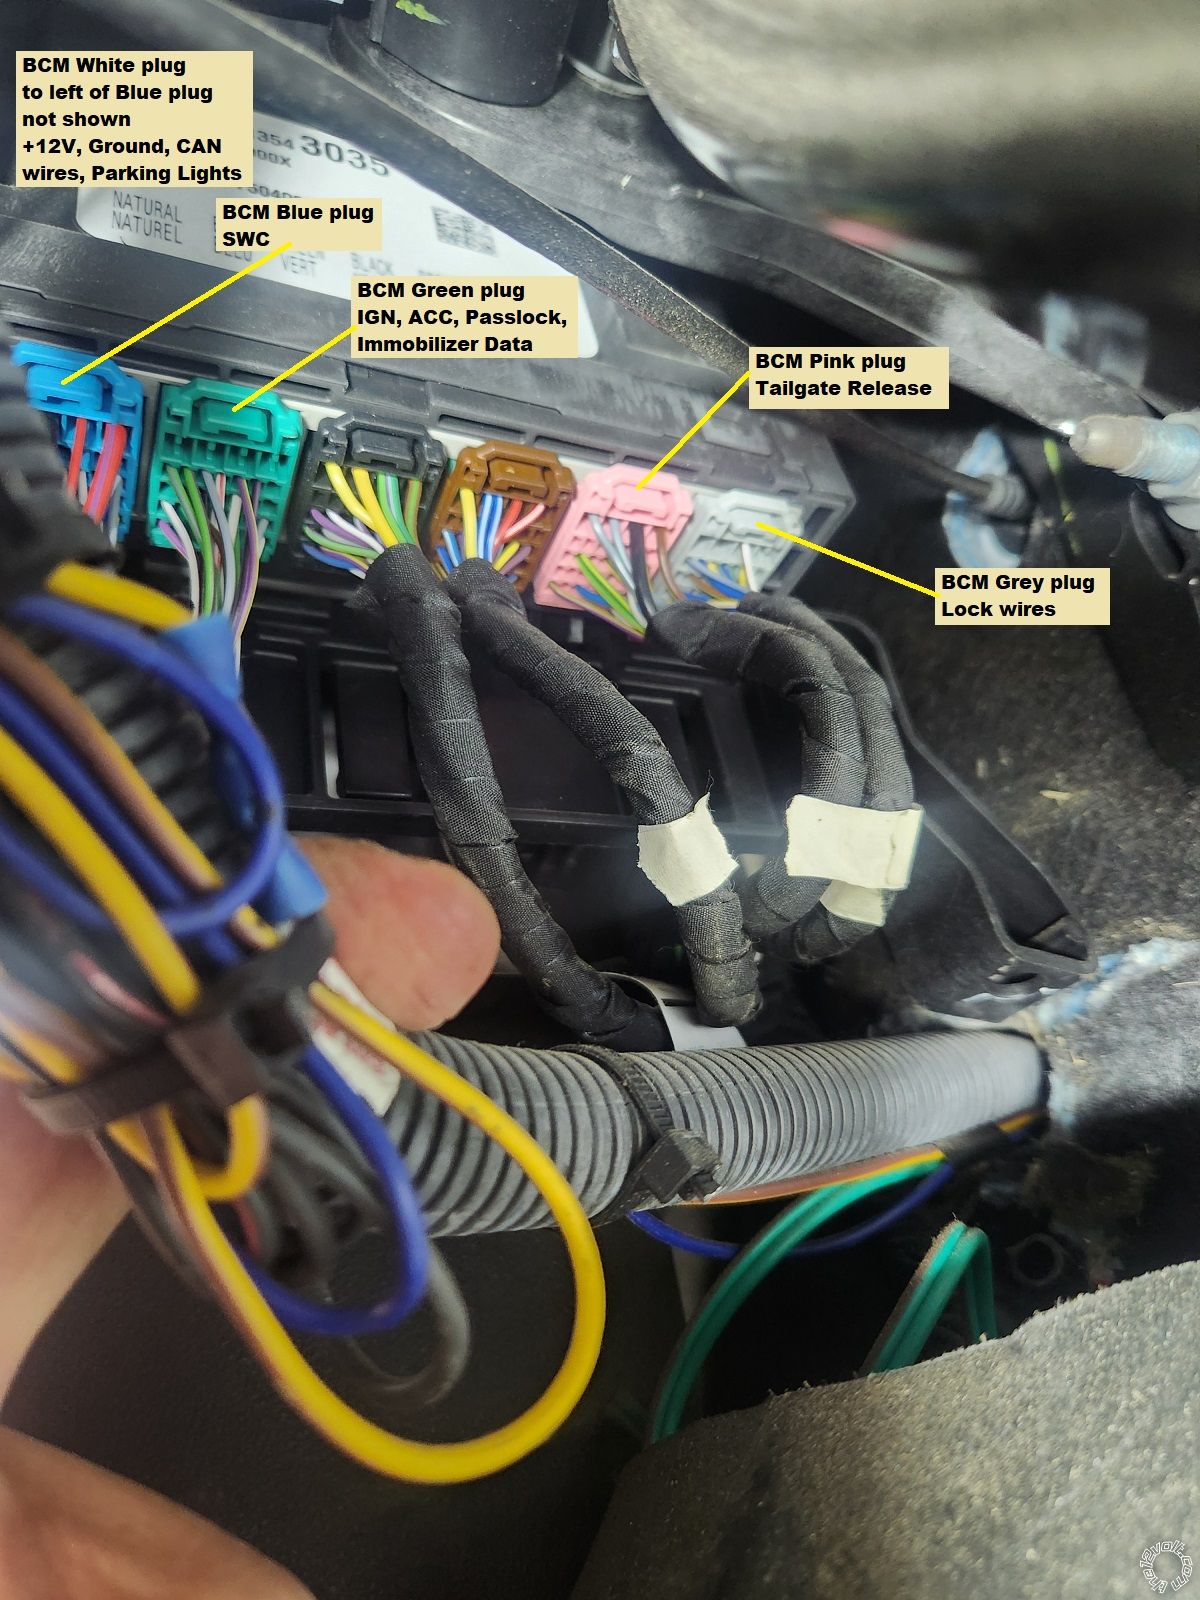
iDatalink provides very good photos and accurate wire info that is available while updating, flashing and configuring the modules. Here are photos taken during this install.
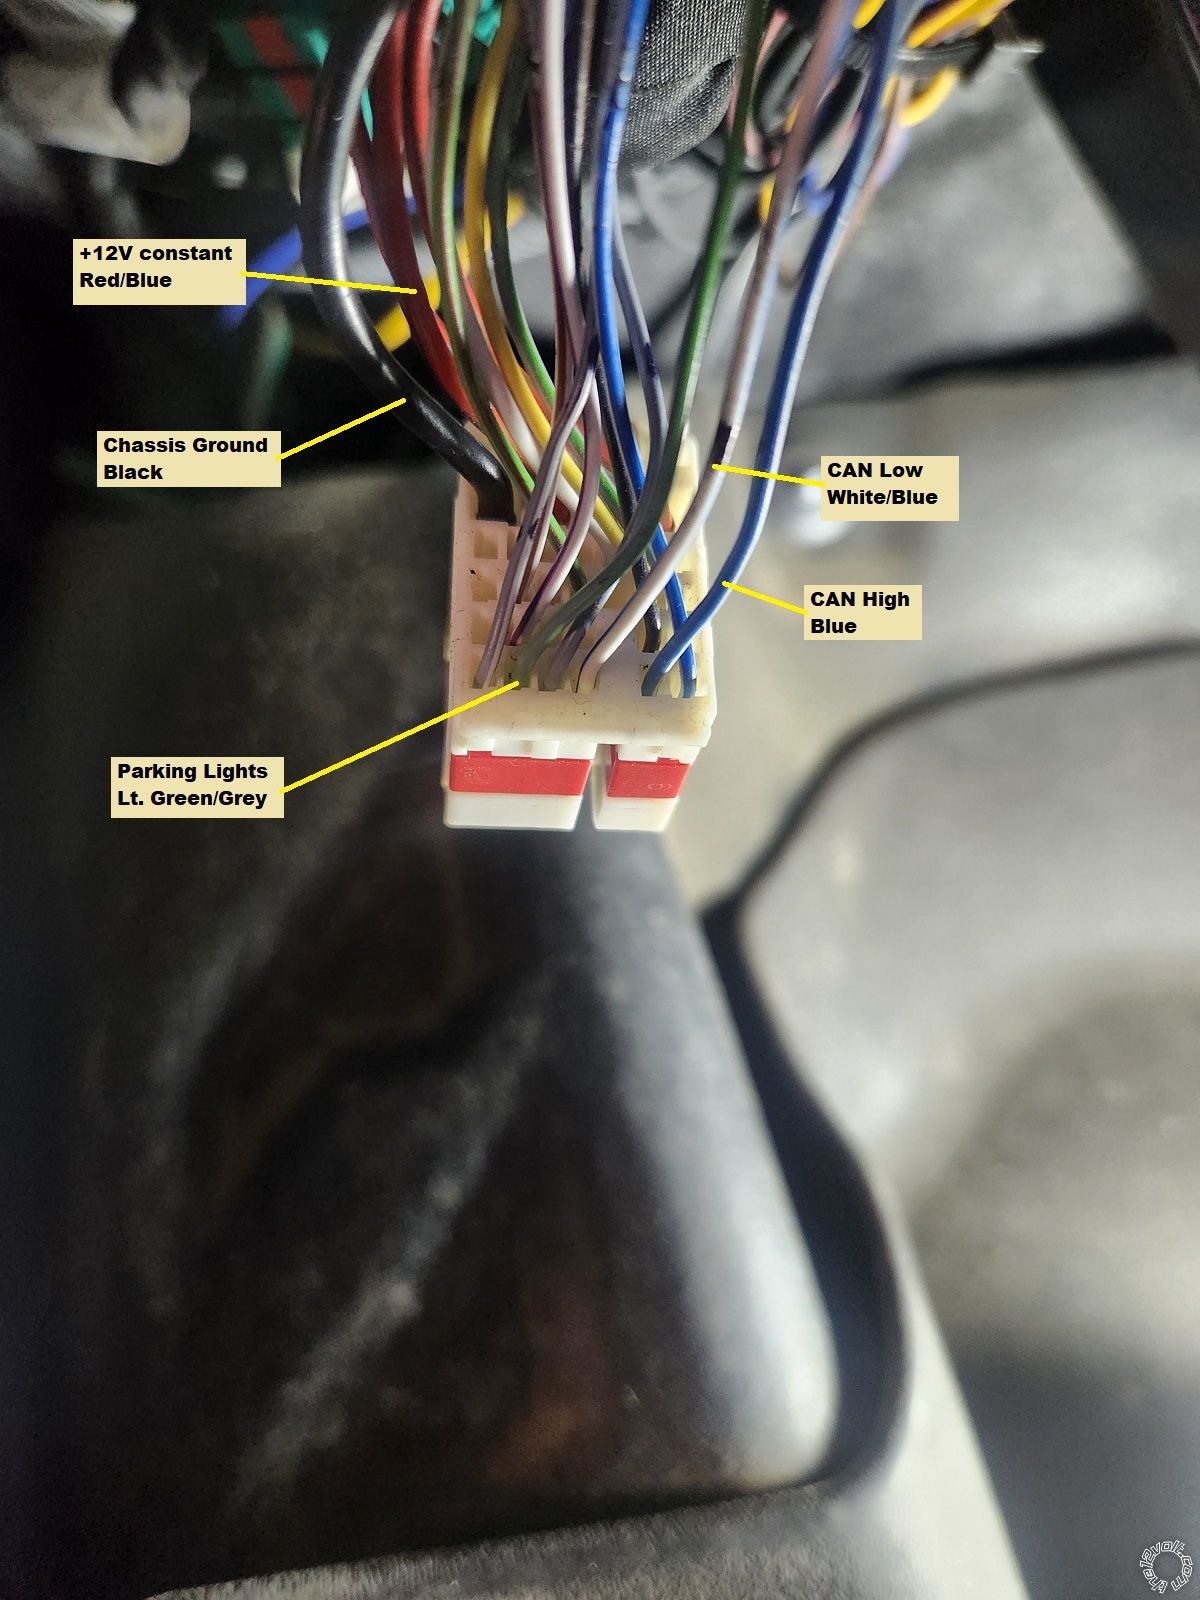
BCM X7 Grey plug

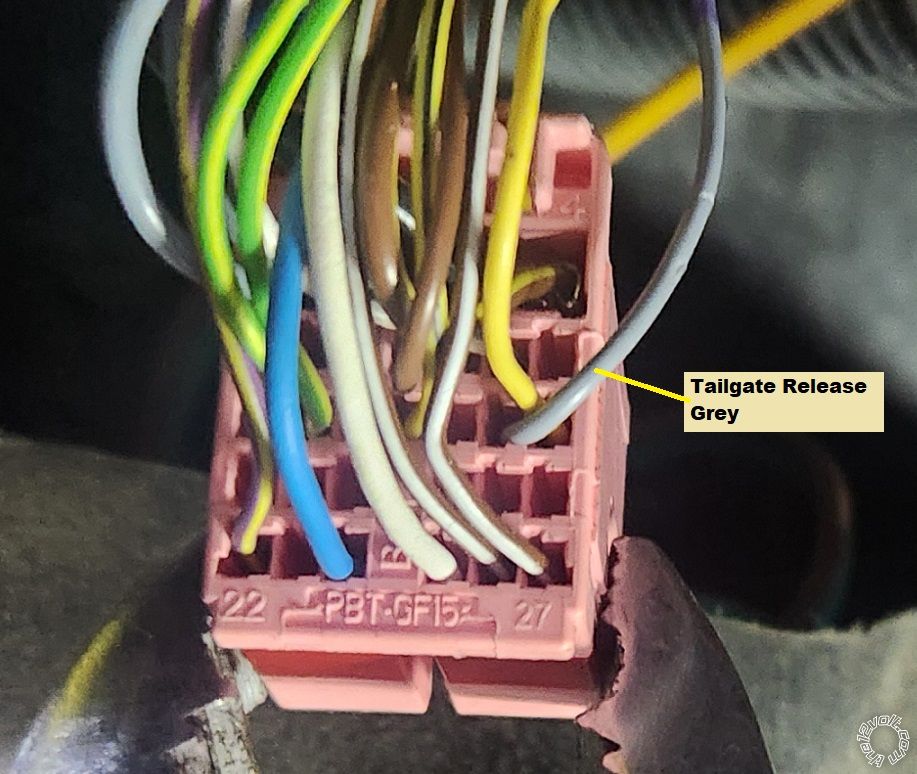
BCM X6 Pink plug
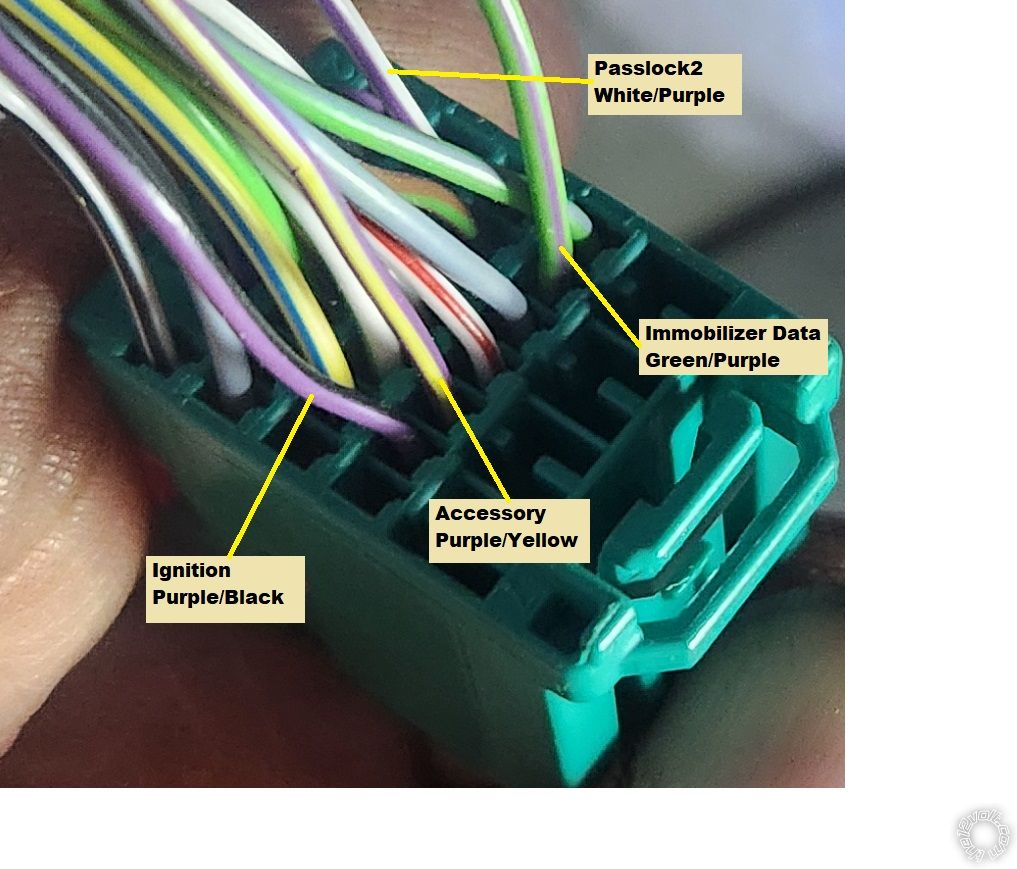
BCM X3 Green plug
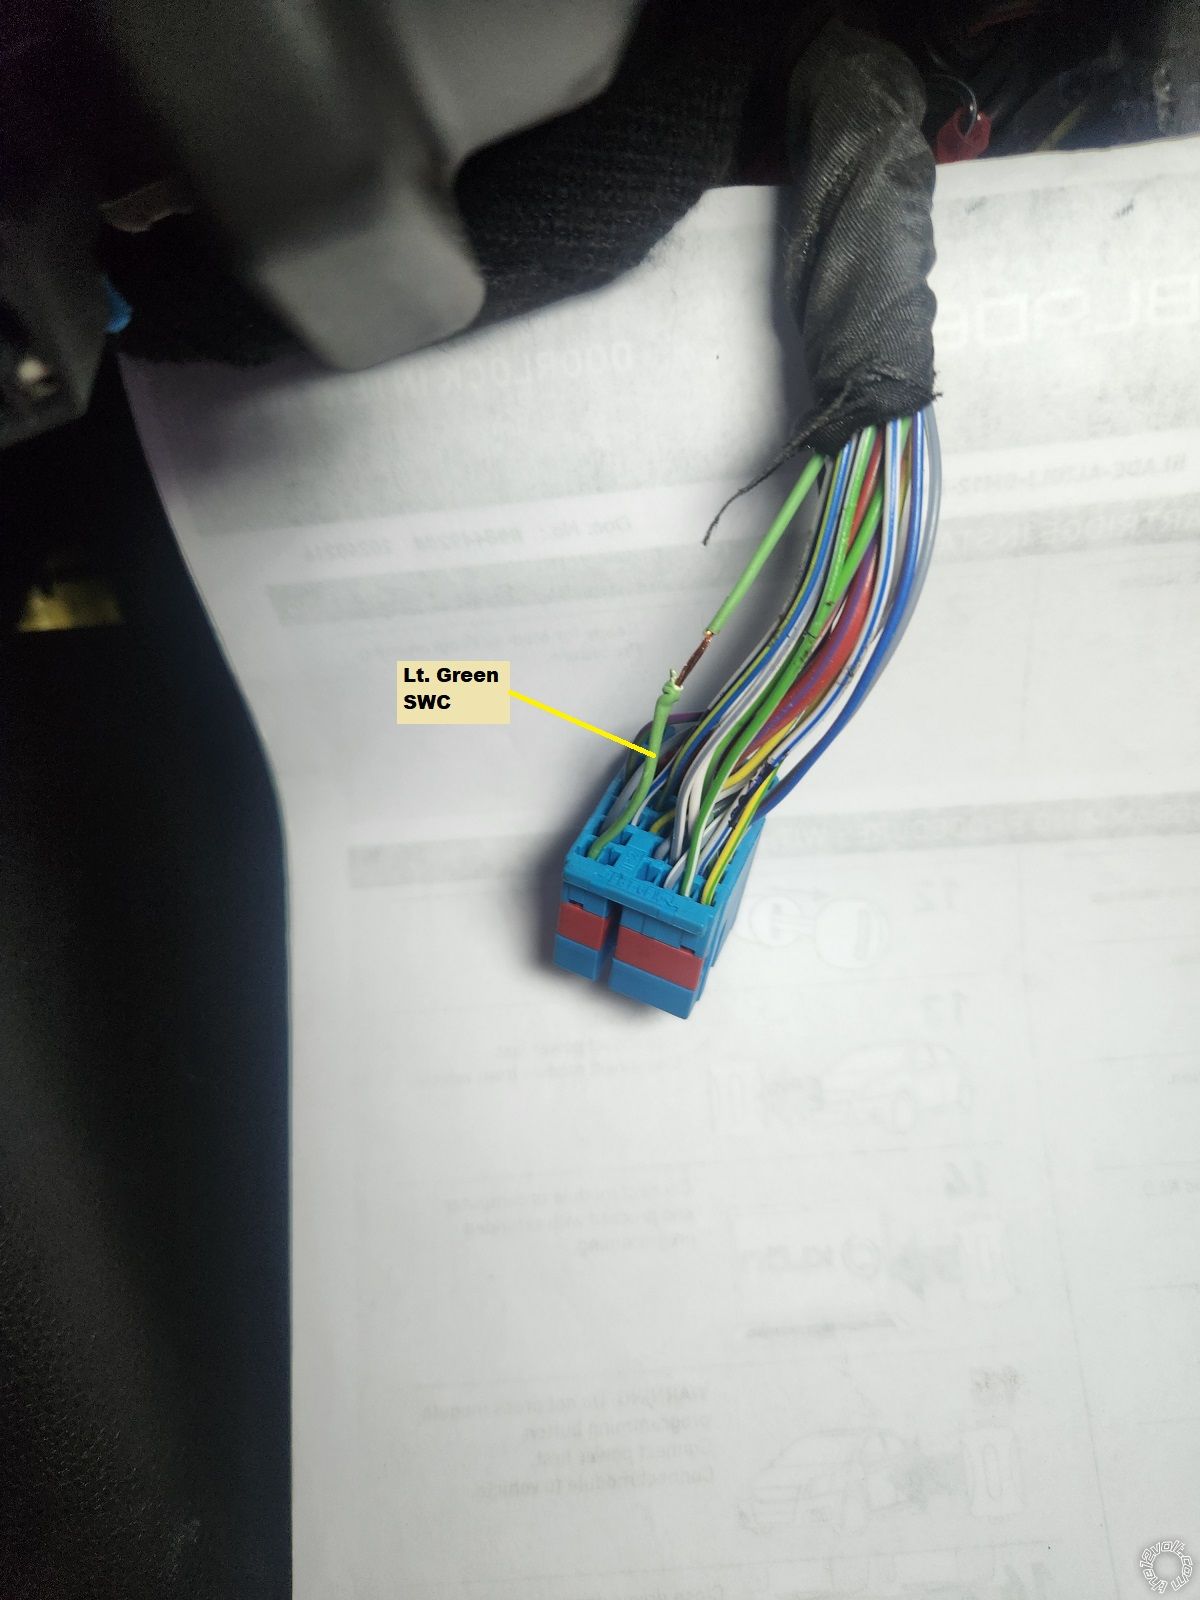
BCM X2 Blue plug
BCM X1 White plug
For the new installer the basic install sequence is :
1. Install the Blade AL cartridge into the Compustar CM900 controller.
2. Connect the CM900 unit to the ADS USB cable and PC.
3. Load WEB Link and sign in.
4. Update the CM900 with the latest firmware - if necessary.
5. Select the correct Blade firmware and flash the module.
6. Set any CM900 and bypass options needed.
6a. For this install
Engine sensing to "not connected - fixed time" *
POC4 set to Trunk Release
Trunk release with Unlock & Disarm **
7. Bench prep the R/S module and Blade wires following the GM12 install guide Type 13.
7a. For this application
Cut IGN and ACC wires and solder on 18 gauge wire for easy connection to the thin BCM wires
Cut the Green/White (+) Parking Light with 10 amp fuse for use below.
Cut the two thick +12V fused input wire before the fuses.
Solder the two cut +12V input wires to the Green/White cut wire with the 10 Amp fuse. ***
8. Disconnect the trucks negative battery lead.
9. Locate the BCM and disconnect the required 5 plugs.
10. Make all the wire connections shown in the Type 13 diagram verifying the wire color and pin location are as per the Blade diagram.
10a. Reconnect all BCM plugs.
11. Remove the R/S 10 Amp power fuse.
11. Reconnect the vehicle battery.
12. Verify the truck starts and runs with no faults. Test the factory remotes.
13. Install the R/S 10 Amp fuse.
14. Disconnect the 20 Pin Black Blade connector and perform the Blade Factory Reset procedure shown on the last page of the GM12 install guide.
14a. Reconnect the 20 Pin Black Blade harness if not done after Reset.
15. Perform the vehicle programming procedure shown on Page 58 of the install guide. Each step must complete as per the guide.
16. After successful programming, test the Compustar Lock, Unlock and Tailgate Release remote functions.
17. Verify that the Hood is closed and perform a R/S.
17a. Verify that a Brake Pedal depress and a Hood open will shutdown a remote started engine.
18. Secure the CM900 module and R/S harnesses.
* While the Blade-AL will provide a good Tach signal, it is not needed with the "one-touch" ignition switch starting.
** Even though this truck did not have a Factory Alarm and the Factory remotes can open the Tailgate while locked, the Blade Tailgate Release would not open the Tailgate unless the truck was unlocked.
*** This R/S install will function properly with only a 10 Amp fused supply. The unused Green/White (+) Parking Light has a 10 amp fuse and is of a thinner gauge making the vehicle power connection easier.
Soldering is fun!


 Printable version


