the12volt.com spacer
icon

1st FG project, lots of pics. Opinions?


Post ReplyPost New Topic
< Prev Topic Next Topic >
hound 
Member - Posts: 4
Member spacespace
Joined: August 05, 2006
Location: Canada
Posted: August 07, 2006 at 12:21 PM / IP Logged  

And so it began. A 1995 YJ Wrangler with weak speakers... added a couple amps and a pair of 10" JLs with a cap. But I wanted more CLARITY! So, I decided to throw in a pair of 6.5" speakers, and I had to get pretty creative with their placement.

After seeing an ugly black plastic unit called the Centra-Pod from 4wheelonline.com ($129.99 USD), I decided to build my own. Not only would I be able to choose larger speakers, (the Centra-Pod came with 5.25s) but I'd be able to make it look a whole hell of a lot better.

So here's my project pics, and thanks to all of you guys, the project is, in my eyes, a huge success. Crisp clear sound to go with my new boom.

Thanks again guys, and LET ME KNOW if you think I could improve in any way.

1st FG project, lots of pics. Opinions? - Last Post -- posted image.

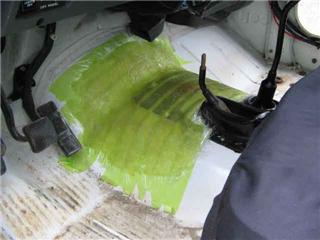
Taking a mould of the transmission hump... I was told it was helpful to wax your masking tape with any old car wax. It seemed to work. My base popped right off nice and neat after the resin had hardened.

1st FG project, lots of pics. Opinions? - Last Post -- posted image.

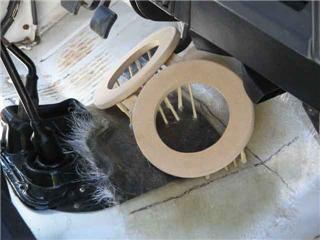
Here's my MDF rings! I was able to attach them firmly to the base using lots and lots of chopsticks cut to lengths, as well as some hot glue. The hot glue is a great choice because it pops off your rings and base easily once your project is nearing completion.

1st FG project, lots of pics. Opinions? - Last Post -- posted image.

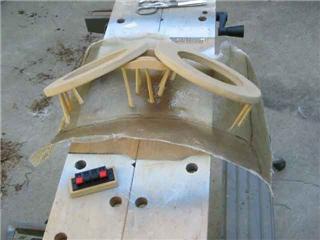
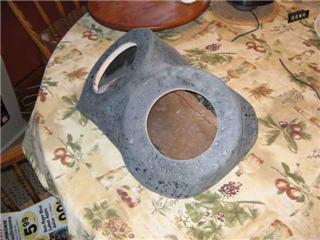
Here's the base attached to the rings, with the rough excess glass trimmed fromt the edges. It's important builders understand that the shape of the base largely dictates the end shape of your entire FG enclosure. Curves and contours are pretty, but will add tears and frustration when it comes time to stretch fabric. (The tears and frustration will be worth it!!) Also visible is the speaker terminal with its MDF base.

1st FG project, lots of pics. Opinions? - Last Post -- posted image.

Once my base had its edges sanded smooth, and my rings mounted securely, I stretched black (cotton/lycra) fabric over the "skeleton". I chose this particular fabric for its ability to stretch 4 ways. I love this step! Gives you an idea of how your project is going to look.

1st FG project, lots of pics. Opinions? - Last Post -- posted image.

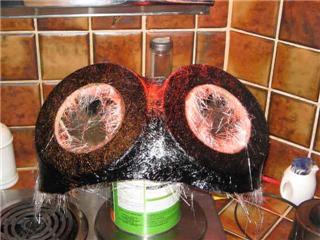
Here we are helping the resin cure under some heat lamps in the kitchen. Please note: I "painted" my fabric with resin ONLY before this step to make my fabric harden and give me a form to lay FG on. (forgot to take a pic of that step, sorry.) This is one of 4 layers of glass on the project.

1st FG project, lots of pics. Opinions? - Last Post -- posted image.

After I felt comfortable with my form's strength, I began sanding! Start out with a coarse paper, as it will take some time. Oh the hours I spent... :) Sanding is KEY to an attractive project. I was told to think of, "how cool it will look and what my buddies will say", and then to remember that while I'm sanding for hours and hours. Here's the form with its high-spots removed, and low spots yet to be filled.

1st FG project, lots of pics. Opinions? - Last Post -- posted image.

Sanding sanding sanding.... THIS particular bit of sanding is bodyfiller. I purchased some "kitty hair" (bondo and fibreglass) and used it to fill my low spots. I'm pretty sure that regular bondo would be just fine too.

1st FG project, lots of pics. Opinions? - Last Post -- posted image.

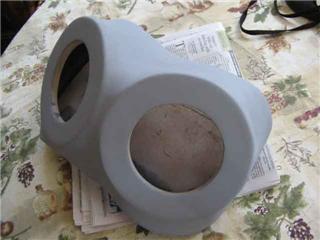
Prime time. After priming you'll notice little pin holes and scratches. Just keep priming and sanding until your scratches disappear, and use some glazing putty to fill in your larger pinholes.

1st FG project, lots of pics. Opinions? - Last Post -- posted image.

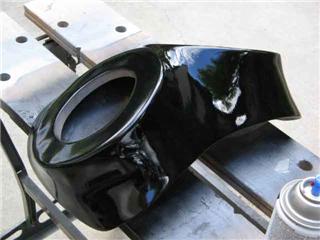
I used a rattle can to lay on 3 coats of black enamel. If you can use a real gun, I'm told it's way better. Looks pretty good to me though....

1st FG project, lots of pics. Opinions? - Last Post -- posted image.

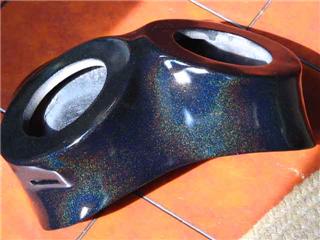
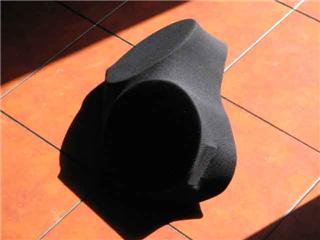
I wanted my project to be somewhat stealthy, as it will be highly visible in the front of my Jeep, but I still wanted it to be somewhat flashy. I applied some rainbow flake over the enamel and finished it with a couple coats of clear. Fancy Shmancy... Not pictured is the poly-fill I put in the enclosure before I screwed the speakers in. Not too much, just enough to deaden sound a bit.

1st FG project, lots of pics. Opinions? - Last Post -- posted image.

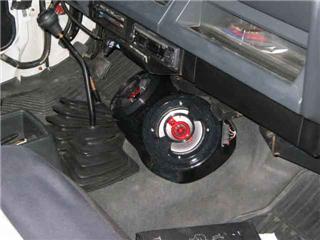
And here she is. It might look like it's touching the vents and shifter, but it's not. Just VERY tight clearances. I attached it to the transmission hump using velcro on the base, and it works very well. The speaker terminal allows me to disconnect it easily, should I have to park for a long period of time (vacation or something else....) and the velcro lets me yank it out no problem. This is kind of a crappy pic, but it looks KILLER in the sunlight.

Sounds great, adds tons of midrange and crisp highs. Hope this helped jeepsters looking for better sound!

Thanks for reading guys,

Hound

sawhit4 
Copper - Posts: 64
Copper spacespace
Joined: June 22, 2006
Location: United States
Posted: August 07, 2006 at 12:54 PM / IP Logged  
looks sweet, i'm in the process of doing something similar, only mine has a 7 inch screen and an ipod holder instead of speakers.  That paint looks great coming from just rattle cans, hope mine looks that good when i get done. 
Melted Fabric 
Silver - Posts: 509
Silver spacespace
Joined: October 24, 2003
Location: California, United States
Posted: August 07, 2006 at 4:19 PM / IP Logged  
CHOPSTICKS FOR SPEAKER RINGS? Dude, I could give you a hug for innovation alone. Very good thinking. Never thought about chopsticks man. "Ya learn sumthin new evree day I tell ya"
Beautiful project results. Your next challenge, fiberglass gas tank. Let's see it happen !!1st FG project, lots of pics. Opinions? - Last Post -- posted image. 1st FG project, lots of pics. Opinions? - Last Post -- posted image. 1st FG project, lots of pics. Opinions? - Last Post -- posted image.
I have not failed. I've just found 10,000 ways that won't work.
When you do not know what you are doing and what you are doing is the best -- that is inspiration.
judgedread 
Member - Posts: 18
Member spacespace
Joined: July 30, 2006
Posted: August 08, 2006 at 12:13 AM / IP Logged  
nice... great build.
Thack79 
Silver - Posts: 526
Silver spacespace
Joined: December 02, 2003
Location: Virginia, United States
Posted: August 08, 2006 at 12:51 PM / IP Logged  
one question. when laying the fiberglass layers on it. do they go on the inside or the outside?
hound 
Member - Posts: 4
Member spacespace
Joined: August 05, 2006
Location: Canada
Posted: August 08, 2006 at 3:32 PM / IP Logged  

Hi,

All my layers are on the outside.

crazyoldcougar 
Copper - Posts: 185
Copper spacespace
Joined: March 03, 2006
Location: Canada
Posted: August 08, 2006 at 4:30 PM / IP Logged  
looks great...there is only one thing i would suggest for next time...
mount your wire terminal on the bottom..for a more stealthy look...
this can easily be done by laying a small piece of pipe (1/2" copper) under the masking tape of your floor mold...that way when you pop your mould you will have a pre formed tunnel on the under side of it to run your wire thgough...likewise you woould mould the terminal right into the bottom of the mold as you go...this can be done a couple ways...
1. you could use your little MDF block you made, if the terminal fits flush in ito then you can just sit it right on the tape and resin glass right over it. if you terminal sticks out a bit then you could use cadboard to hold the MDF up off the floor a bit while making the mold..
2. you could tape the back side of the terminal off and tape it to the floor of the jeep aswell, fiberglass over it (basically using it as a plug) when you pop your mold off you will have a nice snug hole in the bottom of your mold you can screw the terminal too..you could even mold in a piece of MDF on top of bump where the terminal will go then you will have something a little more solid to screw too..
velcro works well but like you said it makes thing easy for a theif...especially in a Jeep...
but either way you did a very good job and the paint looks good..
Fiberglass Guru.
josh1979 
Silver - Posts: 320
Silver spacespace
Joined: July 03, 2006
Location: United States
Posted: August 08, 2006 at 5:00 PM / IP Logged  

very nice job.

one thing to try, next time is to make dule rings one larger than the one that mounts the speaker, or with a router rabbet the edge of the mounting ring  so you can staple the wrapping material on the over hanging edge. this will make it so you dont have to distort the area where the speaker mounts. this will give the speaker a good seel.

1st FG project, lots of pics. Opinions? - Last Post -- posted image.

1st FG project, lots of pics. Opinions? - Last Post -- posted image.

bring back the rotary phone so i dont have to press 1 to proceed in english
Aruman 
Silver - Posts: 363
Silver spacespace
Joined: July 27, 2005
Location: Aruba
Posted: August 08, 2006 at 5:58 PM / IP Logged  
looks very nice
Shaking The Neighborhood
hound 
Member - Posts: 4
Member spacespace
Joined: August 05, 2006
Location: Canada
Posted: August 08, 2006 at 6:39 PM / IP Logged  

Dudes...  awesome suggestions.  The speaker terminals do look a little awkward stickin' out like that.  And I really like the flush rings.

Thanks guys.


Sorry, you can NOT post a reply.
This topic is closed.

  Printable version Printable version Post ReplyPost New Topic
You cannot post new topics in this forum
You cannot reply to topics in this forum
You cannot delete your posts in this forum
You cannot edit your posts in this forum
You cannot create polls in this forum
You cannot vote in polls in this forum

  •  
Search the12volt.com
Follow the12volt.com Follow the12volt.com on Facebook
Sunday, April 28, 2024 • Copyright © 1999-2024 the12volt.com, All Rights Reserved Privacy Policy & Use of Cookies
Disclaimer: *All information on this site ( the12volt.com ) is provided "as is" without any warranty of any kind, either expressed or implied, including but not limited to fitness for a particular use. Any user assumes the entire risk as to the accuracy and use of this information. Please verify all wire colors and diagrams before applying any information.

Secured by Sectigo
the12volt.com spacer
Support the12volt.com
Top
the12volt.com spacer