the12volt.com spacer
icon

Cutout Diameter


Post ReplyPost New Topic
< Prev Topic Next Topic >
cloak559 
Copper - Posts: 215
Copper spacespace
Joined: July 14, 2006
Location: United States
Posted: September 06, 2006 at 12:10 AM / IP Logged  
I built a new box for a 15" today. I had to take it to my buddies shop to cut the hole for the sub(my router broke)...He cut the hole about a 1/2" too small. Does anyone have any trick or tips for making it bigger without a router? Im pretty sure there isnt but I thought i'd ask, because his shop is a 45 minute drive tha I really dont feel like taking tomarrow morning...
'89 Mercedes-Benz 300E
Pioneer DEH-5900UB
(2)RE Audio SX 10"s
(1)US Amps MD3D
3ft^3 @ 37Hz
Blowing up in a car accident doesnt worry me, as long as I'm putting out some major dB's when I die...
KarTuneMan 
Platinum - Posts: 7,056
Platinum spaceThis member has made a donation to the12volt.com. Click here for more info.spaceThis member consistently provides reliable informationspace
Joined: December 14, 2004
Location: Isle Of Man
Posted: September 06, 2006 at 1:09 AM / IP Logged  
Get out your Jig saw.....
aznboi3644 
Gold - Posts: 2,600
Gold spaceThis member consistently provides reliable informationspace
Joined: May 01, 2006
Location: United States
Posted: September 06, 2006 at 3:38 PM / IP Logged  
If you have some time....hand sand it lol
hellbass212 
Member - Posts: 26
Member spacespace
Joined: February 22, 2006
Location: United States
Posted: September 06, 2006 at 8:06 PM / IP Logged  
Dremel, rotozip... I use it for alot of things so if you dont already have one I'd check into it. Shouldn't take you more than 20 minutes.
Clarion DXZ665mp,Lanzar 2000D,2 Powerbase Extreme 12",Pioneer 5.25" - TS-C503
JL Audio e4300,Fosgate Power 6x9,5 Farad Cap,2 Optima Yellow,205 Amp Alt
cloak559 
Copper - Posts: 215
Copper spacespace
Joined: July 14, 2006
Location: United States
Posted: September 06, 2006 at 8:34 PM / IP Logged  
aznboi3644 wrote:
If you have some time....hand sand it lol
Exactly what I did...Took me about an hour but It dropped right in...
'89 Mercedes-Benz 300E
Pioneer DEH-5900UB
(2)RE Audio SX 10"s
(1)US Amps MD3D
3ft^3 @ 37Hz
Blowing up in a car accident doesnt worry me, as long as I'm putting out some major dB's when I die...
stevdart 
Platinum - Posts: 5,816
Platinum spaceThis member has made a donation to the12volt.com. Click here for more info.spaceThis member has been recognized as an authority in Mobile Audio and Video. Click here for more info.spaceThis member consistently provides reliable informationspace
Joined: January 24, 2004
Location: Pennsylvania, United States
Posted: September 06, 2006 at 9:22 PM / IP Logged  

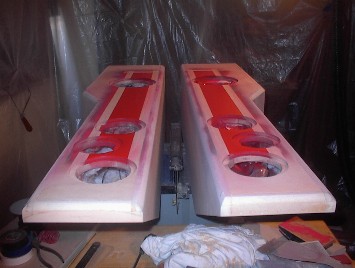
Here's how I did the same thing with my HT mains.  I decided to switch out the 4.5" mids to another line and the new ones didn't quite fit into the routed holes that I made.

Cutout Diameter -- posted image.

You can see that the holes were mortised so that I could flush-mount the driver.  That left the idea of using a jigsaw out of the question because I needed a perfect circle with the proper depth for the new mids.

I use a jig called a Jasper jig, which needs to pivot on the center of the cutout.  I needed to fill the center of these holes up with solid MDF and drill a center hole so that I could rout a new cutout.

1.   Cut a disk that will fit into the hole you now have.

2.  Cut a backing brace that is narrow enough to fit through the existing hole, and long enough to overlap the sides of the hole.

3.  Mark and predrill starter holes in the backing brace to line up with two or more of the speaker mounting holes.  Then secure the backing brace to the inside of the box, extending across the cutout.

4.  Place the disk into the hole and predrill starter holes that will secure it to the brace.  Secure them together with wood screws.

5.  Through trial (but no error), find the center of the disk by using the router and jig.  Secure the jig to the center of the disk and re-rout the hole to the proper size.

Oh...I wrote all this and then I re-read your post.  Oh well...

Build the box so that it performs well in the worst case scenario and, in return, it will reward you at all times.
stevdart 
Platinum - Posts: 5,816
Platinum spaceThis member has made a donation to the12volt.com. Click here for more info.spaceThis member has been recognized as an authority in Mobile Audio and Video. Click here for more info.spaceThis member consistently provides reliable informationspace
Joined: January 24, 2004
Location: Pennsylvania, United States
Posted: September 07, 2006 at 2:09 PM / IP Logged  

My home HT main speakers, designed to flank the TV.  I changed the mids to the high Vifa line, so they look better than the ones shown in these (link below).  These were a buyout deal and sounded pretty good but I didn't like the metallic color and the fact that they were made to have an overlapping lip over the cutout.  The new ones match the rest of the speakers better and sound better, but I haven't taken any pictures since I made the switch.

I showcased them when I got the project done HERE.

Build the box so that it performs well in the worst case scenario and, in return, it will reward you at all times.

Sorry, you can NOT post a reply.
This topic is closed.

  Printable version Printable version Post ReplyPost New Topic
You cannot post new topics in this forum
You cannot reply to topics in this forum
You cannot delete your posts in this forum
You cannot edit your posts in this forum
You cannot create polls in this forum
You cannot vote in polls in this forum

  •  
Search the12volt.com
Follow the12volt.com Follow the12volt.com on Facebook
Wednesday, October 9, 2024 • Copyright © 1999-2024 the12volt.com, All Rights Reserved Privacy Policy & Use of Cookies
Disclaimer: *All information on this site ( the12volt.com ) is provided "as is" without any warranty of any kind, either expressed or implied, including but not limited to fitness for a particular use. Any user assumes the entire risk as to the accuracy and use of this information. Please verify all wire colors and diagrams before applying any information.

Secured by Sectigo
the12volt.com spacer
Support the12volt.com
Top
the12volt.com spacer