the12volt.com spacer
icon

relay to add progressive unlock


Post ReplyPost New Topic
< Prev Topic Next Topic >
joebravo 
Member - Posts: 3
Member spacespace
Joined: January 07, 2008
Location: California, United States
Posted: April 01, 2008 at 6:51 PM / IP Logged  
I have a '96 Accord DX. It basically came powerless. No power locks, power windows, etc. I successfully installed a Viper 1000 model in my Accord. I also installed a Reverse Polarity (5-wire) Central Locking System to add the convenience of keyless entry into my car. The install went great! I didn't even have to connect the actuators to the its control module because the 1000 model drives aftermarket actuators directly (though, I'm switching it back to the control module because it seems the actuators are more powerful connected to the control module versus directly to the alarm).
What I need to know is how to isolate the driver's side actuator so I can connect the Progressive feature (2nd unlock). The systme works great. When I unlock either of the front two actuators, the rest follow. I have been doing my research on how relays work, but I need more specific information.
Appreciate it.
- Bravo
hotwaterwizard 
Silver - Posts: 1,350
Silver spacespace
Joined: December 11, 2003
Location: California, United States
Posted: April 02, 2008 at 12:23 AM / IP Logged  

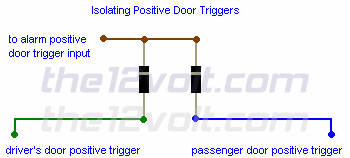
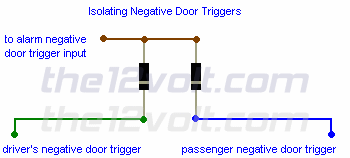
Use a couple of Diodes

https://www.the12volt.com/diodes/diodes.asp

John DeRosa (Hotwaterwizard)
Stockton California
When in doubt, try it out !
joebravo 
Member - Posts: 3
Member spacespace
Joined: January 07, 2008
Location: California, United States
Posted: April 02, 2008 at 11:18 AM / IP Logged  
how should i use the diodes though?  how would the circuit look like?
hotwaterwizard 
Silver - Posts: 1,350
Silver spacespace
Joined: December 11, 2003
Location: California, United States
Posted: April 03, 2008 at 9:56 PM / IP Logged  

relay to add progressive unlock -- posted image.

relay to add progressive unlock -- posted image.

John DeRosa (Hotwaterwizard)
Stockton California
When in doubt, try it out !
techman93 
Silver - Posts: 591
Silver spacespace
Joined: October 28, 2006
Location: Pennsylvania, United States
Posted: April 03, 2008 at 10:29 PM / IP Logged  
I believe that is not what he was looking for ... he wanted to unlock driver door then other door as driver door priority lock set up.
The wire I'm test'n isn't doin' what it's supposed to be doin'... I am so glad I printed that tech sheet, with the wrong info.
Do it right the first time... or I might have to fix it for ya
chriswallace187 
Gold - Posts: 1,661
Gold spacespace
Joined: March 11, 2002
Location: Pennsylvania, United States
Posted: April 04, 2008 at 12:36 AM / IP Logged  
joebravo, here's what you need to do(assuming the front door actuators are 5-wire switched type).
The unlock switch wire from the driver's side actuator will need to be disconnected since you don't want it to control all the other actuators on the first unlock remote button press. It's not possible just to interrupt it temporarily because it will unlock all the rest as soon as your interruption is released.
Obviously, this is going to result in you not being able to unlock all doors from the driver's door lock itself, which defeats the purpose of a central locking system. Happily this is easy to rectify.
Get a power lock switch for your car from a junkyard - make sure you specify that you need about 6 inches or so of the wiring harness. This switch will be used in place of the switch that's built into the driver's door actuator.
A 5-wire actuator contains 2 motor wires for lock and unlock and 3 wires for the switch: constant(usually ground), lock switch, and unlock switch. The factory Honda power lock switch will also have 3 wires which will be connected to those after you figure out which wire from it does what.
You'll be connecting to the Viper as follows - assuming that your central locking system is ground switched.
Purple unlock 87 - 12 VDC constant power
Blue/Black unlock 30 - Cut driver's door actuator unlock motor lead, facing towards the actuator
BROWN / Black unlock 87a - cut motor lead facing towards the central locking module
PURPLE / black lock 87 - ground
GREEN/ black lock 30 - lock switch wire at lock module
WHITE/ black lock 87a - no conn.
Lt. blue 2nd unlock - unlock switch wire at lock module
C Renner's Auto Electronix
My service is cheap, quick, and good - pick any two
joebravo 
Member - Posts: 3
Member spacespace
Joined: January 07, 2008
Location: California, United States
Posted: April 04, 2008 at 1:13 PM / IP Logged  
Ey thanks for the help chriswallace187. That's exactly what I was looking for. I am actually upgrading my alarm, so my questions is, can i use the same setup with two relays or can i make the connections with just one?
chriswallace187 
Gold - Posts: 1,661
Gold spacespace
Joined: March 11, 2002
Location: Pennsylvania, United States
Posted: April 04, 2008 at 1:59 PM / IP Logged  
If your central locking system has (-) switched wires, you'll only need a relay for the driver's unlock. Use the terminals listed above for the unlock motor lead, and wire 86 to 12v constant and 85 to the (-) unlock output from your new alarm.
C Renner's Auto Electronix
My service is cheap, quick, and good - pick any two

Sorry, you can NOT post a reply.
This topic is closed.

  Printable version Printable version Post ReplyPost New Topic
You cannot post new topics in this forum
You cannot reply to topics in this forum
You cannot delete your posts in this forum
You cannot edit your posts in this forum
You cannot create polls in this forum
You cannot vote in polls in this forum

  •  
Search the12volt.com
Follow the12volt.com Follow the12volt.com on Facebook
Friday, May 9, 2025 • Copyright © 1999-2025 the12volt.com, All Rights Reserved Privacy Policy & Use of Cookies
Disclaimer: *All information on this site ( the12volt.com ) is provided "as is" without any warranty of any kind, either expressed or implied, including but not limited to fitness for a particular use. Any user assumes the entire risk as to the accuracy and use of this information. Please verify all wire colors and diagrams before applying any information.

Secured by Sectigo
the12volt.com spacer
Support the12volt.com
Top
the12volt.com spacer