the12volt.com spacer
icon

Install New But Keep Old Radio Clock


Post ReplyPost New Topic
< Prev Topic Next Topic >
spyder1125 
Member - Posts: 22
Member spacespace
Joined: March 15, 2003
Location: United States
Posted: February 22, 2004 at 9:17 PM / IP Logged  
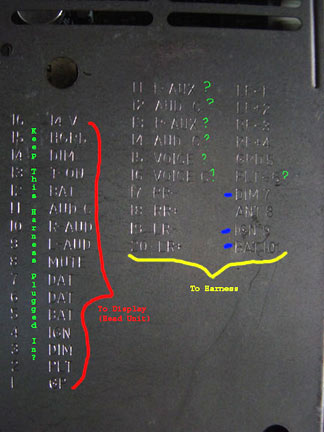
I have a 92 Sunbird. I am installing a new radio into the spot below, however I would still like to have the clock show on the old square one, i found out that the head unit of the old one is just a display and the actual radio/amp is seperate. To this there are several connections going to it, and many wires. I would like to know which wires I should splice into the old radio so I can still get it to show the time and am able to adjust it? Below is a picture of what I THINK is the way, the blue dashes represent what should remain on the harness to continue to function the clock...is ther eanything else I need...what do the question marks represent? I beleive i will keep the wire harness going from the left side of the amp plugged in as this appears to be leading to the head unit/face of the radio.
Install New But Keep Old Radio Clock -- posted image.
customsuburb 
Gold - Posts: 1,813
Gold spacespace
Joined: January 17, 2004
Location: United States
Posted: February 23, 2004 at 8:11 PM / IP Logged  

Can't you just keep everything connected except the speaker leads(even the audio speaker leads could be kept connected, just not at the amp, if you are bypassing the factory amp tottaly with your new head-unit).

Metra Tech 
Copper - Posts: 125
Copper spacespace
Joined: October 21, 2003
Location: United States
Posted: February 24, 2004 at 9:36 AM / IP Logged  
I have actually done this before more than a few times. What you want to do is plug everything back in like it was. Take a DMM and measure the wires going in the display. Find your ground, constant power, and accessory with the DMM and write down the colors on a piece of paper. Now wire your aftermarket radio up and the wires you just found. Thats it.

Sorry, you can NOT post a reply.
This topic is closed.

  Printable version Printable version Post ReplyPost New Topic
You cannot post new topics in this forum
You cannot reply to topics in this forum
You cannot delete your posts in this forum
You cannot edit your posts in this forum
You cannot create polls in this forum
You cannot vote in polls in this forum

  •  
Search the12volt.com
Follow the12volt.com Follow the12volt.com on Facebook
Tuesday, May 6, 2025 • Copyright © 1999-2025 the12volt.com, All Rights Reserved Privacy Policy & Use of Cookies
Disclaimer: *All information on this site ( the12volt.com ) is provided "as is" without any warranty of any kind, either expressed or implied, including but not limited to fitness for a particular use. Any user assumes the entire risk as to the accuracy and use of this information. Please verify all wire colors and diagrams before applying any information.

Secured by Sectigo
the12volt.com spacer
Support the12volt.com
Top
the12volt.com spacer