the12volt.com spacer
icon

1995 corvette door locks , autopage rs915


Post ReplyPost New Topic
< Prev Topic Next Topic >
039c3 
Member - Posts: 31
Member spacespace
Joined: May 29, 2003
Posted: February 23, 2014 at 4:18 PM / IP Logged  
I've read through 12 pages of various Corvette topics here & can't find a definitive answer. Here are my parameters and my research:
Car is a 1995 Corvette coupe.
System is an Autopage C3-RS915.
For the door locks, the alarm detail here says this:
95-96 Corvette alarm detail link
Door Lock      RED / Black      Driver's Kick Panel
Door Unlock      ORANGE / Black      Reverse Polarity
My install manual shows a 3-wire output with green, red, and blue wires:
Green: (+) Unlock, (-) lock pulse output
Red: + 12V
Blue: (+) Lock, (-) unlock pulse output
The manual shows a maximum of 500ma for it.
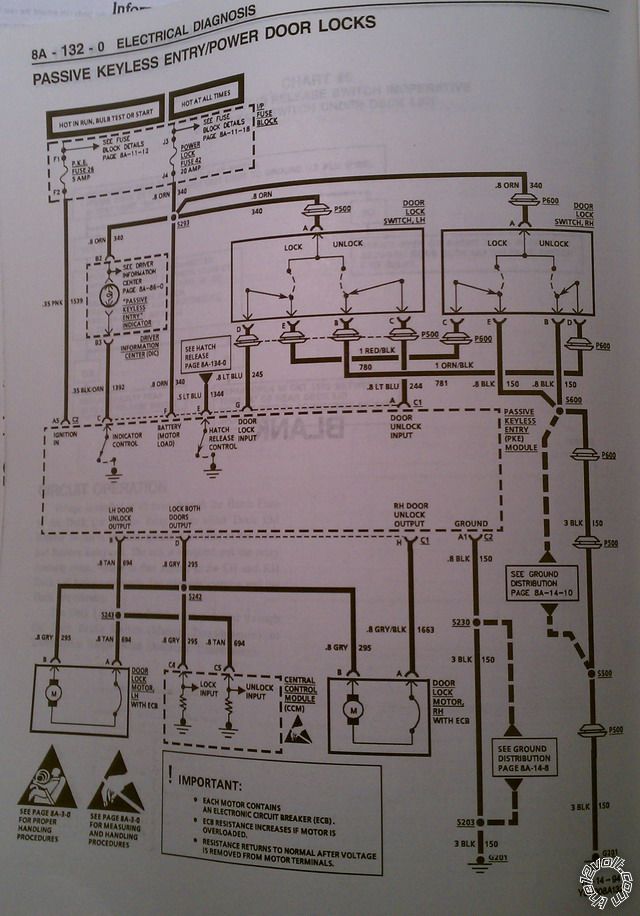
My shop manual shows the door switches have 5 wires (none are illumination), with one supplying constant voltage, two on the passenger side supplying ground, and two from the passenger switch supplying ground to the driver switch (these are the RED / black and ORANGE / black as listed above). The remaining two wires on the driver switch connect to the passive keyless entry module.
The diagram and circuit operation shows the passive keyless entry module getting +12V from the driver switch on one of two light blue wires (one for lock, one for unlock). The exact wording is:
During a door switch "lock" operation, voltage is applied to terminal "G" of the PKE module connector C1. This voltage will be applied from the LH door lock switch when either the LH or RH door lock switch is activated. During an "unlock" operation, the description is the same as above except voltage from the LH door lock switch is applied to terminal "A" of the PKE module connector C1.
I've attached a picture of the shop manual's door wiring page for reference.
This post for a 1994 Corvette indicates I should cut the RED / black and ORANGE / black wires in the driver kick panel and then apparently use the 5-wire dual relay setup.
My questions:
1. Do I need to cut the RED / black & ORANGE / black wires and then use 2 relays as per the 5-wire setup?
2. Could I direct wire (tap) the Autopage blue and green wires to the light blue wires that go from the driver switch to the PKE module?:
AP blue to PKE terminal "G"
AP green to PKE terminal "A"
Would the (-) pulse from the AP wires have a detrimental effect on the PKE module? If so, it appears a workaround could be made using relays so that the PKE only saw positive voltage, but this defeats what I thought might be simpler wiring.
Thanks for any assistance.
1995 corvette door locks , autopage rs915 -- posted image.
i am an idiot 
Platinum - Posts: 13,693
Platinum spaceThis member consistently provides reliable informationspace
Joined: September 21, 2006
Location: Louisiana, United States
Posted: February 23, 2014 at 4:44 PM / IP Logged  
You must cut the 2 wires and use the 2 relays. GM cars from that era have high current switches that did not use relays at all. There is no other way to do it.
howie (aka: harryharris)
Silver - Posts: 355
Silver spacespace
Joined: February 17, 2014
Location: Florida, United States
Posted: February 23, 2014 at 4:57 PM / IP Logged  
Use the DEI 451 lock module, it plugs straight into your Autopage unit.
Test before boxing up.
039c3 
Member - Posts: 31
Member spacespace
Joined: May 29, 2003
Posted: February 23, 2014 at 10:25 PM / IP Logged  
Thank you both for the advice & the module info.
039c3 
Member - Posts: 31
Member spacespace
Joined: May 29, 2003
Posted: March 08, 2014 at 6:09 PM / IP Logged  
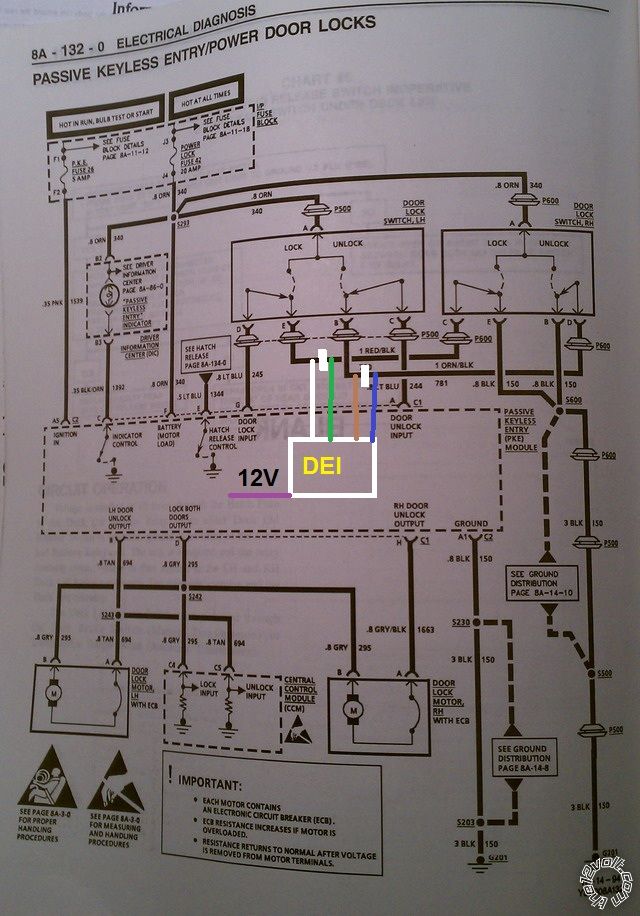
I bought the DEI 451 module and cut the RED / black and ORANGE / black wires to the driver door switch at the driver side kick panel. After installation, the door switches worked normally. I blew the DEI fuse when I tried the remote lock. I powered the violet DEI wire with 12 volts, and connected the others as follows:
W/B: Driver switch R/B (lock)
Br/B: Driver switch O/B (unlock)
G/B: Other side of R/B wire
Bl/B: Other side of O/B wire
As noted, the DEI unit plugs into my RS915.
I edited the above photo and added in how I have the DEI 451 wired.
The DEI instructions say the W/B and Br/B must go to the switch side, and the other two go to the motor side. The Corvette does not connect the switches directly to the motors, they send +12V to the keyless entry module, which connects to the motors.
My best guess is that I wired these backwards, I should consider the passenger side the switch side and the driver side the motor side. It's been a long day, so I'll check it more tomorrow.
1995 corvette door locks , autopage rs915 -- posted image.
039c3 
Member - Posts: 31
Member spacespace
Joined: May 29, 2003
Posted: March 08, 2014 at 10:50 PM / IP Logged  
UPDATE
I wired it backward. I reversed the 4 wires and it works as it should.
For future reference if anyone is doing another Corvette with the 451 module:
Cut RED / black and ORANGE / black wires in driver kick panel.
WHITE/ Black to R/B going to passenger switch
BROWN / Black to O/B going to passenger switch
GREEN/ Black to R/B going to driver switch
Blue/Black to O/B going to driver switch
You can use the larger orange wire @ the driver kick panel for power.
howie (aka: harryharris)
Silver - Posts: 355
Silver spacespace
Joined: February 17, 2014
Location: Florida, United States
Posted: March 09, 2014 at 1:42 AM / IP Logged  
The trick on any motor wire is to cut one of them then operate the lock/unlock via key, switch OEM fob etc. The side of cut wire that flashes 12V+ is 87a or brown.black WHITE/ black, AKA NC.
Test before boxing up.
howie (aka: harryharris)
Silver - Posts: 355
Silver spacespace
Joined: February 17, 2014
Location: Florida, United States
Posted: March 09, 2014 at 1:46 AM / IP Logged  
Just looking at those diagrams, I'd have gone for gray and tan underneath but I'm being wise after the event.
Scrub that, I'm wrong.
Test before boxing up.
039c3 
Member - Posts: 31
Member spacespace
Joined: May 29, 2003
Posted: March 09, 2014 at 8:40 PM / IP Logged  
Now that the door locking has been conquered, my next issue is the car remote starting and then stalling a few seconds later. I read in another thread here it is best to continue an existing thread than to start a new one.
When I first installed the system, it seemed to remote start and run OK, but I was more focused on the door locks. I don't recall changing any programming, but now it starts and runs a few seconds and stalls, and will not re-start with the key (the starter will not engage). Doing some reading, it appears the theft deterrent system is kicking in. If I wait 4 minutes and don't try to remote start, it will re-start with the key. The security light on the dash is on steady during non-starts.
I'm using a PLJX bypass that was programmed per their instructions before connecting the brown wire to the Autopage. Here's the PLJX wiring I'm using per their instructions:
Pink: Connected to GM ignition switch pink wire, hot in run and start.
Blue: Connected (tapped/soldered, as are all wires) to VATS wiring harness WHITE/ black wire (it has two, the PURPLE / white wire shows connected to ground).
Black: Connected to a factory ground point on the kick panel.
Red: Connected to fused battery +12V
Brown: Connected to the Autopage BROWN / black wire that sends a ground signal while remote starting.
Here's the PLJX manual:
http://www.bypasskit.com/Manuals/922_PLJX_H00_S00_D00_I_EN.pdf
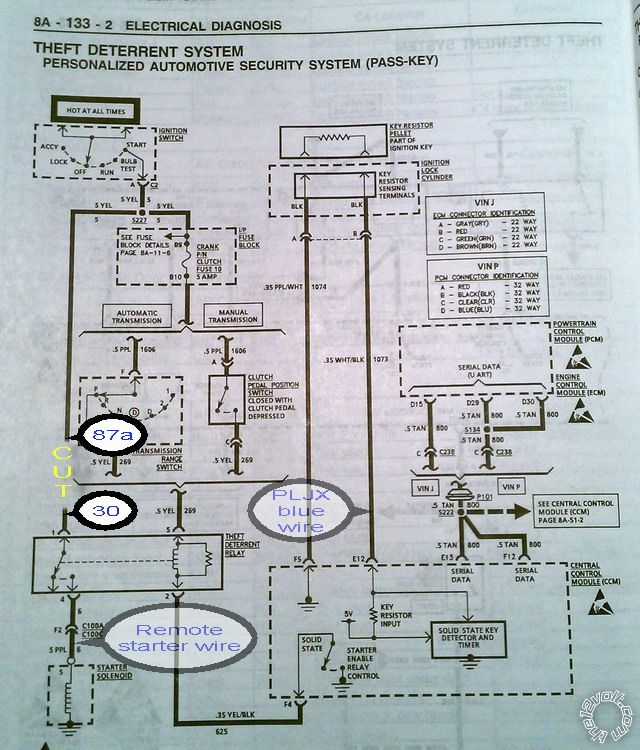
I have the Autopage wired to the theft deterrent relay as follows (see picture below):
Relay pin / function / Autopage connection
4 / To starter solenoid / Remote start purple wire (sends +12V to start)
1 / From ignition switch / Was cut and an anti-grind relay installed, terminals 87a and 30, so this is normally closed unless the remote start is engaged (the relay coil is fed by +12V and the same ground feed wire from the Autopage unit), thus keeping the key switch from operating
2 / Output from central control module (input for this is the VATS wiring) / Unmodified
5 / Output from clutch safety switch / Unmodified
The shop manual describes the theft deterrent circuit operation as follows:
Arming sequence is with ignition off, a door is opened. The "security" light flashes. When a lock switch is moved to "lock", momentary voltage goes to pin C4 of the central module. Security indicator stays on. When the door is closed, ground is removed from C12 or D16 (door switch inputs). System armed, indicator on for a few seconds then off.
Cancellation takes place when either door lock is moved to unlock before closing the door. Doing this sends a momentary voltage to terminal C5 of the central module.
Disarming takes place by turning either outside lock with the key to unlock. This applies ground to terminal D15 of the central module, disarming the system.
The Autopage has a wire (H6/3) that can output a 1 second ground to disarm a factory system. Maybe this is what I need to connect to terminal D15? The manual shows a light green wire performing this function from the driver door lock that I could tap at the kick panel.
Here's the Autopage manual's text regarding the wire's functions (cropped to the function I'm interested in):
H6/3 Pink wire – (-) 200mA Programmable Output
Factory Security Disarm Signal Output –
This wire is designed to disarm a factory installed security system. This wire sends a negative (-) 1 seconds pulse upon a remote start and remote door unlocking. Some factory systems must be disarmed to allow remote starting. In most cases, this wire may be connected directly to the factory alarm disarm wire. The correct wire will show negative ground when the key is used to unlock the doors or trunk. This wire is usually found in the kick panel area in the wiring harness coming into the car body from the door.
Thanks for any help with this project. If the above disarm wire works, I'll update the thread for future reference.
Here's a page from the shop manual showing what I've done on the theft deterrent relay:
1995 corvette door locks , autopage rs915 -- posted image.
039c3 
Member - Posts: 31
Member spacespace
Joined: May 29, 2003
Posted: March 09, 2014 at 8:55 PM / IP Logged  
UPDATE
Despite the line in one of the "Lethal Weapon" films that it's always the red wire, in this case it was the pink (H6/3) wire. I programmed it to send the (-) pulse, and the system operates fine via remote start and normal key start.
I hope my work here will help another sometime down the road.
Page of 2

  Printable version Printable version Post ReplyPost New Topic
You cannot post new topics in this forum
You cannot reply to topics in this forum
You cannot delete your posts in this forum
You cannot edit your posts in this forum
You cannot create polls in this forum
You cannot vote in polls in this forum

  •  
Search the12volt.com
Follow the12volt.com Follow the12volt.com on Facebook
Thursday, October 31, 2024 • Copyright © 1999-2024 the12volt.com, All Rights Reserved Privacy Policy & Use of Cookies
Disclaimer: *All information on this site ( the12volt.com ) is provided "as is" without any warranty of any kind, either expressed or implied, including but not limited to fitness for a particular use. Any user assumes the entire risk as to the accuracy and use of this information. Please verify all wire colors and diagrams before applying any information.

Secured by Sectigo
the12volt.com spacer
Support the12volt.com
Top
the12volt.com spacer