the12volt.com spacer
icon

fiberglassing procedure


Post ReplyPost New Topic
< Prev Topic Next Topic >
_juice_ 
Member - Posts: 10
Member spacespace
Joined: January 10, 2006
Location: United States
Posted: January 15, 2006 at 5:12 PM / IP Logged  
well i looked around to see what i needed to do next and couldnt really find an exact answer to my question...so here it is
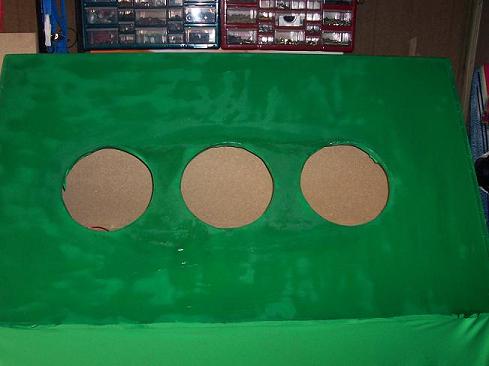
i built the entire enclosure from 3/8 fiberboard, stretched some really elastic cloth material over it and stapled it in place..then i mixed the resin and brushed it on(it's curing right now) so what do i do next? it isnt going to be under any pressure at all, it's just so i can paint to make it look cleaner.
do i keep adding just resin? or do i need to add fiberglass matt and resin?
also what exactly is the purpose of putting the fleece or whatever material down first? could i just brush the resin straight onto the fiberboard? im just not sure what the purpose is...seems it would be easier to put it straight on the board....
i do understand the purpose of the fleece when your building it with the fiberglass as the frame like most of the ones on here i've seen...can someone clarify this for me?
sorry for all the questions too...im just starting to do this and dont want to mess up on the first project..i have done some boxes with the premixed kitty hair and it was a pain in the butt...anyways thanks for the help
there is no cure for stupidity
_juice_ 
Member - Posts: 10
Member spacespace
Joined: January 10, 2006
Location: United States
Posted: January 15, 2006 at 5:15 PM / IP Logged  
heres where it is right now
fiberglassing procedure -- posted image.
there is no cure for stupidity
_juice_ 
Member - Posts: 10
Member spacespace
Joined: January 10, 2006
Location: United States
Posted: January 15, 2006 at 5:17 PM / IP Logged  
let the insults begin...LOL
there is no cure for stupidity
visionsss 
Member - Posts: 19
Member spacespace
Joined: October 09, 2004
Location: Washington, United States
Posted: January 15, 2006 at 10:54 PM / IP Logged  

It looks like your rings for  your speakers aren't even 3D. If the whole entire speaker box is made of MDF and you just want to paint it then you dont even need to glass the box to paint it. I usually just rough up the MDF  with some 120gritt to take the shine off so it will hold the primer, sand, primer, sand, priner, paint.  Sometimes i will use a little bondo or glazing putty to hide inperfections.

The whole point to stretching fleece is to create 3D designs. You can stretch the fleece to make any design you want. Once the fleece is glassed and you have the shape that you want. You add more layers of chopped matt either to the front or from behind in order to strengthen the form.

If every side on your box is MDF and you just stretched cloth over it with a coat of resin. I would just rough up the entire box, use a thin layer of bondo or glazing putty and start primer and paint. The resin and matt are only used to add strength.

Is that the answer you were looking for?

Fred Kincaid
Visions Sound & Security
GPS Northwest
_juice_ 
Member - Posts: 10
Member spacespace
Joined: January 10, 2006
Location: United States
Posted: January 16, 2006 at 7:14 AM / IP Logged  
yes that helped me alot.
i wish i would have taken some pics of the box before the cloth and resin...the face of the box isnt flat like it looks in the pic. it is acually sitting about 6" back into the box, so there is a curve to the glass part of it to give it somewhat of a 3D look.
i tried to sand and paint the bare wood before, it just kept absorbing every coat of primer i sprayed on..after about the 5th coat of primer, i finally just gave up
MDF...im guessing thats what im calling "fiberboard" or as they call it at LOWES..project board?
ive never heard it called MDF around here
I also wasnt sure how many coats of just resin to put on before i started adding the matt...so what i got from your post is...stretch the fleece, resin it one time and let it harden( that builds the shape you want)then you go back and start adding the matt in layers (this builds the strenth of the structure) i got the part about the "Thumb test" then you sand,bondo,sand,primer,sand (repeat till smooth) then paint.
sorry i sound like an idiot, im trying to learn and I cant afford alot of mistakes (money & time)
thanks again for the help,
matthew
there is no cure for stupidity
HottAccord 
Silver - Posts: 247
Silver spacespace
Joined: August 12, 2004
Location: United States
Posted: January 16, 2006 at 5:20 PM / IP Logged  
Hey Juice, you've got the jist of it. Home Depot & Lowes carry MDF (Medium Density Fiberboard), but don't let the name fool you, this is some good & thick wood! Commonly comes in 3/4" thickness. Id say, go get some and start your project over. Let us know how you progress, good luck!
Im a fiberglass whore!!
visionsss 
Member - Posts: 19
Member spacespace
Joined: October 09, 2004
Location: Washington, United States
Posted: January 16, 2006 at 10:22 PM / IP Logged  

Correct on the procedure.

I can't see the wood in the pic very well but it looks like the wood that you are using is not MDF. With MDF you can't actually see little particals of wood that are glued together which you can in "project board". MDF is more or less just glue and sawdust; but it sure is great to work with! I believe thats why you are having the problem with the other wood soaking up all your primer. MDF wont hog up your primer but it does have a smoother surface that the primer wont even stick to unless you rough it up. Thats why I "take the shine off.

Whether you start over or not. Make sure you get MDF next time. Let us know if you have more questions.

Curious, what are you putting this in? It looks like a big box.

Fred Kincaid
Visions Sound & Security
GPS Northwest
bellsracer 
Silver - Posts: 703
Silver spacespace
Joined: January 14, 2006
Location: United States
Posted: January 17, 2006 at 3:42 AM / IP Logged  

Wow... where to begin... I am sorry to say, but this one is going to have to start over. First I would start with making sure you have the right materials. MDF and fleece (or cheesecloth) would be the materials to get. It looks like you are using elastic-polyester or spandex material for this. Big no-no. unless you are mounting 5" speakers or smaller this won't hold up at all. If you are mounting subs, even 6.5" or larger definitely look for fleece. if doing 8" sub or larger expect to start layering F/G on its interior at LEAST 3/8" thick. From what I can see in the picture it does look like you have MDF. Just make sure it is at least 3/8" thick too. I prefer to go 1/2" to be honest.

Now it is a matter of construction of the box. Unless you are planning to do a bottom mount on the speakers, the holes for your box don't look like they will mount speakers. (if you are planning on doing the standard top mount installation read on, otherwise ignore the rest of this paragraph) Since you are mounting the speakers 6" deep in the front of the box, you need to make a ring sandwich that are the size of the speaker mounts.  Secure the inner ring to the position that you want to mount the speaker. Staple in the fleece and stretch it into place. before you begin glassing, mask the outer ring with masking tape. I recommend the green masking tape (I think 3m calls it their 355 tape) or if you can't find it, use the 14+day blue tape you can find at Lowes. (paint dept) mix and apply your resin to the fleece. While it is still fresh, put the outer ring in place and secure it with clamps. This will create a flat sturdy base for your speakers to mount.

I know I said some rather confusing things in here. I'll draw up some diagrams and hopefully can get it uploaded within 48 hours to better explain what I am talking about. I hope this helps. PM me if you have ?'s

Never send your ducks to eagle school.
The difference between ordinary and extraordinary is that little extra.
The 3Ls of life: Learn from the Past, Live for the Present, Look to the Future.
_juice_ 
Member - Posts: 10
Member spacespace
Joined: January 10, 2006
Location: United States
Posted: January 18, 2006 at 7:30 AM / IP Logged  
lmao at the remark about the beanbag game sprahl85!!!hahaha
well...the wood says it's "medium density project board" on the rack at lowes, BUT they also have another kind of project board and it's alot smoother than what i have and cost about $7 more per sheet...so i guess thats what i need from now own.
the fg isnt really doing anything on the box except creating a curved look..it isnt supporting any load at all, the speakers mount directly to the face of the MDF, the glass where the speakers are mounted is actually layed out smooth across the wood and it curves upward as it goes out toward the edges of the box(really hard to explain..sorry)
but anyways, i didnt scrap the whole project...i did go out there with a gringer and cut the glassed part out and started resanding it so i can try it the way you guys are telling to...Im going to get the right materials this time too...lol, no more polyester or whatever i used
"visionsss" this is part 1 of a 2 boxes im going to put in a 97' chevy 3500 crewcab dually...i wanted to make it 1 single box but there isnt any way i could fit it through the doors.
thanks for all of the advice guys, if i get stuck again, i'll call upon you all again for more advise.
laterz,
matthew
there is no cure for stupidity
tuscani 
Member - Posts: 27
Member spacespace
Joined: January 06, 2006
Posted: January 18, 2006 at 10:32 PM / IP Logged  
you can use spandex or fleece... all will work.. I use a spandex type material in all my projects. I like it because I dont need to presoak the fleece, I can just lay mat right over the top and the stuff is so porus that it will soak straight through. Then you just add a couple more layers of mat (or more depending on size I use 2.5oz Kevlar reinforced) so any gap spanning 10" or less requires a minimum of 2 layers, usually 3 for safe keeping.
Sorry to hijack thread.
Page of 2

  Printable version Printable version Post ReplyPost New Topic
You cannot post new topics in this forum
You cannot reply to topics in this forum
You cannot delete your posts in this forum
You cannot edit your posts in this forum
You cannot create polls in this forum
You cannot vote in polls in this forum

  •  
Search the12volt.com
Follow the12volt.com Follow the12volt.com on Facebook
Sunday, April 28, 2024 • Copyright © 1999-2024 the12volt.com, All Rights Reserved Privacy Policy & Use of Cookies
Disclaimer: *All information on this site ( the12volt.com ) is provided "as is" without any warranty of any kind, either expressed or implied, including but not limited to fitness for a particular use. Any user assumes the entire risk as to the accuracy and use of this information. Please verify all wire colors and diagrams before applying any information.

Secured by Sectigo
the12volt.com spacer
Support the12volt.com
Top
the12volt.com spacer