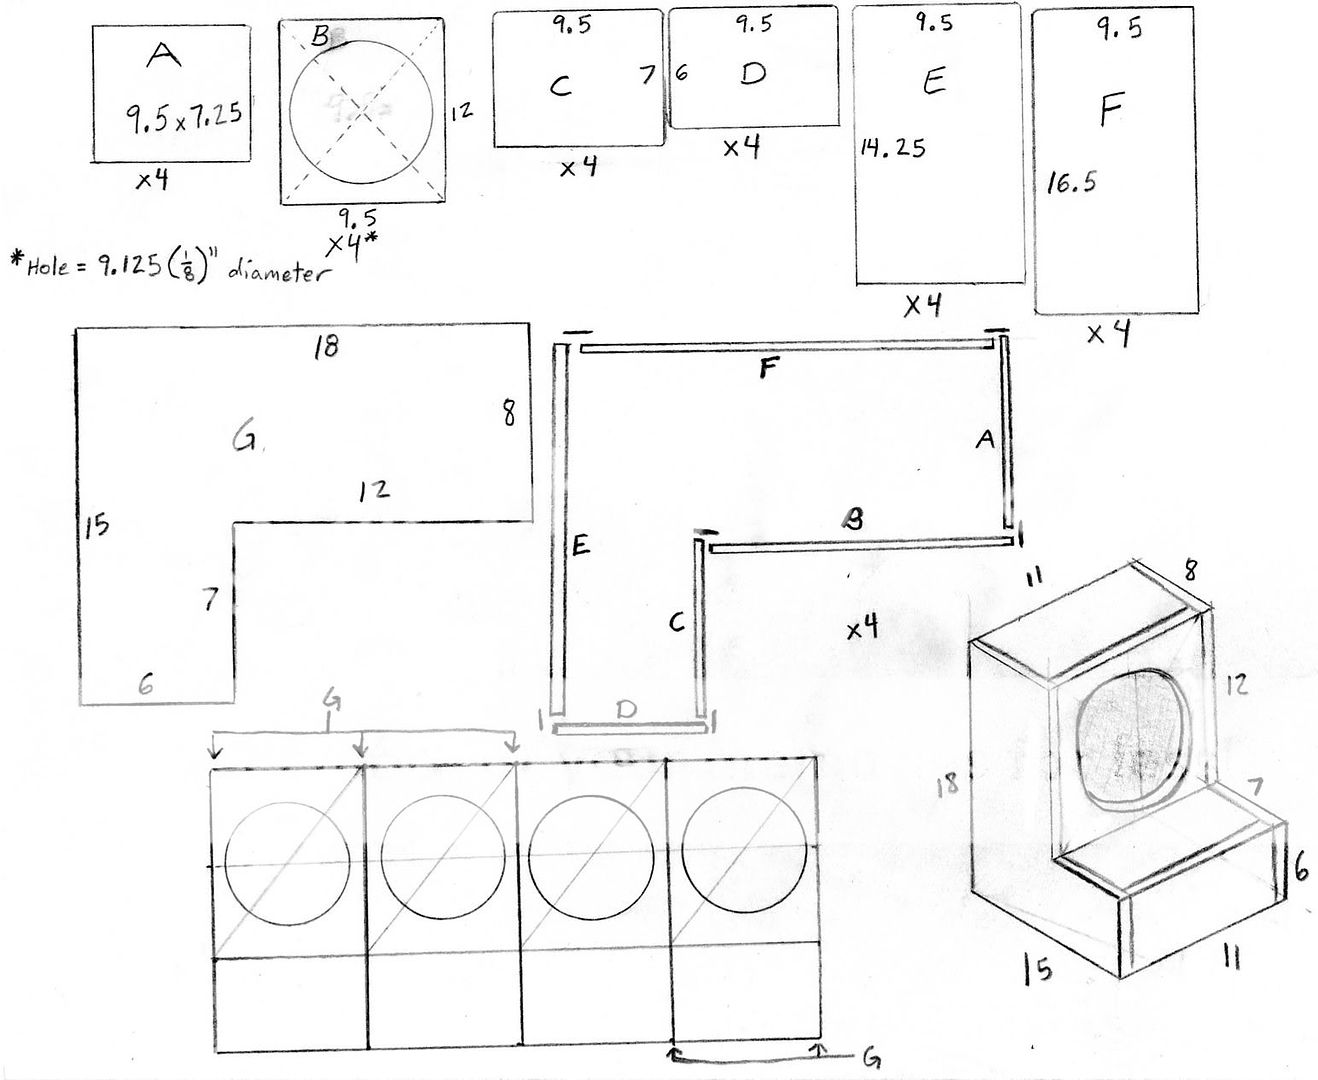
[IMG]https://i3.photobucket.com/albums/y69/DonsArtNGames/img001a.jpg[/IMG]Sorry for the long wait. This enclosure is 41.75 inches wide. 18 inches tall and 15 inches deep at it's bottom (measure before continuing; We could not find our '90 GT measurements and manual). It is setup as a type 1 sealed enclosure to give better, smoother bass response. This will also help reduce the size and maintain simplicity. The material this is designed for is 3/4 inch MDF. Sorry that the plan is not to scale. (He almost forgot about it and had to be reminded) Now to the details of it.
Across the top of the image are 6 parts for the setup. You will need to make 4 of each of those boards. The middle left image (marked G) will have 5 of them made. The measurements are in inches. The middle picture is how the top boards will be assembled. The tabs show where the edge and the face of the boards will meet and made flush. The letters show you which board is which. That one is drawn to scale. All the edges that meet are the 9.5 inch edges (for those who have not figured it out >.< ) The G panels will be dividers and ends for the box. Panel B is where you will be cutting your mounting hold for the speaker. It is exactly 9.125 (1/8) inches around. Although the plans show the cutout to be in the center of the panel, the hole can be shifted up about an inch. doesn't sound like much, but that will give you an extra inch to round out the joint of this "L" shaped box using F/G. With the speaker mounted, there will be about 1 to 1.5" from the back of the speaker to the inside back wall of the box.
Variation : Don't think we didn't forget about your wanting to build with fiberglass. A really cool variant that was created for this will let you use fiberglass. Your base for this idea will use jersey (knit type preferably; the stretchy stuff). Get a hold of 5 wooden cones. They should not be more than a couple of inches high. This should be easy enough for you to come by at craft stores. If not, get taller cones and cut them to length. If you have a rourter available, use a 1/4" roundoff bit around the top, face sides, front top edge, and speaker hole. Round off the tops of the cones so they cannot poke through the jersey if they are sharp (or to whatever roundness you like) and glue them to the face of the box along the G panel's edge (at the top pointy part pointing the same direction as the bottom fo the "L") Next make 4 rings that are the same outer diameter of the speaker ring of the subs out of 3/4" MDF. The rings should be about 1.5 inches wide. use the 1/4 inch router on the outer edges of the rings. Cover the rings with Green automotive tape (preferred) or blue painters tape. Now for the trick part. Stretch and glue the Jersey around the front of the enclosure. Using C-Clamps, clamp the rings in place where your speakers will be. Adjust the jersey to ensure that it is even and looks nice. At this point, it should look like that the speakers are pulling the F/G in. The bottom half of the "L" is a good base to build a display panel/area for the rest of the equipment. For the F/G part you are going to start at the rings and build up from there. Unclamp your first ring and apply your resin to the Jersey where the ring covers. Then re-clamp your ring into place while the resin is still soft. Repeat for the rest of the rings. While the speaker mount areas are drying, go ahead and F/G the rest of the jersey. Build it up with F/G mat to about 3 layers (or about 1/4") thick. Once all that has cured, prime, sand and shoot it from there.
If the picture is too small, here is a link to a big version of it: https://i3.photobucket.com/albums/y69/DonsArtNGames/img001.jpg
I hope this works out well for you and I can't wait to see the results.
Ganbatte ne (Do your best)
Bells Racers
PS any questions?
Never send your ducks to eagle school.
The difference between ordinary and extraordinary is that little extra.
The 3Ls of life: Learn from the Past, Live for the Present, Look to the Future.


 Topic Closed)


 Printable version


