the12volt.com spacer
icon

How to make this fiberglass?


Post ReplyPost New Topic
< Prev Topic Next Topic >
dabper 
Member - Posts: 7
Member spacespace
Joined: December 22, 2005
Location: Thailand
Posted: March 28, 2006 at 2:30 PM / IP Logged  
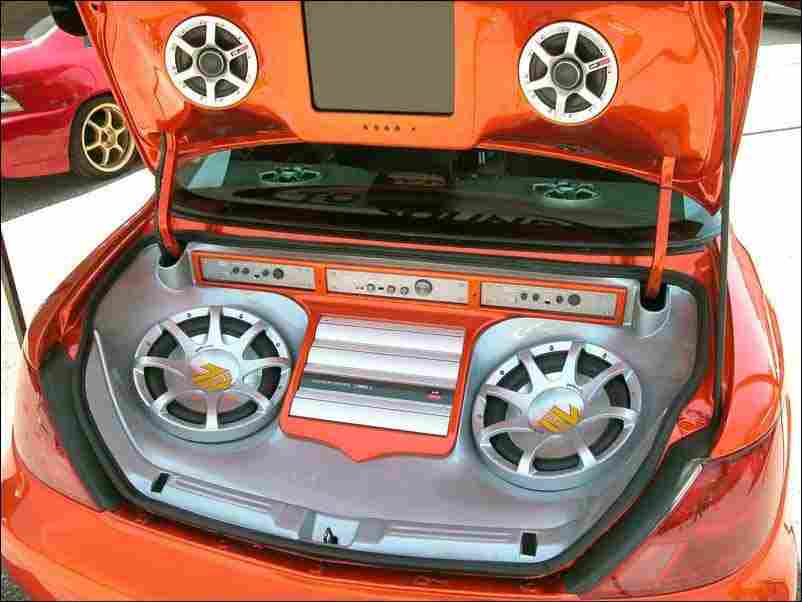
How to make this fiberglass? -- posted image.
Fiberglass in silver area.
hello evey body
schmoo 
Copper - Posts: 62
Copper spacespace
Joined: April 21, 2005
Location: Canada
Posted: March 28, 2006 at 5:09 PM / IP Logged  
with alot of work.  You will have to make a frame(likely several) to create the general shape, then stretch fleece over that and then start to resin.  I would not look to doing this as a first time at fibreglassing. Try something smaller and slowly work your way to that.  That would come from a lot of experience.
a true canadian eh!
crazyoldcougar 
Copper - Posts: 185
Copper spacespace
Joined: March 03, 2006
Location: Canada
Posted: March 28, 2006 at 7:25 PM / IP Logged  

that is a lot of planning, however actual fiberglass is probably everything you see...i would very well imagine everything underthat is MDF..there would be two separate boxes one for each sub...there would be a floating platform for the amp rack that would be built after and bolted down to it..

Basically i would put money down that the "silver: portion of fiberglass is only a cover for everything underneath..there is probably a couple optima under there too...maybe some processing equipment too...

honestly the hardest part of doing this would be to get the openings on the door hinges right...you will need a buddy to help you open and close the trunk while you were in it..but aside from that you will need some weather stripping, a little bit of fiberglass knowledge and two sub boxes...after that it is pretty simple..

i cant tell if they incorporated the factory latch panel or not into the back side of the trunk but i would assume they just made a mold of it and blended it into the rest of the design...

Fiberglass Guru.
crazyoldcougar 
Copper - Posts: 185
Copper spacespace
Joined: March 03, 2006
Location: Canada
Posted: March 28, 2006 at 7:40 PM / IP Logged  

ANYWAY as for building this...

you would like i said need the two sub boxes alligned on whatever they will be sitting on in the final project...you would probably fasten them to a MDF false floor...

once the boxes are alligned..you need to build the floating piece for the amp rack...you can see it is sitting about 3 - 4" higher then the subs (this adds to the contours) pnce you have the size and shape of "said" amp rack you need to support it very well on a set of stilts...

next remove all the weather stipping around the trunk...

now you foil over the top of your sub boxes...

basically glue in the rings for around the trunk hinges...glue them to the back portion of the amp rack...this particular ones look like they may have been ABS pipe but i dont know what they used..

after everything is in the place you want it...strectch the fleece or grill cloth or what ever fabric you will using over the entire trunk...( i really hope you foiled and taped everything in your trunk and around it...)

place you weather stripping back...letting the fabic sag a little wee bit in the centre..

now you screw down a couple rings that are the exact size ( or slightly larger) of your speakers into the speaker boxes, now you should pretty much have the shape your after...you may have to staple a littlebit along the back portion of the amp rack to get a 90* corner in there...

add a couple layers of matt to it, sand and add some kitty hair to it...let it cure, pull it out...you dont need to build up the flat surfaces on th eamp rack thoug..that could create problems later in the install..

once hard you can remove the stilts holding up the amp rack, and remove the weather stripping (it will be garbage now) you will have to get a new one for your trunk or hopefully you went to a wreckers to get some in the first place) remove the rings from the sub boxes..if you want to fasten the panel in place using the sub's screws then you should resin over the centre of the holes and when youremove the rings resin over where the screw holes where..you can carefully build that area up later

now you should be able to pop out the panelsand and finish as desired

Fiberglass Guru.
crazyoldcougar 
Copper - Posts: 185
Copper spacespace
Joined: March 03, 2006
Location: Canada
Posted: March 29, 2006 at 5:42 PM / IP Logged  

ahh the more i look at it it looks more like they may have made a frame accross the back side as well where the trunk latch is...they just traced it onto a piece of cardboard and then transfered the shape onto MDF...then cut her out trimed it and then most likely cut out the centre of the piece so it was just a 1" thick outline piece..then installed that to the false floor aswell..

you will basically build a skeleton out of MDF and use it to support the fabric...later you can remove some of the braces if you so wish...just remember to foil them..and you will only be able to remove the braces that protrude outward...the ones that pull the fabric down will have to stay, since you will have to fasten the fabric to them...you may be able to foil those braces too and break them off once there is a couple layers of glass down though...but the staples may break the shape...and you will be left with a boat load of kitty hair work to do..

Fiberglass Guru.

Sorry, you can NOT post a reply.
This topic is closed.

  Printable version Printable version Post ReplyPost New Topic
You cannot post new topics in this forum
You cannot reply to topics in this forum
You cannot delete your posts in this forum
You cannot edit your posts in this forum
You cannot create polls in this forum
You cannot vote in polls in this forum

  •  
Search the12volt.com
Follow the12volt.com Follow the12volt.com on Facebook
Saturday, April 27, 2024 • Copyright © 1999-2024 the12volt.com, All Rights Reserved Privacy Policy & Use of Cookies
Disclaimer: *All information on this site ( the12volt.com ) is provided "as is" without any warranty of any kind, either expressed or implied, including but not limited to fitness for a particular use. Any user assumes the entire risk as to the accuracy and use of this information. Please verify all wire colors and diagrams before applying any information.

Secured by Sectigo
the12volt.com spacer
Support the12volt.com
Top
the12volt.com spacer