


how will i finish assembling my sub boxes
Home /
the12volt's Install Bay /
Car Audio / how will i finish assembling my sub boxes ( Topic Closed)


Posted: September 28, 2008 at 10:44 AM / IP Logged
 Now my other problem is how to cut the baffle board to fit it around the large 12.5" tube I bought to mount the subs into.As you can see, the tube fits snugly into the box itself, so the baffle board will either be cut really close to the side of the box or it will be a two piece baffle board that will go around the tube.The other problem with this is, the "circle" I need to cut to slide the tube into, will actually need to be a parabola/oval so the tube will slide in straight... How do i figure out how big this hole needs to be, I don't want there to be a bunch of extra space around the tube.
 Essentially when its all done the tube will be mounted in the box like this..... only better :)
 I really need some help to finish this up professionally, and neatly.I have the skill, I just need to know HOW to do what I need to do to finish it up.
Posted: September 28, 2008 at 12:02 PM / IP Logged
Posted: September 28, 2008 at 12:17 PM / IP Logged
Posted: September 28, 2008 at 12:29 PM / IP Logged
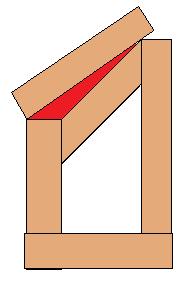 The red portion being where you will have a gap as of right now.
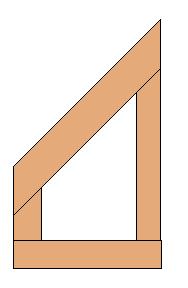
Posted: September 28, 2008 at 12:44 PM / IP Logged

Posted: September 28, 2008 at 12:48 PM / IP Logged
Sorry, you can NOT post a reply.
This topic is closed.
 Printable version
| You cannot post new topics in this forum You cannot reply to topics in this forum You cannot delete your posts in this forum You cannot edit your posts in this forum You cannot create polls in this forum You cannot vote in polls in this forum |

| Search the12volt.com |
Follow the12volt.com 
Friday, May 17, 2024 • Copyright © 1999-2024 the12volt.com, All Rights Reserved • Privacy Policy & Use of Cookies

Friday, May 17, 2024 • Copyright © 1999-2024 the12volt.com, All Rights Reserved • Privacy Policy & Use of Cookies
Disclaimer:
*All information on this site ( the12volt.com ) is provided "as is" without any warranty of any kind, either expressed or implied, including but not limited to fitness for a particular use. Any user assumes the entire risk as to the accuracy and use of this information. Please
verify all wire colors and diagrams before applying any information.
