the12volt.com spacer
icon

angle and bracing in MDF


Post ReplyPost New Topic
< Prev Topic Next Topic >
txthunder31 
Member - Posts: 2
Member spacespace
Joined: September 05, 2006
Location: United States
Posted: September 05, 2006 at 7:44 PM / IP Logged  
I am attempting to build a enclosure out of 3/4" MDF with multiple angles. This is new to me and not sure how to build bracing for each side of the angle. If someone has pictures of this or could explain how it is done I would greatly appreciate it.
Audio solutions
Flakman 
Copper - Posts: 365
Copper spaceThis member has made a donation to the12volt.com. Click here for more info.spacespace
Joined: April 25, 2005
Location: United States
Posted: September 05, 2006 at 9:30 PM / IP Logged  
I have used CA glue and a nail gun to hold the position, then used bondo to stiffen and seal the seams. I'm sure there will be offered other techniques as well.
The Flakman
I feel strange. I have deja vu and amnesia at the same time.
John | Manteca, CA
stevdart 
Platinum - Posts: 5,816
Platinum spaceThis member has made a donation to the12volt.com. Click here for more info.spaceThis member has been recognized as an authority in Mobile Audio and Video. Click here for more info.spaceThis member consistently provides reliable informationspace
Joined: January 24, 2004
Location: Pennsylvania, United States
Posted: September 05, 2006 at 9:39 PM / IP Logged  

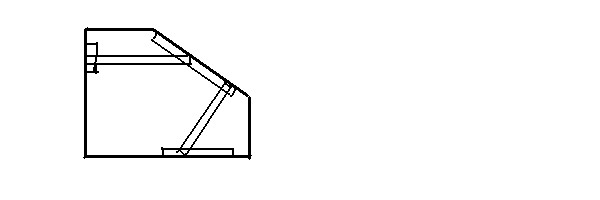
Bracing is not visible, so you can get by with using shortcuts as long as the result is stability.  To attach an angled side to another side that is not parallel, you can use cleats on those sides to attach the brace to.  A cleat is just a length of MDF that is used for this purpose;  it can be of any size that will secure the bracing.  A strong glue, like Gorilla glue that has a 4 hour cure time, is a good way to ensure that there is no movement in the bracing.  Here's an illustration I whipped up:

angle and bracing in MDF -- posted image.

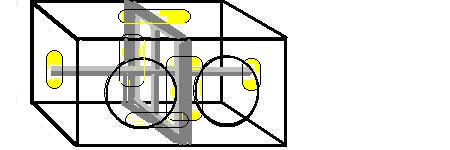
By using cleats, you don't have to worry about getting the angles on the ends of the braces the same as the angles of the box baffles.  And bracing can be accomplished using a wide variety of methods, so don't worry about having to follow a strict set of rules.  You generally want to brace the most susceptible baffle, the face, to the back of the box.  Also brace any large expanse of baffle whether it's sides, top or bottom, as these larger expanses are more prone to flexing than a smaller baffle.  Here's something I drew one time to demonstrate the weakest areas of a sub enclosure:

angle and bracing in MDF -- posted image.

The box-type configuration in the center is a brace created using cleats.  The connected cleats in themselves would brace this box properly from front to back, and this form of bracing is best accomplished by using one single piece of MDF and cutting the center out of it.
Build the box so that it performs well in the worst case scenario and, in return, it will reward you at all times.
txthunder31 
Member - Posts: 2
Member spacespace
Joined: September 05, 2006
Location: United States
Posted: September 05, 2006 at 10:30 PM / IP Logged  
Thank you guys so much this will be a new for me. The plan is to have two amps one on each side and then a 2.0 farad power cap in the center so it will have like 6 different angles on it. Thanks again
Audio solutions

Sorry, you can NOT post a reply.
This topic is closed.

  Printable version Printable version Post ReplyPost New Topic
You cannot post new topics in this forum
You cannot reply to topics in this forum
You cannot delete your posts in this forum
You cannot edit your posts in this forum
You cannot create polls in this forum
You cannot vote in polls in this forum

  •  
Search the12volt.com
Follow the12volt.com Follow the12volt.com on Facebook
Saturday, May 4, 2024 • Copyright © 1999-2024 the12volt.com, All Rights Reserved Privacy Policy & Use of Cookies
Disclaimer: *All information on this site ( the12volt.com ) is provided "as is" without any warranty of any kind, either expressed or implied, including but not limited to fitness for a particular use. Any user assumes the entire risk as to the accuracy and use of this information. Please verify all wire colors and diagrams before applying any information.

Secured by Sectigo
the12volt.com spacer
Support the12volt.com
Top
the12volt.com spacer