the12volt.com spacer
icon

2000 honda accord, 556hw


Post ReplyPost New Topic
< Prev Topic Next Topic >
spy1309 
Member - Posts: 6
Member spacespace
Joined: November 29, 2009
Posted: November 29, 2009 at 1:01 PM / IP Logged  

I have a 2000 Honda Accord on witch I installed a remote start, the remote start works perfectly with the key in the ignition switch, I bought a bypass unit 556HW and programed it for mode 2, all I get is a fast flashing of the red LED ,, input not detected".

I read alot of posts but I can't make it work, the install papers are not very clear, and I cannot find the 7 wire plug at the ignition switch, all I see are 2 green plugs in the top of the ignition switch with 4 wire each going to the transponder and the collors does not match with the ones from the schematics.

Can somebody give me some pointers I am freazing my but for 10 hours by now trying to figure this out , or at least where can I find this 7pin connector?

Thank you.

metz35 
Copper - Posts: 458
Copper spacespace
Joined: January 13, 2003
Location: Pennsylvania, United States
Posted: November 29, 2009 at 2:09 PM / IP Logged  
its pluged into the key cyclinder it may not have 7 wires but has 7 places for wires, it may be green or white, the other one is green with 5 spots for wires this IS NOT the right plug its the hardest one to get to
beegbie 
Copper - Posts: 341
Copper spacespace
Joined: August 17, 2002
Location: United States
Posted: November 29, 2009 at 4:20 PM / IP Logged  
It's been a long time since I installed one of these but mode 1 is for 2nd gen honda immobilizer and mode 2 is for 1st gen. Mode 2 should have it's own wiring diagram that shows a 4 pin plug. I hope this helps.
spy1309 
Member - Posts: 6
Member spacespace
Joined: November 29, 2009
Posted: November 30, 2009 at 6:45 PM / IP Logged  

Well I hope that you are right because already I spotted something, in the install papers it says that for the Honda Accords model 1999-2003 you have to use mode 2, for 2003 and up mode1, the other way you just described, what is the correct one?

Mode 2 does not show any diagram and the green plug who connects to the key transponder does not have 7 pins, at best 5.

beegbie 
Copper - Posts: 341
Copper spacespace
Joined: August 17, 2002
Location: United States
Posted: November 30, 2009 at 7:11 PM / IP Logged  
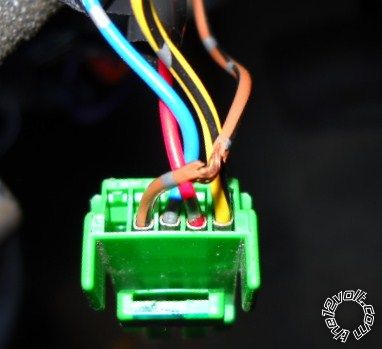
Look for a 4 pin plug with a red, blue ,yellow/black, and a BROWN / black. If you find this is will try to help.
spy1309 
Member - Posts: 6
Member spacespace
Joined: November 29, 2009
Posted: December 05, 2009 at 3:24 PM / IP Logged  

Ok I ve found the connector with the wires you listed it comes from the black box with the  plastic ring around the ignition.

Now what wires from the 556HW go where? The install instructions are very unclear, as you see there are only 5 slots not 7 as stated by the instructions and only 4 wires.

The factory instructions for the 556HW mode 2 are here   http://www.directedstore.com/manuals/556HW.pdf

2000 honda accord, 556hw -- posted image.

pitoaudiovisual 
Copper - Posts: 388
Copper spacespace
Joined: April 25, 2005
Location: Pennsylvania, United States
Posted: December 06, 2009 at 2:47 AM / IP Logged  
ok the orange and black of the bypass goes to the blue of the car. The red wire of the car must be cut in half the key side gets the yellow and black of the bypass and the yellow of the bypass goes to the other side of the red wire. the pink wire of the bypass goes to the yellow and black of the car. the blue and white of the bypass goes to the negative from the remote start. red of bypass is constant and black is ground.
Confidence is the key to any project!!
spy1309 
Member - Posts: 6
Member spacespace
Joined: November 29, 2009
Posted: December 06, 2009 at 2:09 PM / IP Logged  

Followed the instructions given still a no go, engine cranks but does not start., also if I connect the blue/white of the bypass to the negative output wire of the remote start even if I leave the key in the ignition still does not start, the soonest I remove the blue/white the car starts with the key in the ignition.

Also in the install diagram there is a green wire from the bypass who needs to be connected is reffered as the ,,refrence " wire, where that one gets connected?

This thing drives me nuts and is getting colderrrrrrr

pitoaudiovisual 
Copper - Posts: 388
Copper spacespace
Joined: April 25, 2005
Location: Pennsylvania, United States
Posted: December 06, 2009 at 3:49 PM / IP Logged  
are u doing the programming correctly meaning using mode 2 and verifing that it is in mode two with the led flashing twice and make sure u are using the black master key. as for the green reference  i dont kno cause it doesnt say where it goes and the only color u have left is brown and the programming does mention using the brown wire double check the wiring and make sure ur in mode 2 with the lights. if and only if u want to take a chance connect  the green wire to brown but i dont recomment it.
Confidence is the key to any project!!
spy1309 
Member - Posts: 6
Member spacespace
Joined: November 29, 2009
Posted: December 08, 2009 at 10:55 PM / IP Logged  

Yes when I programed the bypass I was getting 2 flashes, after that the soonest i try to remote start or even when I am starting the car with the key the LED flashes constantly and that is translated in the instructions as ,,no input detected".

:)) I think I tried to connect the green wire to the brown already still a no go .

Nobody ever did it for a 1999-2003 Honda?

Page of 2

  Printable version Printable version Post ReplyPost New Topic
You cannot post new topics in this forum
You cannot reply to topics in this forum
You cannot delete your posts in this forum
You cannot edit your posts in this forum
You cannot create polls in this forum
You cannot vote in polls in this forum

  •  
Search the12volt.com
Follow the12volt.com Follow the12volt.com on Facebook
Friday, May 3, 2024 • Copyright © 1999-2024 the12volt.com, All Rights Reserved Privacy Policy & Use of Cookies
Disclaimer: *All information on this site ( the12volt.com ) is provided "as is" without any warranty of any kind, either expressed or implied, including but not limited to fitness for a particular use. Any user assumes the entire risk as to the accuracy and use of this information. Please verify all wire colors and diagrams before applying any information.

Secured by Sectigo
the12volt.com spacer
Support the12volt.com
Top
the12volt.com spacer