the12volt.com spacer
icon

1998 cavalier, viper 5301


Post ReplyPost New Topic
< Prev Topic Next Topic >
smokeman1 
Platinum - Posts: 1,588
Platinum spaceThis member has made a donation to the12volt.com. Click here for more info.spaceThis member has been recognized as an authority in Mobile Security and Convenience. Click here for more info.spacespace
Joined: September 14, 2009
Location: Wisconsin, United States
Posted: March 17, 2010 at 7:40 AM / IP Logged  

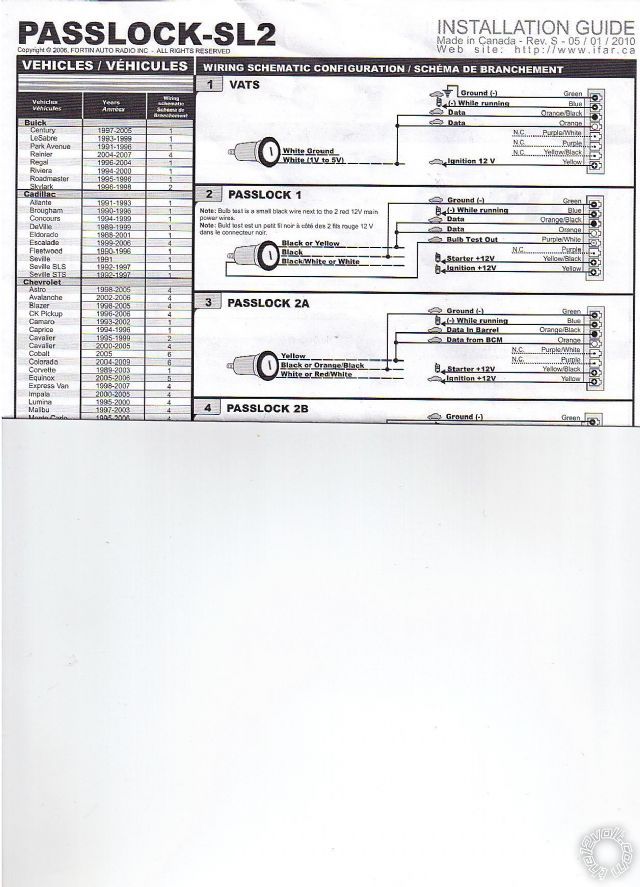
Working on putting in a Viper 5301 in my son's 1998 Cavalier. I have most of the wiring done and will be using a Fortin Passlock-SL2. My question is on the 8 pin harness showing the yellow/black and the yellow going to the remote starter, starter +12v and ignition +12v. Are these wires to be connected to the Viper 5301 Heavy Gauge Harness? H3/1 Pink ignition and H3/4 Violet? I feel I have most of the other wires on the Passlock figured out, but these two seem a bit confusing.

Also, anyone have an idea of a good way to hook up the rear defrost on this vehicle. not much info on this as to where is a good wire to get at. Tough to get at the wiring on this car because of the metal bracing under the dash.

Thanks

smokeman1 
Platinum - Posts: 1,588
Platinum spaceThis member has made a donation to the12volt.com. Click here for more info.spaceThis member has been recognized as an authority in Mobile Security and Convenience. Click here for more info.spacespace
Joined: September 14, 2009
Location: Wisconsin, United States
Posted: March 17, 2010 at 7:45 AM / IP Logged  

1998 cavalier, viper 5301 -- posted image.

Sorry all, forgot to upload the diagram on the first post.

KPierson 
Platinum - Posts: 3,527
Platinum spaceThis member consistently provides reliable informationspace
Joined: April 14, 2005
Location: Ohio, United States
Posted: March 17, 2010 at 8:27 AM / IP Logged  
You can either connect them to the viper wires or the car wires.  I typically would solder them with the alarm wires to the OEM wires.
Kevin Pierson
smokeman1 
Platinum - Posts: 1,588
Platinum spaceThis member has made a donation to the12volt.com. Click here for more info.spaceThis member has been recognized as an authority in Mobile Security and Convenience. Click here for more info.spacespace
Joined: September 14, 2009
Location: Wisconsin, United States
Posted: March 18, 2010 at 6:13 AM / IP Logged  

Thanks for the quick responce and advice. I hooked up all the passlock wires as shown, will try it tonight.

Anyone have any thoughts on connecting the rear defrost on this car? Unlike my Taurus, which was easy to get at the defrost switch, it appears that you have to take most of the dash apart to get at the defroster switch on the panel.  So can I use a relay to a line in the drivers door sill loom that goes to the defrost? And should I run a heavy gauge wire from the constant 12 volt source for the power  or from the battery because of  the current draw?

Have a good day everyone.

tedmond 
Gold - Posts: 4,610
Gold spaceThis member has been recognized as an authority in Mobile Security and Convenience. Click here for more info.spacespace
Joined: January 06, 2007
Location: Ontario, Canada
Posted: March 19, 2010 at 7:04 AM / IP Logged  
rear defrost BLACK (+) @ Drivers kick
use a relay to change polarity of the defogger output.
Ted
2nd Year Tier 1 Medical School
Still installing as a hobby...pays for groceries
Compustar Expert
smokeman1 
Platinum - Posts: 1,588
Platinum spaceThis member has made a donation to the12volt.com. Click here for more info.spaceThis member has been recognized as an authority in Mobile Security and Convenience. Click here for more info.spacespace
Joined: September 14, 2009
Location: Wisconsin, United States
Posted: March 20, 2010 at 6:04 AM / IP Logged  

I will look for that defrost wire this weekend.  As I understand to change the polarity from the relay section on this site, it would be 12 volt constant to pins 30 and 86, 12 volts out to defroster grid on pin 87, and negative trigger in from remote start to pin 85.  I assume that the (-) trigger in should be a latched setting on the remote start. 

Thanks

tedmond 
Gold - Posts: 4,610
Gold spaceThis member has been recognized as an authority in Mobile Security and Convenience. Click here for more info.spacespace
Joined: January 06, 2007
Location: Ontario, Canada
Posted: March 20, 2010 at 6:30 AM / IP Logged  
it can be latched or a single pulse. meter the wire and change the setting accordingly on the unit.
Ted
2nd Year Tier 1 Medical School
Still installing as a hobby...pays for groceries
Compustar Expert
smokeman1 
Platinum - Posts: 1,588
Platinum spaceThis member has made a donation to the12volt.com. Click here for more info.spaceThis member has been recognized as an authority in Mobile Security and Convenience. Click here for more info.spacespace
Joined: September 14, 2009
Location: Wisconsin, United States
Posted: March 22, 2010 at 7:26 PM / IP Logged  

Just an update,

Tedmond, you were correct on the wire and location for the rear defroster.  This install went without a snag. Found and tested all the wires, soldered and taped. Passlock connected right up and programmed. Remote started on the first try.  Kinda scared me. I was expecting something to go wrong. I even did my first relay for the dome light supervision. In short, I owe it all the this site and all who have posted  the information and advice. Thank you all.

next and last project, my daughters 2005 focus with a Viper 5301.


Sorry, you can NOT post a reply.
This topic is closed.

  Printable version Printable version Post ReplyPost New Topic
You cannot post new topics in this forum
You cannot reply to topics in this forum
You cannot delete your posts in this forum
You cannot edit your posts in this forum
You cannot create polls in this forum
You cannot vote in polls in this forum

  •  
Search the12volt.com
Follow the12volt.com Follow the12volt.com on Facebook
Wednesday, May 8, 2024 • Copyright © 1999-2024 the12volt.com, All Rights Reserved Privacy Policy & Use of Cookies
Disclaimer: *All information on this site ( the12volt.com ) is provided "as is" without any warranty of any kind, either expressed or implied, including but not limited to fitness for a particular use. Any user assumes the entire risk as to the accuracy and use of this information. Please verify all wire colors and diagrams before applying any information.

Secured by Sectigo
the12volt.com spacer
Support the12volt.com
Top
the12volt.com spacer