the12volt.com spacer
icon

2011 town and country remote start


Post ReplyPost New Topic
< Prev Topic Next Topic >
tbird2340 
Copper - Posts: 363
Copper spacespace
Joined: October 03, 2003
Location: Ohio, United States
Posted: December 15, 2011 at 1:59 PM / IP Logged  
I'm installing a Compustar 6200 Brain with the RF-P1B-SS and BLADE-AL bypass..
I have the wiring diagram for both the vehicle and for the BLADE-AL.. I'm a little confused as to what all I need to connect..
Is all that I need to hook up what is shown below from the BLADE-AL guide?
2011 town and country remote start -- posted image.
According to it all that I would be hooking up to the actual vehicle would be the IGN, the CANH, the CANL, and the parking light wire..
Other than that I would think I just need to hook up my (2) 12V and ground to my brain.. Is that right?
Sorry but it's been a few years since I've done installs and I've never used a Blade.
Appreciate any help!
tedmond 
Gold - Posts: 4,610
Gold spaceThis member has been recognized as an authority in Mobile Security and Convenience. Click here for more info.spacespace
Joined: January 06, 2007
Location: Ontario, Canada
Posted: December 15, 2011 at 2:18 PM / IP Logged  
has the blade-al been flashed for your specific vehicle?
never done a 2011 TC but based off the wiring the blade-al will take care of everything for you.
just the power/grounds from the 6pin main harness to the compustar is needed, and follow wiring diagram for blade-al
Ted
2nd Year Tier 1 Medical School
Still installing as a hobby...pays for groceries
Compustar Expert
kreg357 
Platinum - Posts: 7,783
Platinum spaceThis member has made a donation to the12volt.com. Click here for more info.spaceThis member has been recognized as an authority in Electrical Theory. Click here for more info.spaceThis member has been recognized as an authority in Mobile Security and Convenience. Click here for more info.spacespace
Joined: January 30, 2009
Location: Pennsylvania, United States
Posted: December 15, 2011 at 2:21 PM / IP Logged  

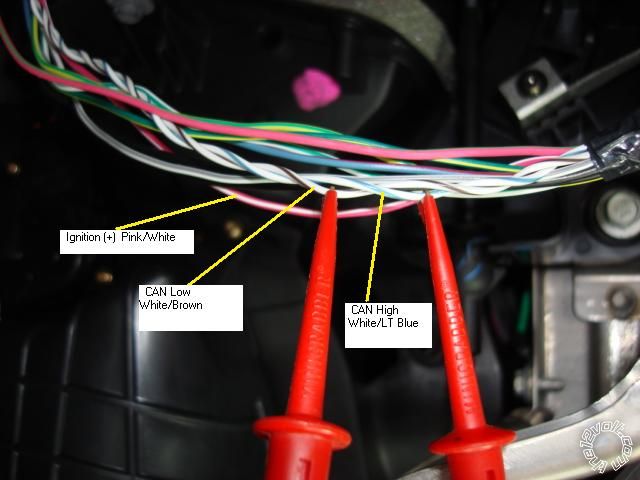
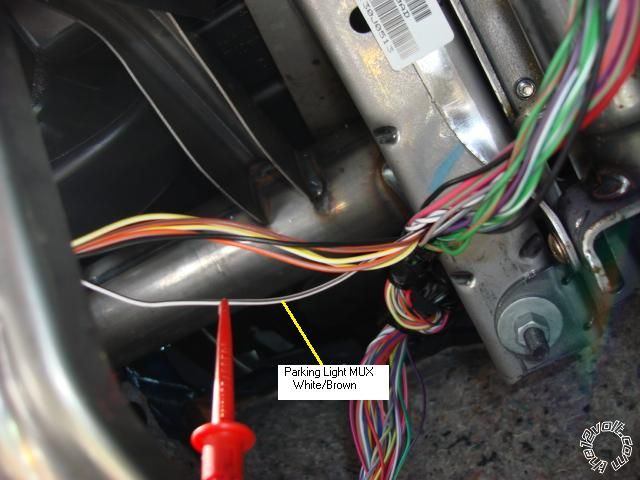
Pretty much.  From the CM6200 the two Red +12V power, Black to Chassis Ground, Gray/Black to Hood Pin, and White to Horn ( optional ). 

Here are some pics :

2011 town and country remote start -- posted image.

2011 town and country remote start -- posted image.

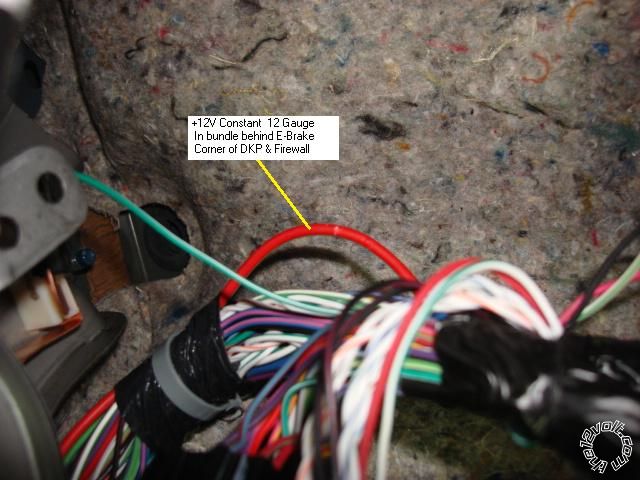
You can fuse down the CM6200 power to 10 Amps ( each ) and connect to this wire :

2011 town and country remote start -- posted image.

Soldering is fun!
tbird2340 
Copper - Posts: 363
Copper spacespace
Joined: October 03, 2003
Location: Ohio, United States
Posted: December 15, 2011 at 2:38 PM / IP Logged  
Thanks a lot for these pics.. Where are the pictures in the first two pictures in relation to vehicle location?
I can't believe that's all you have to hook up! That's the least amount of wires I've ever had to do.. Awesome!
2011 town and country remote start -- posted image. 2011 town and country remote start -- posted image.
metz35 
Copper - Posts: 458
Copper spacespace
Joined: January 13, 2003
Location: Pennsylvania, United States
Posted: December 15, 2011 at 2:50 PM / IP Logged  
one of my favorite vehicles.... its like a slam dunk in basketball :)
kreg357 
Platinum - Posts: 7,783
Platinum spaceThis member has made a donation to the12volt.com. Click here for more info.spaceThis member has been recognized as an authority in Electrical Theory. Click here for more info.spaceThis member has been recognized as an authority in Mobile Security and Convenience. Click here for more info.spacespace
Joined: January 30, 2009
Location: Pennsylvania, United States
Posted: December 15, 2011 at 3:01 PM / IP Logged  

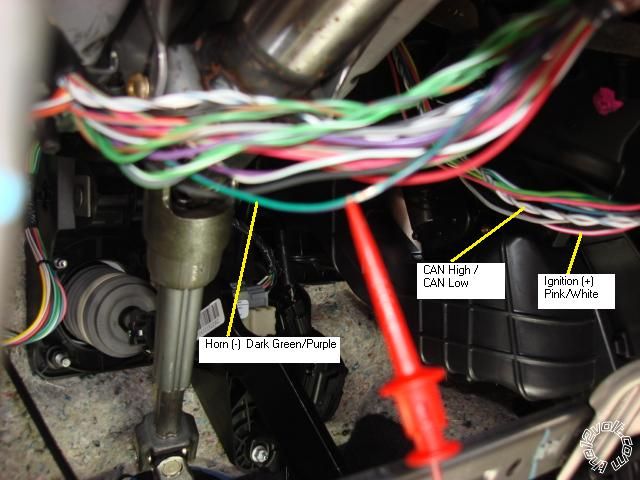
The Ignition and CAN wires are under the drivers dash coming down from the ignition switch.  Here is another picture that is further back ( and shows the Horn wire ) for a better perspective. 

2011 town and country remote start -- posted image.

When you remove the lower dash panel ( 3 torx screws ) and the metal knee plate ( 4 torx screws ), it is pretty easy to find.

The Parking Light wire picture was taken looking up behind the switch.  The vehicle has a lot of room to work & place the R/S unit.  Like metz35 said, "a real slam dunk"!

Soldering is fun!
tbird2340 
Copper - Posts: 363
Copper spacespace
Joined: October 03, 2003
Location: Ohio, United States
Posted: December 25, 2011 at 5:56 PM / IP Logged  
Anyone know if it would be OK to use a 1N4003 diode? The picture shows a 1N4001 but I actually have a 1N4003 in hand..
Thanks
Ween 
Platinum - Posts: 1,366
Platinum spacespace
Joined: August 01, 2004
Location: Illinois, United States
Posted: December 25, 2011 at 7:21 PM / IP Logged  
a 1N4003 will work just fine.
tbird2340 
Copper - Posts: 363
Copper spacespace
Joined: October 03, 2003
Location: Ohio, United States
Posted: December 26, 2011 at 7:50 PM / IP Logged  
Thanks for all the help. Got this done tonight and it was simple as everyone said! :)

Sorry, you can NOT post a reply.
This topic is closed.

  Printable version Printable version Post ReplyPost New Topic
You cannot post new topics in this forum
You cannot reply to topics in this forum
You cannot delete your posts in this forum
You cannot edit your posts in this forum
You cannot create polls in this forum
You cannot vote in polls in this forum

  •  
Search the12volt.com
Follow the12volt.com Follow the12volt.com on Facebook
Sunday, April 28, 2024 • Copyright © 1999-2024 the12volt.com, All Rights Reserved Privacy Policy & Use of Cookies
Disclaimer: *All information on this site ( the12volt.com ) is provided "as is" without any warranty of any kind, either expressed or implied, including but not limited to fitness for a particular use. Any user assumes the entire risk as to the accuracy and use of this information. Please verify all wire colors and diagrams before applying any information.

Secured by Sectigo
the12volt.com spacer
Support the12volt.com
Top
the12volt.com spacer