I'll sell you my Cibie Bi-Oscars. Bought for rallying decades ago but never used. (I bought them secondhand but essentially unused - maybe 30 minutes of use. And don't stress - they are compatible with heteros and others. )
A universal upgrade on my ancient vehicles is an upgrade to halogen lights. (Coincidentally Cibie; 5-3/4" types; inner spots and outer hi/low with integral park light.)
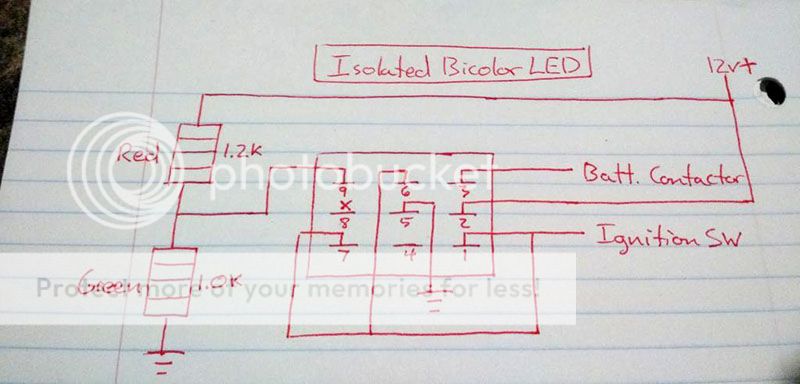
The inner spots have always run via relays - traditionally "New Era" dual relay types.
More recently (2 decades ago?) I started running outer lows & highs thru relays. Initially one relay per filament (as per my inner spots) but recently reduced to one relay per beam - ie, 3 relays for lo, high & spots - but I'll go back to one relay per filament - probably using micro (DIN) relays.
Tho individual relays is in part for redundancy, I find then invaluable for headlight alignment. (I can't get behind the lights to the connectors without removing the shells etc.)
The wiring is excessively oversized from the battery +12V. 2 runs - one for spots & one for hi/lo, each thru
bolted plastic finks (fuse links) of about 60A rating. Each relay has its own 20A or 30A ATS type auto-resetting circuit breaker; they'll be (say) 10A or 15A when I move back to a relay-per-filament implementation. (Isn't it insane - using fuses for lights? In retrospect they should obviously be self-resetting breakers. To think my 1960s vehicles used a single 30A glass fuse for ALL lighting!)
Except for now - a temporary vehicle I got for 12 months )whilst reworking my then road goer) which is now in its 15th year of road registration - I've always had a switch for the spots to disable them on high beam. Smart bottoms that don't dip their lights after my first flash get the additional spots on their second flash (which for some reason is often quite a long despite their quick dip reaction).
And I'll only use outer highs around town. Reflected road signs are too bright with the spots anyhow.
Tho originally not fitting a spot-disable switch due to the vehicles
temporary nature, when enduring reality hit I decided to use
mode switching. That would have features like town or country (high with no spots or with spots) or anger (see country mode); permanent outer lows with inner "hibeam" spots; and flash selectivity - ie, flash low beams if beams are off (so as to not be fines for flashing {certain warnings} using hi beams, else hi with beams on, or spots in high-beam city/town mode.
It would also handle PWMing (dimming) of my 10W or 20W halogen parking bulbs to meet legal requirements, turn each off if its corresponding beam was operating, or dim a low or high filament to act as a parker if a parking bulb failed. Dimming of all bulbs to legal requirements - ie 55W lows - I currently use 90W/130W H4s and 100W spots. (Hibeam Wattage limits are somewhat ambiguous.)
Auto turn off if left on after say 60 seconds to get to the house or tent, or if battery voltage is low.
There were other features that I don't now recall, but all that was based on using PICAXE 08M2s which I've only had for a few years (or decades?) and thus have not had time to implement. Besides, an 08M2 to sense my OEM temp gauge to control my electric fan is a higher priority. (I've only been using electric fans since 1978 and thus haven't had time to build a temp sensing circuit, tho I did uses Klixons (temperature switches) a few years ago, but they kept falling off the head.)
Sorry, I seem to have digressed...


I was going to say that you shouldn't have to disable lights because of a 2nd battery, the alternator should handle it. If not I'd also consider OFF if the aircon or wipers are on, the latter however possibly being when you want the extra lighting.
Besides, assuming a reasonable link and normal electrical loads, secondary batteries should be close to fully recharged within 10 minutes if not sooner.
But what I do suggest is a dash or condole voltmeter - specifically a 3-digit digital type. IMO they - else voltage monitoring alarms - should be standard equipment the same way ammeters were once considered essential.
I've written more than enough on that elsewhere - recently I think there were two the12volt threads regarding ammeters - but in short (no pun), a voltmeter can indicate a failing or undersized charging system, overvoltage (which kils batteries and other things), the state of the battery (aging or failing) or other faults - eg, failing starter motors.
Note that the voltmeter should be connected across the battery terminals because that is what the charging system is geared for. I use a small PCB type relay to connect battery +ve to the voltmeter when IGN is on. (The PICAXE 08M2 project to provide auto turn on under alarm conditions or on demand or 'hold-on' for 2 minutes after IGN off has been delayed due to unforeseen procrastination.)
Modern 12V vehicles should charge at say 14.2V - 14.4V. (Older 13.8V vehicles should be adjusted to 14.2-14.4V.)
Excluding faults, that voltage might drop at low RPM - especially with lights & wipers etc - but otherwise a drop means excess load on the alternator.
Of course my (Jap) alternator sits steady on 14.2V as soon as the engine starts - even at idle with spots (200W) and hibeam (260W) and wipers and brake lights and HU at an applicable start-up
thrash volume tho it can drop to maybe 13.7 - 13.9V after some driving. [That's ok. The upto 14.4V is to help restore the battery (reverse any sulfation etc)) and charging voltages may (should!) vary with battery temperature (typically alternators use an internal temp sensor else a timing algorithm). And once fully charged, a 12V lead-acid battery's charge voltage should be reduced to its 'float voltage' (typically ~13.4V - 13.8V) tho car batteries seem to last fine without such features.]
Anyhow, with a voltmeter you soon get used to normal aberrations like low-RPM hi-load dips, brake or headlight dips, cranking dips to 10V or lower, and a fully charged battery of 12.7V dipping to maybe 12.5V or 12.3V when IGN or lights are on. (That's due to a battery's internal resistance - the voltage drop is proportional to the load (current) [V=IR] - even tho the battery is still 12.7V
internally.
You then know if secondary batteries or lights or stereo volume cause excessive draw or that the alternator is failing etc.
WRT to battery condition there are probably 4 basics to know.
(1) A fully charged 12V lead-acid (whether wet/flooded cell, AGM or gel) should be ~12.7V. (In theory 12.67V at 25C, but that can vary with the battery type & construction. Refer to the battery datasheets.)
(2) After charging a battery will have 'surface charge' which may take up to 24 hours to self dissipate in wet cells. This means a voltage higher than what the
actual battery is (wrt to its SOC = State Of Charge). My 14.2V charged car battery can read 13.7V immediately after engine switch off. (If I wanted to know its real SOC I'd have to dissipate the surface charge - eg a few to 15 minutes with lights or hibeam, or wait up to one day.)
Rats, what were the other 2? The "
not above 14.4V (long term) because excess gassing occurs" & that it kills AGMs (because they have no fluid to gas or boil) was ancillary. So too the "
need above ye olde 13.8V" due to newer chemistry AND because 13.8V was insufficient to reverse the plate sulfation that increasingly occurs the more 'not fully charged' a battery is.
Maybe that as a Rule Of Thumb, assume each 0.1V drop/change is equivalent to a 10% change in State Of Charge - ie, remaining capacity. [Usually it's more like 1.2V or 1.4V per 10% SOC - eg, if full is 12.7V and 0% SOC (fully flat) is 11.3V; sometimes less (0% = 11.9V for some batteries), but 0.1V is usually conservative and an easy to use figure to use. EG - you shouldn't discharge a deep cycle battery more than 50%, hence 5 x 0.1V = 0.5V from say 12.6V (or 12.7V) = 12.1V so if the battery is 12.1 or 12.2V its ok (but should be charged ASAP). The actual 50% SOC voltage might be 12.0V for a 12.65 100% SOC (fully charged) and 11.45V 0% SOC deep cycle, but our 12.1 (or 12.2V) is a conservative estimate.
Or that a battery's capacity increases with temperature (hence heat a flat battery in emergency conditions) but its life reduces.
FYI - the latter is a detail used by some car-audio forums. A long gone OP on the12volt intended placing his 2nd AGM battery in the engine bay to increase its capacity. (I won't name the relevant Florida based forum.) I thought that was brilliant - gaining maybe 20% to 30% capacity by reducing the battery's life 4- or 8-fold (each 10C temperature rise halves battery life) whilst also increasing its internal resistance which increases with temperatue (and state of discharge and they buy AGMs for their lower internal resistance) instead of buying a third battery and placing both in the boot/trunk thereby gaining 100% extra capacity at half their (individual) resistance with lower stress per battery for under half or one quarter the ongoing cost. Ah yes, I see amazing things on the web!

Anyhow, I'll go and collect my thoughts.
Besides Agents of Shield is about to start and I need to shower all my neighbor's 4WD grime off first.


 Printable version


