the12volt.com spacer
icon

How to Wire Through a Door Molex.


Post ReplyPost New Topic
< Prev Topic Next Topic >
forbidden 
Platinum - Posts: 5,352
Platinum spaceThis member has made a donation to the12volt.com. Click here for more info.spaceThis member has been recognized as an authority in Mobile Audio and Video. Click here for more info.spacespace
Joined: November 01, 2003
Location: Alberta, Canada
Posted: June 05, 2006 at 2:11 AM / IP Logged  

This tutorial is to aid you when you are faced with the dreaded door molex and how to get your speaker wires past it. This install was done on a 2006 Mazda 3. This is becoming more and more common these days so expect to see it in your new car, be it a Mazda or a Jeep.

Here is a great picture of what not to do. I should point out that this method is done frequently by installers who are lazy, or for customers that do not want to pay to have the job done properly. Notice as well the rust starting below where he drilled. This is from the installer not cleaning up his metal shards after drilling. I should also point out, that this customer, a friend of mine in a different city, went for the "deal" and not the quality. He was also told by four local shops, 2 big box and two specialty shops that this is also the only way that they will do this work. Here is the list of excuses he was given.

(1) It voids warranty.

(2) The wire does not fit.

(3) The wire will get cut when the door opens and closes.

(4) The wire will chaff in the molex.

(5) The electrical switches will no longer work.

How to Wire Through a Door Molex. -- posted image.

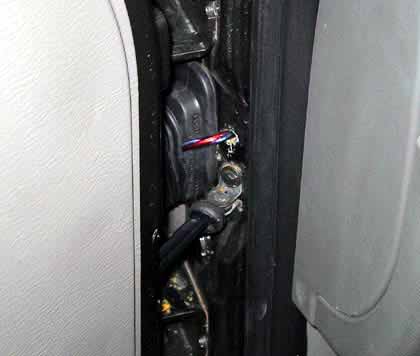
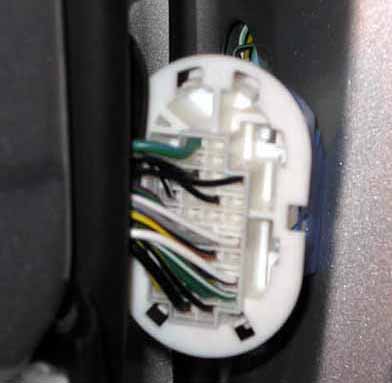
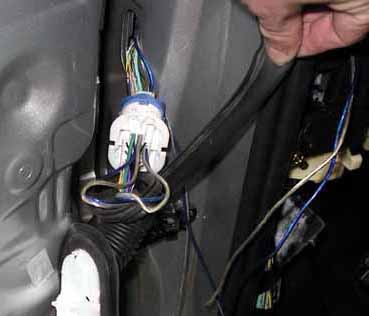
Here is a picture of the suspected offender. Putting your fingers onto the boot where it makes contact with the door, you should be able to feel the plastic molex housing underneath.

How to Wire Through a Door Molex. -- posted image.

The first thing to do is to peel back the protective rubber boot to expose the molex and to see how it is locked into the door. Use a pick tool or a small common screwdriver to help you here if you cannot get your fingers in the area. If you are going to be putting your fingers into this area, take great care not to move the door as when it swings it might try and cut your fingers off as it swings past.

How to Wire Through a Door Molex. -- posted image.

How to Wire Through a Door Molex. -- posted image.

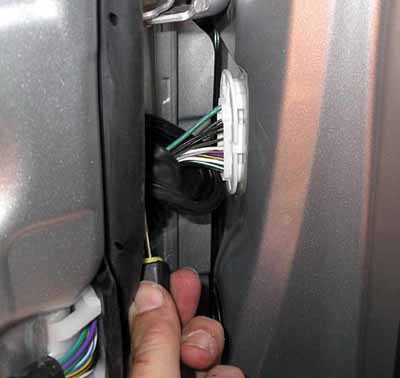
Next is the picture of the molex a little closer. If you look closely at the plug, you will see the press down lock tabs in the four corners. Use a pick tool and push the tab down while you pry that corner. Next push the other matching top (or bottom) tab down. Either the top or the bottom of them molex should now be free from the door. Now do the other 2 tabs to release the entire molex and pull it out of the mounting hole. Expect it to be fairly deep so be carefull as to how you pull it out. The metal in the door jamb is sharp, so be carefull not to chaff the factory wires on it!

How to Wire Through a Door Molex. -- posted image.

How to Wire Through a Door Molex. -- posted image.

How to Wire Through a Door Molex. -- posted image.

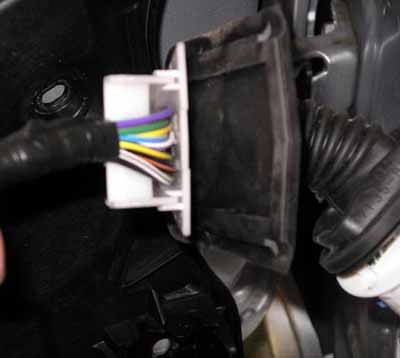
Now for the first look at what you can do. If you notice in the last picture all the unused holes (holes with no wires going into the molex). That is where we shall be running our new wires. You need to look at both the front and the backside of the molex as there very well may be factory wires in the back molex that do not come through on the front side (depending on options in your vehicle).

How to Wire Through a Door Molex. -- posted image.

The above picture is the back half of the molex after it has been unsnapped from the front.

How to Wire Through a Door Molex. -- posted image.

The above picture is the front half of the offensive foul beast that we are soon to torture. The next picture below in this case is where the new wires must enter the boot from on the drivers door.

How to Wire Through a Door Molex. -- posted image.

How to Wire Through a Door Molex. -- posted image.

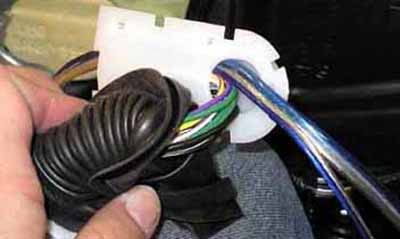
The second picture above is the boot removed from the protective plastic shroud that the factory wires are in. As I am installing components in this car, I have two runs of 18 gauge speaker wire to pass through to the vehicle. The next picture below shows an alternative method (vehicle dependent) of passing a wire through a molex. If the molex has side holes as this one does, then it is a easy method to pass the wires through. It does not require drilling of either front or back molex to pass through. In this vehicle, I chose not to do this method.

How to Wire Through a Door Molex. -- posted image.

How to Wire Through a Door Molex. -- posted image.

Now onto the business end. There are two ways to drill a molex. One way is to separate the two molex's and drill each indipendent. I generally choose a drill bit that is just under the size of the hole that is there for a factory wire to pass into. As there is no factory wire in the way, it is easy to check. The drill bit size also needs to be just larger than the size of the wire you are trying to pass through. This next picture shows me drilling the front molex from the backside (doorside). The other way to drill the molex is to snap it back together into one large molex and drill from the front to the back. This is my preferred method however, you must be carefull when the drill bit approaches the backside that it does not bind on any factory wires.

How to Wire Through a Door Molex. -- posted image.

The next picture shows a before and after shot of the rear molex.

How to Wire Through a Door Molex. -- posted image.

How to Wire Through a Door Molex. -- posted image.

Next you need to split your speaker wire down the center. Pass the wire through the front molex as you see in the next picture.

How to Wire Through a Door Molex. -- posted image.

Now pass the wire through the rear molex as well. Slowly push the molex's together while you pull the extra speaker wire out.

How to Wire Through a Door Molex. -- posted image.

How to Wire Through a Door Molex. -- posted image.

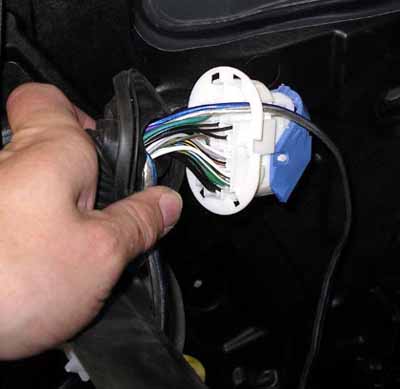
Now you should be able to reconnect your molex together, wires ran through it and put the molex back into it's deep dark hole from whenst it came. Take care to secure your speaker wires on both sides of the molex so that the wire cannot move around.

How to Wire Through a Door Molex. -- posted image.

Now you have a new set of speaker wires ran through a molex, properly and with a guage of wire adequate to carry all of that power that new amp of yours is set to give you.

Top Secret, I can tell you but then my wife will kill me.
DYohn 
Moderator - Posts: 10,741
Moderator spaceThis member has made a donation to the12volt.com. Click here for more info.spaceThis member has been recognized as an authority in Electrical Theory. Click here for more info.spaceThis member has been recognized as an authority in Mobile Audio and Video. Click here for more info.spacespace
Joined: April 22, 2003
Location: Arizona, United States
Posted: June 05, 2006 at 8:49 PM / IP Logged  
Great work Rob.  Thank you for the contribution!
Support the12volt.com
spookiestylez 
Silver - Posts: 531
Silver spaceThis member has made a donation to the12volt.com. Click here for more info.spacespace
Joined: September 23, 2005
Location: Virginia, United States
Posted: June 05, 2006 at 9:17 PM / IP Logged  

Great tutorial, I recently tried to explain this to someone on here...Ill link em to this thread.Great stuff to add to the site!

sS

rtfm
doibuy 
Copper - Posts: 177
Copper spacespace
Joined: March 15, 2006
Posted: June 05, 2006 at 9:26 PM / IP Logged  
This is a great post with tons of detail (photos really help).  This is the only way this should be done.  I haven't had to do it much with speaker wires, but acutators all the time.  Usually with cars getting power locks there aren't many wires in the molex which makes it a lot easier, this example shows that even with a lot of wires in the molex it is still possible.  Once again great job!
soultinter 
Copper - Posts: 170
Copper spacespace
Joined: January 16, 2004
Location: United States
Posted: June 08, 2006 at 2:31 PM / IP Logged  
Damn that is good stuff!!!!               Kudos to you !
bassplayer24_7 
Copper - Posts: 40
Copper spacespace
Joined: October 23, 2004
Location: South Carolina, United States
Posted: June 09, 2006 at 11:05 AM / IP Logged  
very nice
(2) 12" JL W3V3
(1) 6" JL W0
Phoenix Gold Octane R 8.0:1
Phoenix Gold Octane R 2.0:1
Phoenix Gold Octane R 5.0:4
Clarion Crossover
JVC Head Unit
pmh61 
Copper - Posts: 151
Copper spacespace
Joined: April 06, 2003
Location: United States
Posted: June 09, 2006 at 12:17 PM / IP Logged  
that first pic looks like the first one i ever did in my 1990 honda accord that was about 6 years ago but yelled at by my uncle and was taught your way lol
zhalverson 
Copper - Posts: 180
Copper spacespace
Joined: January 21, 2005
Location: United States
Posted: June 09, 2006 at 7:29 PM / IP Logged  
That's just great information.  Thanks a ton, I've been wondering the proper way to do that.  This site rules!How to Wire Through a Door Molex. -- posted image.
forbidden 
Platinum - Posts: 5,352
Platinum spaceThis member has made a donation to the12volt.com. Click here for more info.spaceThis member has been recognized as an authority in Mobile Audio and Video. Click here for more info.spacespace
Joined: November 01, 2003
Location: Alberta, Canada
Posted: June 10, 2006 at 2:46 AM / IP Logged  
What to do for my next trick.......
Top Secret, I can tell you but then my wife will kill me.
KPierson 
Platinum - Posts: 3,527
Platinum spaceThis member consistently provides reliable informationspace
Joined: April 14, 2005
Location: Ohio, United States
Posted: June 10, 2006 at 10:13 AM / IP Logged  

Keep in mind that they use Molex style conntectors because they are waterproof.  You just compromised the integrity of the entire connector. 

This may not be a big deal in all cars, but do this in a G35/350Z and you will have problems in 6 months when the stock BCM is damaged from water dripping on it.  These cars hold a LOT of water in their inner door skins, where the wires come out inside the door.  The wire provides a path in to the car from the inner door for water to follow.  Right below the connector on the car side sits the stock BCM, in a plastic, non weatherproof, enclosure.

You really should get in the habit of siliconing at least the car side of the harness before you put it back together.  The door typically isn't a big issue because they fill with water anyway when it rains.

Kevin Pierson
Page of 4

  Printable version Printable version Post ReplyPost New Topic
You cannot post new topics in this forum
You cannot reply to topics in this forum
You cannot delete your posts in this forum
You cannot edit your posts in this forum
You cannot create polls in this forum
You cannot vote in polls in this forum

  •  
Search the12volt.com
Follow the12volt.com Follow the12volt.com on Facebook
Tuesday, March 19, 2024 • Copyright © 1999-2024 the12volt.com, All Rights Reserved Privacy Policy & Use of Cookies
Disclaimer: *All information on this site ( the12volt.com ) is provided "as is" without any warranty of any kind, either expressed or implied, including but not limited to fitness for a particular use. Any user assumes the entire risk as to the accuracy and use of this information. Please verify all wire colors and diagrams before applying any information.

Secured by Sectigo
the12volt.com spacer
Support the12volt.com
Top
the12volt.com spacer