the12volt.com spacer
icon

lanzar amplifiers


Post ReplyPost New Topic
< Prev Topic Next Topic >
riverratxj 
Member - Posts: 10
Member spacespace
Joined: August 16, 2009
Location: North Carolina, United States
Posted: October 01, 2009 at 12:41 PM / IP Logged  
  I am trying to help out a friend with his system.  He got 2 Lanzar(i know...) 2400w 2 channel amps that are 2ohm stable.   He is hooking these to 2 SPL 2800w max 2ohm dvc 15"s.  One amp per speaker.  Now here is the questions:  The place he took it to get it hooked up said NOT to bridge these amps.  That they would "pop" in no time.  And they needed to run each voice coil to each channel(independent).  BUT I have read over and over on there website and handbook that you CAN bridge these amps but only on a 4ohm load.  So, why cant he wire the voice coils to make a 4ohm load and bridge the amps?  Plus they ran his power wire to a dist. block that has 2 30amp fuses.  Am I wrong for thinking thats not enough for 2 2400w amps?  Plus I always thought that you NEED the main fuse less than or around a foot from the batt.  The dist block is all the way in the trunk, of-course...  So am I a retard or are these guys...?  Any input from the genius's on here would be greatly apreciated.  Thanks in advance.
riverratxj 
Member - Posts: 10
Member spacespace
Joined: August 16, 2009
Location: North Carolina, United States
Posted: October 01, 2009 at 12:43 PM / IP Logged  
 BTW: running these amps bridged at 4 ohms is where they make 2400w x 1.
speedtrip 
Member - Posts: 5
Member spacespace
Joined: September 24, 2009
Location: Washington, United States
Posted: October 01, 2009 at 1:09 PM / IP Logged  

I think you are right in that the fuse on the main power line should be close to the battery.  I believe this is because you wouldn't want such a large gauge hot line running the entire length of the vehicle unfused.  In the event it rubs on some metal down to the wire i would think there is a potential for a very unpleasant outcome.

Granted the chance of that happening may be slim...but i don't think i would risk it.  There may be other reasons to fuse early that i am unaware of...

And to your other point, I think running the subs in series on each amp bridged at 4 would work fine.

I'm no genius so take all that with a grain of salt...i'm new here.

riverratxj 
Member - Posts: 10
Member spacespace
Joined: August 16, 2009
Location: North Carolina, United States
Posted: October 01, 2009 at 1:30 PM / IP Logged  
  I appreciate your input.  Yea I told him he needs a fuse close to the battery and he said, "well if its got a fuse its got a fuse, whats it matter where its at.."  ummm, your power wire could possibly turn into a heating element running all the way thru your car before it reaches that fuse in your trunk...  Honestly dont know the chances of that either, but like you said, why risk it.  And with that; can anyone tell me what size fuse he would need at the batt. for these two "huge" amps?  BTW the amps have two 25a fuses on them.  For a total of 50A per amp... 
tommy... 
Gold - Posts: 1,901
Gold spacespace
Joined: December 10, 2004
Location: United States
Posted: October 01, 2009 at 2:25 PM / IP Logged  

The fuse should be no farther away from the battery then 18"...Read this... http://bcae1.com/fuses.htm ...If this is how this guy does stuff...Might just want to stay away from him...If he is using a dist block and the wire goes to a smaller gauge then those wires need fused also(which from what you posted the dist block is fused and should be protecting the smaller gauge wires coming from the output side...) What size power wire is he using...?

4 awg125 amps

Wire GaugeRecommended
Maximum Fuse Size
00 awg400 amps
0 awg325 amps
1 awg250 amps
2 awg200 amps
4 awg125 amps
6 awg80 amps
8 awg50 amps
10 awg30 amps
12 awg20 amps
14 awg15 amps
16 awg7.5 amps
These are the recommended maximum fuse ratings for the corresponding wire size. Using a smaller fuse than what's recommended here will be perfectly safe.

M.E.C.P & First-Class
Go slow and drink lots of water...Procrastinators' Unite...Tomorrow!
tommy... 
Gold - Posts: 1,901
Gold spacespace
Joined: December 10, 2004
Location: United States
Posted: October 01, 2009 at 2:29 PM / IP Logged  
 
Installing an Amplifier
Although I showed a few system diagrams on the 'fuses' page, I did not directly address amplifier installation. This section will hopefully answer some of your questions.
Making the Connections to the Power Source:
Most amplifiers draw significant amounts of current (too much current to be drawn from the vehicle's fuse box). This means that you will have to make a connection to a more suitable point. Most of the time, the main power wire is connected to the battery's positive terminal. Since the battery is capable of supplying more than 1000 amps of current and your power wire can't likely safely carry that much current, you MUST have an inline fuse (this can not be stressed enough). The fuse must be rated to protect the power wire being used. If the power wire was unfused and accidentally shorted to ground, the wire and the vehicle would soon be fully engulfed in flames. The fuse holder should be between 6 and 18 inches from the battery. If it's too close to a standard lead acid battery, the fuse and holder may corrode like the positive battery terminal does. If it's too far away, it will not provide the required protection because there is too much unprotected wire (between the battery and the fuse).
Routing the Power Wire to the Rear of the Vehicle:
In many vehicles, there are unused rubber or plastic plugs in the firewall. These plugs can be removed and a small hole (size determined by the outside diameter of the wire) can be cut or drilled in it. The plug can then be replaced and the wire can be passed through the plug. If the angle of the plug will allow water to run around the wire and into the vehicle, use some silicone sealant to seal around the wire. Sometimes, there are extra 'nipples' on rubber plugs where the speedometer or other cables pass through the firewall. The tips can be cut off of the nipples and the wire can be passed through the firewall.
Drilling!:
If there is no place to run the wire (not likely), you will have to drill a hole. If you can not CLEARLY see both sides of the firewall where you want to drill the hole, DO NOT drill. There are many hazards to drilling through the firewall. You could puncture fuel lines, brake lines and wires. If you 'think' you know where the drill will pass through the firewall, you can use a center punch and make a small dent on one side then go around to the other side to see if you were right about the location. Many vehicles have 2 layers of sheet metal in the firewall area so this technique won't always work. After you drill the hole, make sure to use the appropriate grommet in the hole to prevent the wire from being cut on the sharp metal. If you don't have a grommet, you could possibly use a piece of heater hose or similar material (siliconed into place to prevent it from falling out of the hole). I know that some people will say that you should just get a grommet, but knowing human nature, I know that some people will try to run it through the FW without a grommet (or any protection) if they don't have one handy. The piece of rubber hose isn't a perfect solution but it may help protect the power wire for those too lazy to do it right.
Keep it Clear of the Pedals:
When routing the wire through the FW and under the dash, tie it out of the way of the steering and brake components. Make sure that you run all of the brake, clutch, accelerator and steering components through their full range of motion to determine whether or not the power wire will be in the way of any of these controls. When routing the wire under the carpet, make sure that it's routed so that it will not be crushed or pinched or punctured when the seats (if removed) and rocker molding are replaced. When routing it under the rear seats, make sure that the seat will not put undue pressure on the wire when people sit in the seat. When routing it into the trunk (boot), it will likely have to pass over a sharp piece of metal and make a sharp bend. If this is the case with your vehicle, I recommend covering the wire with a small piece of heater hose where it passes over the sharp edge. If you're only installing one amplifier, the power wire can be connected directly to the amp. If you are connecting the main power wire directly to the amp and the amp does not have an on-board fuse, install the appropriate fuse at the battery (the main fuse will protect the vehicle, wire and amplifier).
Routing Wires from the Head Unit:
To prevent radiated electrical noise from entering your system's signal line, you should avoid running the RCA patch cords along the the main power wire. It is OK for the power wire and the RCA cables to cross each other or even run together for a very short distance but you shouldn't run them together for any significant distance. One common solution is to run the RCA cables down the opposite side of the vehicle. The remote output lead from the head unit may be run down the same side as the main power wire (away from the RCA cables). Any speaker wires that run from front to back can be run down either side. Some people go the extra step and run speaker wires down the center of the vehicle but I don't believe it's necessary. They won't pick up any noise from the power wire and won't induce noise into the RCA signal lines. Again... Make sure that none of the wires will be damaged when the vehicle is reassembled.
Note:
I strongly recommend that you insert a 1/2 amp (one-half amp) fuse in the remote lead (as close to the radio as possible). This will help prevent the radio from being damaged if the remote lead is shorted to ground.
Ground:
I told you how to make a good ground earlier in this page. This is a little more info.

1.If you have any signal processors such as equalizers or crossovers, I would recommend grounding them at a different location than where the amp(s) are grounded. I know that some people advocate grounding all of the audio components in one place but the amplifiers will introduce a significant amount of noise (some inaudible) at the grounding point. A different ground (a foot or more away from the amp ground) will be much quieter. If the audio components are of good quality, the difference of ground will < color=#ff8080>NOT introduce any noise. The ground connection does not need to be as robust as the one used for the amplifier. Just make sure to sand down to the bare metal at the grounding point.

2.Some people say that an amplifier's case must be isolated from ground (mounted on a piece of wood). This, in my opinion, is a load of @#$%! Most amplifiers connect the case of the amp to ground internally. If there is no connection between the case and ground inside the amp, the case will be completely isolated from ground (and everything else) so it will < color=#ff8080>not matter if you connect it to ground by mounting it down to a grounded piece metal. Do you think they would actually build an amplifier in a metallic case if it could not be connected to ground?

Installing Multiple Amplifiers
Main Power:
When installing multiple amplifiers, you have a few options. If you already have a moderately large wire (8 gauge) for your first amp, you can run a second (appropriately sized) fused wire for the second amp. If you don't plan to add any more amplifiers in the future, this will work fine. This will not require that you buy a distribution block. The second solution would be to install a large wire (suitable to supply both/all amplifiers). A 4 gauge wire is the most common size wire for the main power wire. For a 4g wire, you can use a main power fuse as large as 150 amps. I don't recommend anything larger. The main power wire would run through the vehicle as before but when it gets to the back of the vehicle, it will be connected to a distribution block. The main power wire would go in the larger connector and the smaller connectors would go to the amplifiers.
Grounding:
It is OK to ground all of the amplifiers in the same place (if the ground wire doesn't need to be extended to more than about 18 inches). If the amplifiers are mounted on opposite sides of the trunk, I'd probably use 2 ground connections (with 3/8 bolts to the vehicle's floor pan).


Distribution Block:
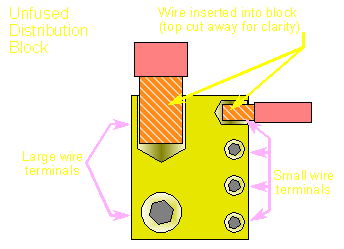
A distribution block generally has 1 or 2 large wire connectors (4g is common) and 4 smaller connections. All of the connections are bound down with socket head set screws (the screw head is a six sided socket with no flange). If the block has no fuses, any of the connections can be used as inputs OR outputs (although, the larger sockets are used for the supply wires (from the battery)). This diagram shows an unfused distribution block.
lanzar amplifiers -- posted image.

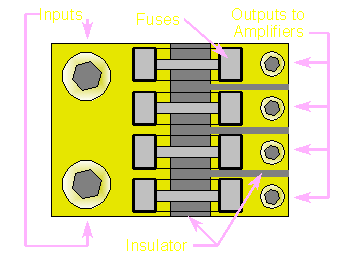
This is what a fused Dblock might look like:

lanzar amplifiers -- posted image.
The left side of the fuses are connected to the input terminals. The right side of each fuse is connected to it's own independent output terminal. The gray area is an electrical insulating material. Without the insulator, the block would not allow the terminals and fuses to operate independently (they would be shorted together). This diagram shows glass fuses but they are also made for Maxi-Fuses (which I prefer).
M.E.C.P & First-Class
Go slow and drink lots of water...Procrastinators' Unite...Tomorrow!
tommy... 
Gold - Posts: 1,901
Gold spacespace
Joined: December 10, 2004
Location: United States
Posted: October 01, 2009 at 2:35 PM / IP Logged  

http://bcae1.com/bridging.htm

M.E.C.P & First-Class
Go slow and drink lots of water...Procrastinators' Unite...Tomorrow!
riverratxj 
Member - Posts: 10
Member spacespace
Joined: August 16, 2009
Location: North Carolina, United States
Posted: October 01, 2009 at 4:58 PM / IP Logged  
  Thank you very much for the technical information you provided.  This is why I ever even signed up for this forum.  I will get a fuse on his vehicle asap!   I do however have a few more questions.  I read what you posted and the link but didnt find this answer.... Is there anything wrong with running one amps remote from the other?  For clearity: one amp has the remote wire coming for the head unit; can you get away with just running another remote wire from the first amp to the second?  I did see you suggest a .5A fuse on these incase of accidental grounding.  Also for signal:  What is the best way of running RCA's to the second amp since these amps dont have a pass thru.  Two splitters on the main rca's coming from head unit to two more sets of rca's going to amps?  Thanks greatly for your info and advice!
aznboi3644 
Gold - Posts: 2,600
Gold spaceThis member consistently provides reliable informationspace
Joined: May 01, 2006
Location: United States
Posted: October 01, 2009 at 8:36 PM / IP Logged  
just so you know those amps are more like 300-400 watt amps
Custom Enclosure Design
tommy... 
Gold - Posts: 1,901
Gold spacespace
Joined: December 10, 2004
Location: United States
Posted: October 01, 2009 at 8:49 PM / IP Logged  
As far as using the remote lead to power additional devices... https://www.the12volt.com/relays/page5.asp#rtol ...
M.E.C.P & First-Class
Go slow and drink lots of water...Procrastinators' Unite...Tomorrow!
Page of 2

  Printable version Printable version Post ReplyPost New Topic
You cannot post new topics in this forum
You cannot reply to topics in this forum
You cannot delete your posts in this forum
You cannot edit your posts in this forum
You cannot create polls in this forum
You cannot vote in polls in this forum

  •  
Search the12volt.com
Follow the12volt.com Follow the12volt.com on Facebook
Thursday, March 28, 2024 • Copyright © 1999-2024 the12volt.com, All Rights Reserved Privacy Policy & Use of Cookies
Disclaimer: *All information on this site ( the12volt.com ) is provided "as is" without any warranty of any kind, either expressed or implied, including but not limited to fitness for a particular use. Any user assumes the entire risk as to the accuracy and use of this information. Please verify all wire colors and diagrams before applying any information.

Secured by Sectigo
the12volt.com spacer
Support the12volt.com
Top
the12volt.com spacer