the12volt.com spacer
icon

viper 5701, car wont start


Post ReplyPost New Topic
< Prev Topic Next Topic >
steve k 
Member - Posts: 37
Member spacespace
Joined: September 29, 2010
Location: Florida, United States
Posted: September 30, 2010 at 5:29 PM / IP Logged  

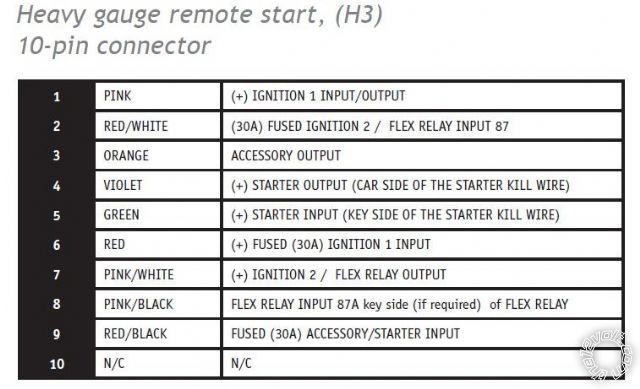
I uploaded the wiring, can you tell methe ignition wires ? and whitch one from the 2 that connects to the one comming from the engine. Thanks again.

yukon 2001
steve k 
Member - Posts: 37
Member spacespace
Joined: September 29, 2010
Location: Florida, United States
Posted: September 30, 2010 at 5:33 PM / IP Logged  
viper 5701, car wont start - Page 2 -- posted image.
yukon 2001
kreg357 
Platinum - Posts: 7,783
Platinum spaceThis member has made a donation to the12volt.com. Click here for more info.spaceThis member has been recognized as an authority in Electrical Theory. Click here for more info.spaceThis member has been recognized as an authority in Mobile Security and Convenience. Click here for more info.spacespace
Joined: January 30, 2009
Location: Pennsylvania, United States
Posted: September 30, 2010 at 5:49 PM / IP Logged  

H3/1 goes to Yukon Pink ( IGN1 ) at ignition switch harness

H3/2 goes to Yukon Red ( +12v Constant ) at ignition switch harness

H3/3 goes to Yukon Orange ( ACC1 ) at ignition switch harness

H3/4 goes to Yukon cut Yellow ( Starter ) engine side

H3/5 goes to Yukon cut Yellow ( Starter ) key switch side

H3/6 goes to Yukon Red ( +12v constant ) at ignition switch harness

H3/7 goes to Yukon White ( IGN2 ) at ignition switch harness

H3/8 not used

H3/9 goes to Yukon Red ( +12v constant ) at ignition switch harness

All wires should be verified with a Digital Multi Meter.  Also verify the Viper Menu 3 Menu Item 8 is still at the factory default of Option 1 ( IGN1 ).

Soldering is fun!
steve k 
Member - Posts: 37
Member spacespace
Joined: September 29, 2010
Location: Florida, United States
Posted: September 30, 2010 at 5:53 PM / IP Logged  
kreg Thanks for the reply, is it necessery to connect everything? I will not be using remote start, I only want the alarm to kill the car if the alarm is on or if the alarm goes into alarm mode.
yukon 2001
kreg357 
Platinum - Posts: 7,783
Platinum spaceThis member has made a donation to the12volt.com. Click here for more info.spaceThis member has been recognized as an authority in Electrical Theory. Click here for more info.spaceThis member has been recognized as an authority in Mobile Security and Convenience. Click here for more info.spacespace
Joined: January 30, 2009
Location: Pennsylvania, United States
Posted: September 30, 2010 at 6:04 PM / IP Logged  

Never installed one that way.  You paid good money for the 5701, might as well use it completely.  Just need a Passlock 2 bypass and you're all set... viper 5701, car wont start - Page 2 -- posted image.

I guess you could just do H3/4, H3/5 and H3/9 ( just to be safe ). 

Soldering is fun!
steve k 
Member - Posts: 37
Member spacespace
Joined: September 29, 2010
Location: Florida, United States
Posted: October 01, 2010 at 5:18 AM / IP Logged  
Kreg I ordered the module, from sonic it shuld be here in a few days .........I took your advice :) Thanks.
yukon 2001
kreg357 
Platinum - Posts: 7,783
Platinum spaceThis member has made a donation to the12volt.com. Click here for more info.spaceThis member has been recognized as an authority in Electrical Theory. Click here for more info.spaceThis member has been recognized as an authority in Mobile Security and Convenience. Click here for more info.spacespace
Joined: January 30, 2009
Location: Pennsylvania, United States
Posted: October 01, 2010 at 7:18 AM / IP Logged  
Might as well, you have a nice system and its only a few more wires to connect.  If you ordered the PLJX bypass, set the jumper to "B" and follow the guide for Passlock 2 on pages 6 & 7.   Remember not to connect the Brown "Ground When Running" to the Viper (-) 200mA Status Output ( Blue ) wire until the module has been programmed.
Soldering is fun!
steve k 
Member - Posts: 37
Member spacespace
Joined: September 29, 2010
Location: Florida, United States
Posted: October 01, 2010 at 6:52 PM / IP Logged  
Kreg thanks again I am hooking this up to my Yukon and one to my mothers Buick Randevuz . The module is a DLPKGM. Any advice will be appreciated.
yukon 2001
kreg357 
Platinum - Posts: 7,783
Platinum spaceThis member has made a donation to the12volt.com. Click here for more info.spaceThis member has been recognized as an authority in Electrical Theory. Click here for more info.spaceThis member has been recognized as an authority in Mobile Security and Convenience. Click here for more info.spacespace
Joined: January 30, 2009
Location: Pennsylvania, United States
Posted: October 01, 2010 at 7:01 PM / IP Logged  

The DLPKGM is pretty straight forward.  Just follow the programming steps closely.

Good Luck!

Soldering is fun!
kreg357 
Platinum - Posts: 7,783
Platinum spaceThis member has made a donation to the12volt.com. Click here for more info.spaceThis member has been recognized as an authority in Electrical Theory. Click here for more info.spaceThis member has been recognized as an authority in Mobile Security and Convenience. Click here for more info.spacespace
Joined: January 30, 2009
Location: Pennsylvania, United States
Posted: October 01, 2010 at 7:26 PM / IP Logged  
The Buick is a bit different.  It has PassKey 3 immobilizer.  The DLPKGM does that and some other things like door locks and supplies a Tach signal ( 2003+ ).  Just download the vehicle specific install guide for the Buick and follow that.
Soldering is fun!
Page of 3

  Printable version Printable version Post ReplyPost New Topic
You cannot post new topics in this forum
You cannot reply to topics in this forum
You cannot delete your posts in this forum
You cannot edit your posts in this forum
You cannot create polls in this forum
You cannot vote in polls in this forum

  •  
Search the12volt.com
Follow the12volt.com Follow the12volt.com on Facebook
Wednesday, April 24, 2024 • Copyright © 1999-2024 the12volt.com, All Rights Reserved Privacy Policy & Use of Cookies
Disclaimer: *All information on this site ( the12volt.com ) is provided "as is" without any warranty of any kind, either expressed or implied, including but not limited to fitness for a particular use. Any user assumes the entire risk as to the accuracy and use of this information. Please verify all wire colors and diagrams before applying any information.

Secured by Sectigo
the12volt.com spacer
Support the12volt.com
Top
the12volt.com spacer