the12volt.com spacer
icon

Chapman Alarm Auto Arm


Post ReplyPost New Topic
< Prev Topic Next Topic >
pilotguy 
Member - Posts: 4
Member spacespace
Joined: November 01, 2010
Location: California, United States
Posted: November 01, 2010 at 7:14 PM / IP Logged  

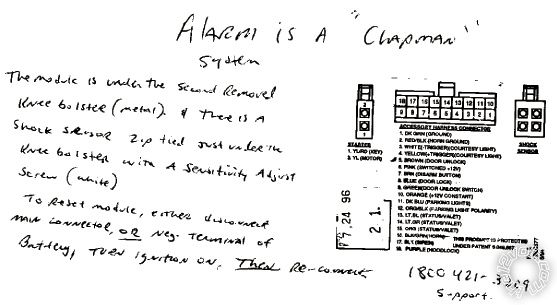
There is another post here about Chapman alarms and being out of business.  I did call the 1-800-421-3209 Phone number and it is good, and they can help, if you need info. I did learn that to disable the auto-arm feature, that you either need to disconnect the module, or the negative terminal of the battery, and ThEN turn the ignition key on, and then re-connect whatever you disconnected. That is supposed to "reset" the module. Attatched is the  schematic of one installed with a 7/24/94 date, (they are on a decal On the module).

Chapman Alarm Auto Arm -- posted image.
pilotguy 
Member - Posts: 4
Member spacespace
Joined: November 01, 2010
Location: California, United States
Posted: November 01, 2010 at 7:15 PM / IP Logged  
My post above applies to a 1997 Ford Mustang with a Chapman Alarm 4 button remote
beegbie 
Copper - Posts: 341
Copper spacespace
Joined: August 17, 2002
Location: United States
Posted: November 01, 2010 at 7:25 PM / IP Logged  
What model is it?
pilotguy 
Member - Posts: 4
Member spacespace
Joined: November 01, 2010
Location: California, United States
Posted: November 02, 2010 at 2:09 PM / IP Logged  

Well, I did the above steps, and it didn't work for me,so I called back.  They said take apart the module, and move dip switch 3 to the opposite position.  I did that and it didn't work either, so my fix is to leave the whole dam* thing unplugged.  I was told that if these fixes didn't do it, that it was a bad module.  I don't believe that, as all I did was replace a battery terminal, and obviously reset something, but..... The locks/remote still works fine. Just no alarm, which is great.  We're hoping somone steals this pos anyway...    The only numbers on the thing are on the schematic and they say its an R-2 module and the LBL0577 is the only other number on the label.

I will never be returning to this post... call the 800 #...

pilotguy 
Member - Posts: 4
Member spacespace
Joined: November 01, 2010
Location: California, United States
Posted: November 02, 2010 at 5:31 PM / IP Logged  
I lied.  After removing the module, you have to Connect the Yellow wires together again. It's for the starter relay. Otherwise, no crank. Everything else works...
Ween 
Platinum - Posts: 1,366
Platinum spacespace
Joined: August 01, 2004
Location: Illinois, United States
Posted: November 02, 2010 at 5:46 PM / IP Logged  

hi,

does it have a led and/or valet button...and  disarm also?

mark

beegbie 
Copper - Posts: 341
Copper spacespace
Joined: August 17, 2002
Location: United States
Posted: November 02, 2010 at 6:39 PM / IP Logged  
pilotguy wrote:

Well, I did the above steps, and it didn't work for me,so I called back.  They said take apart the module, and move dip switch 3 to the opposite position.  I did that and it didn't work either, so my fix is to leave the whole dam* thing unplugged.  I was told that if these fixes didn't do it, that it was a bad module.  I don't believe that, as all I did was replace a battery terminal, and obviously reset something, but..... The locks/remote still works fine. Just no alarm, which is great.  We're hoping somone steals this pos anyway...    The only numbers on the thing are on the schematic and they say its an R-2 module and the LBL0577 is the only other number on the label.

I will never be returning to this post... call the 800 #...

We are all going to miss you.
91stt 
Silver - Posts: 564
Silver spaceThis member consistently provides reliable informationspace
Joined: May 24, 2006
Location: New Jersey, United States
Posted: November 02, 2010 at 10:45 PM / IP Logged  
Chapman was the expediter version for Code Alarm
The diagram you have there is the equivalent of the Code ROG-1 or ROG-2 (Rogue) unit. It is a factory keyless entry add-on alarm. The starter disable on it is a normally open type, so unplugging the unit will not allow you to start the car. The ROG-1 used wire loops for programming and the ROG-2 used dip switches. Dip switch 3 selects auto-arming. In the "On" position the auto-arming feature will be disabled. Ensure that you are changing dip switch 3 and not 2. Dip switch 2 is for the auto starter lockout.
This information is provided only as a reference.
All circuits should be verified with a digital multi-meter prior to making any connections.
brtt485 
Member - Posts: 2
Member spacespace
Joined: February 07, 2011
Location: Massachusetts, United States
Posted: February 07, 2011 at 12:18 PM / IP Logged  

91stt wrote:
Chapman was the expediter version for Code Alarm
The diagram you have there is the equivalent of the Code ROG-1 or ROG-2 (Rogue) unit. It is a factory keyless entry add-on alarm. The starter disable on it is a normally open type, so unplugging the unit will not allow you to start the car. The ROG-1 used wire loops for programming and the ROG-2 used dip switches. Dip switch 3 selects auto-arming. In the "On" position the auto-arming feature will be disabled. Ensure that you are changing dip switch 3 and not 2. Dip switch 2 is for the auto starter lockout.

This is very helpful information!  I am in the similar situation as pilotguy, I purchased a car with this dealer installed system and cant figure out how to turn off the auto arming feature.  Good to know it is dip switch 3.  My module has 4 dip switches inside so I was trying to figure out what the others were.  So now that I know 2 is the auto starter lockout and 3 is the auto arming feature, can you tell me what switches 1 and 4 do?

Also, what exactly is auto starter lockout?

Thanks a ton!

Page of 2

  Printable version Printable version Post ReplyPost New Topic
You cannot post new topics in this forum
You cannot reply to topics in this forum
You cannot delete your posts in this forum
You cannot edit your posts in this forum
You cannot create polls in this forum
You cannot vote in polls in this forum

  •  
Search the12volt.com
Follow the12volt.com Follow the12volt.com on Facebook
Thursday, April 25, 2024 • Copyright © 1999-2024 the12volt.com, All Rights Reserved Privacy Policy & Use of Cookies
Disclaimer: *All information on this site ( the12volt.com ) is provided "as is" without any warranty of any kind, either expressed or implied, including but not limited to fitness for a particular use. Any user assumes the entire risk as to the accuracy and use of this information. Please verify all wire colors and diagrams before applying any information.

Secured by Sectigo
the12volt.com spacer
Support the12volt.com
Top
the12volt.com spacer