the12volt.com spacer
icon

2012 civic wiring diagram


Post ReplyPost New Topic
< Prev Topic Next Topic >
wattage2004 
Member - Posts: 7
Member spacespace
Joined: June 13, 2011
Location: Texas, United States
Posted: June 14, 2011 at 2:45 PM / IP Logged  
Ok, I have found the ignition (blue wire not pictured), and the constant 12V (white wire not pictured) by testing the wire with a DMM. This is probably a very novice question, but how can I test the smaller wires pictured above without cutting the wires? I can't seem to get the DMM tip into the wiring harness like I could with the larger gauges in the constant and ignition wires. Any suggestions would be greatly appreciated. Thanks.
2012 Civic Sedan LX
howie ll 
Pot Metal - Posts: 16,466
Pot Metal spacespace
Joined: January 09, 2007
Location: United Kingdom
Posted: June 14, 2011 at 3:36 PM / IP Logged  
As a pro with 40+ years experience I can tell you that that's what I'd do in fact if I'm right you don't even need those two relays also from your questions I don't think you should do this job, you don't appear to have any knowledge of how to go about this. If in doubt test.
I wish you luck.
wattage2004 
Member - Posts: 7
Member spacespace
Joined: June 13, 2011
Location: Texas, United States
Posted: June 14, 2011 at 3:51 PM / IP Logged  
I understand you're a pro with over 40 years of experience, which is why I'm asking you rather than simply attempting this on my own. How would you test a small-gauged wire? You still haven't answered that basic question. I understand, you use a DMM, and I also understand that you know more about cars than I do, but this is a basic question. I'm obviously not going to cut any wires, but I can't get the metal tip of the DMM down into its connection in the harness. Please help me by telling me how to test a small-gauge wire where the tip of the DMM won't reach into the small connection port in the harness. Do I need to change testing locations from the steering column down to the larger panels of wires by the driver-side door?   Thank you.
2012 Civic Sedan LX
howie ll 
Pot Metal - Posts: 16,466
Pot Metal spacespace
Joined: January 09, 2007
Location: United Kingdom
Posted: June 14, 2011 at 4:54 PM / IP Logged  
There are two ways:
a) The correct way is to obtain a "bed of nails" adaptor for the test lead.
b) The quick and dirty method, a "traditional" grey metal Stanley knife, test probe in lanyard hole then very carefully slice into the cable.
I actually prefer method b.
Test initially with your probe to 20VDC, black lead to ground, red to each wire then turn to low beam.
If you don't get a reading, place red end on a confirmed 12V+ source, remember what I said before about NEG pulse.
Also I've a hunch your wiper feeds are also NEG.
kreg357 
Platinum - Posts: 7,827
Platinum spaceThis member has made a donation to the12volt.com. Click here for more info.spaceThis member has been recognized as an authority in Electrical Theory. Click here for more info.spaceThis member has been recognized as an authority in Mobile Security and Convenience. Click here for more info.spacespace
Joined: January 30, 2009
Location: Pennsylvania, United States
Posted: June 15, 2011 at 6:23 AM / IP Logged  

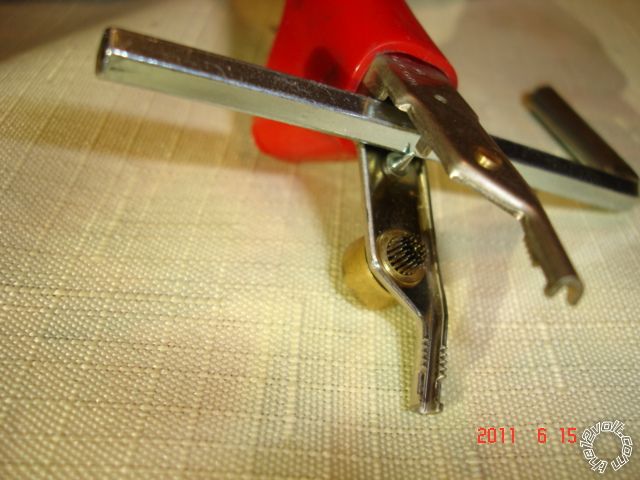
Here is a picture of the "Bed of Nails" type test lead Howard mentioned.  

2012 civic wiring diagram - Page 2 -- posted image.

Soldering is fun!
amidauphin 
Member - Posts: 2
Member spacespace
Joined: June 20, 2005
Location: Quebec, Canada
Posted: October 15, 2011 at 6:52 PM / IP Logged  
Honda Civic 2012 LX 4 doors
I want to install a Window Auto Rollup Module. I've done it before on my Civic 2003 but now I want to add one to my Civic 2012. I need to cut 4 wires (4 windows). I need to insert the module between the "window motor UP" and the "Window switch".
Question 1:
Where can I found those 4 wires. In the driver's door or in the dashboard ?
Question 2:
Where can I found the wiring diagram (with color codes) of those wires ?
Thank you and have a nice day !
Honda Civic LX 2012 4 doors
howie ll 
Pot Metal - Posts: 16,466
Pot Metal spacespace
Joined: January 09, 2007
Location: United Kingdom
Posted: October 16, 2011 at 1:20 AM / IP Logged  
Find the two wires going to the motors in each door. Both will be 0v at rest, one will go to 12v+ on window raise will the other stays at 0v. The one going to 12v+ is the one you cut. Or test in the driver's kick well or door switch. The wire you're looking for has to go to 12v+ from 0v on window raise.
amidauphin 
Member - Posts: 2
Member spacespace
Joined: June 20, 2005
Location: Quebec, Canada
Posted: October 17, 2011 at 9:13 PM / IP Logged  
Thanks Howie, I will try that. I checked with my dealer and the 2012 shop manual is not even available on Honda's web site yet.
This module can be install under the dash but needs the wires (+12v Passenger wire going to the window motor) which is in the passenger door only.
I took a look at the hole where the wires go from the body to the driver's door and don't see how I can pass a wire or two between the door and the body. The wires ends of the body ends in the hole with a connector and the wire comming from the door are equiped with a connector.
So my only chance is to install the Auto up module in the door where I have the 4 window's +12V wire AND hope there's a "constant +12V" and the "lock (+) or (-)" also in the door wich my module need.
Thank You
Honda Civic LX 2012 4 doors
howie ll 
Pot Metal - Posts: 16,466
Pot Metal spacespace
Joined: January 09, 2007
Location: United Kingdom
Posted: October 17, 2011 at 11:10 PM / IP Logged  
Ah, the nitty gritty of Hondas, getting into the doors. Pull those Molex plugs and drill them out.
Page of 2

Sorry, you can NOT post a reply.
This topic is closed.

  Printable version Printable version Post ReplyPost New Topic
You cannot post new topics in this forum
You cannot reply to topics in this forum
You cannot delete your posts in this forum
You cannot edit your posts in this forum
You cannot create polls in this forum
You cannot vote in polls in this forum

  •  
Search the12volt.com
Follow the12volt.com Follow the12volt.com on Facebook
Thursday, July 10, 2025 • Copyright © 1999-2025 the12volt.com, All Rights Reserved Privacy Policy & Use of Cookies
Disclaimer: *All information on this site ( the12volt.com ) is provided "as is" without any warranty of any kind, either expressed or implied, including but not limited to fitness for a particular use. Any user assumes the entire risk as to the accuracy and use of this information. Please verify all wire colors and diagrams before applying any information.

Secured by Sectigo
the12volt.com spacer
Support the12volt.com
Top
the12volt.com spacer