the12volt.com spacer
icon

2007 Toyota FJ Cruiser Remote Start Pictorial


Post ReplyPost New Topic
< Prev Topic Next Topic >
offroadzj 
Gold - Posts: 2,043
Gold spaceThis member has made a donation to the12volt.com. Click here for more info.spaceThis member has been recognized as an authority in Mobile Security and Convenience. Click here for more info.spacespace
Joined: June 03, 2005
Location: New York, United States
Posted: January 15, 2012 at 2:43 PM / IP Logged  
Vehicle: 2007 Toyota FJ Cruiser Manual Transmission
Starter: Compustar CM6200
Bypass: N/A
Disassembly:
- Remove driver door sill panel
- Remove dead pedal by pulling towards driver seat then remove plastic clip holding kick panel. Then pull kick panel towards driver seat to remove.
- Remove (2) 10mm bolts holding knee bolster panel to dash. Pull top, left side vent panel out just enough to remove knee bolster panel.
2007 Toyota FJ Cruiser Remote Start Pictorial -- posted image.
- Remove (4) 10mm bolts holding metal support bracket to dash. Pull up and out to remove support bracket.
- Remove (3) phillips head screws holding lower steering column. Squeeze on both top edges of lower steering column and pull down to remove.
2007 Toyota FJ Cruiser Remote Start Pictorial -- posted image.
Installation:
- Ignition switch harness (Main ignition connections)
2007 Toyota FJ Cruiser Remote Start Pictorial -- posted image.
- Horn switch harness (Horn Trigger)
2007 Toyota FJ Cruiser Remote Start Pictorial -- posted image.
- Parking light switch harness (Parking lights (-))
2007 Toyota FJ Cruiser Remote Start Pictorial -- posted image.
- BECU module (Door Trigger, Trunk Trigger, Parking Lights (+/-))
2007 Toyota FJ Cruiser Remote Start Pictorial -- posted image.
- Front of fusebox (Dome Supervision, Brake wire, Parking brake)
2007 Toyota FJ Cruiser Remote Start Pictorial -- posted image.
- Driver Kick Panel (Factory arm/disarm, Power Lock/Unlock)
2007 Toyota FJ Cruiser Remote Start Pictorial -- posted image.
- Clutch Switch
2007 Toyota FJ Cruiser Remote Start Pictorial -- posted image.
- Firewall Grommet (Hood Pin)
2007 Toyota FJ Cruiser Remote Start Pictorial -- posted image.
- Firewall (Engine Side)
2007 Toyota FJ Cruiser Remote Start Pictorial -- posted image.
- Chassis Ground (Driver Kick Panel)
2007 Toyota FJ Cruiser Remote Start Pictorial -- posted image.
Not Pictured:
Tach - BLACK/ White @ OBDII connector
Hood Pin - Aftermarket pin required
Kenny
Owner / Technician
KKD Garage LLC
Albany, NY 12205
kreg357 
Platinum - Posts: 7,802
Platinum spaceThis member has made a donation to the12volt.com. Click here for more info.spaceThis member has been recognized as an authority in Electrical Theory. Click here for more info.spaceThis member has been recognized as an authority in Mobile Security and Convenience. Click here for more info.spacespace
Joined: January 30, 2009
Location: Pennsylvania, United States
Posted: January 15, 2012 at 3:56 PM / IP Logged  
Nice one, Kenny!  Looks like you're a Compustar convert.  2007 Toyota FJ Cruiser Remote Start Pictorial -- posted image.
Soldering is fun!
offroadzj 
Gold - Posts: 2,043
Gold spaceThis member has made a donation to the12volt.com. Click here for more info.spaceThis member has been recognized as an authority in Mobile Security and Convenience. Click here for more info.spacespace
Joined: June 03, 2005
Location: New York, United States
Posted: January 17, 2012 at 9:40 PM / IP Logged  
Yup... and when they actually get around to getting the 7000 series units out I will be 100% converted.. lol
Kenny
Owner / Technician
KKD Garage LLC
Albany, NY 12205
lucasoil4u 
Copper - Posts: 317
Copper spacespace
Joined: May 11, 2009
Location: Minnesota, United States
Posted: September 27, 2013 at 2:53 PM / IP Logged  
When will the 7000 units be available?
bat9905 
Copper - Posts: 131
Copper spacespace
Joined: January 13, 2008
Location: Washington, United States
Posted: November 10, 2013 at 4:55 PM / IP Logged  
Nice write up on the Fj. I plan on doing one of these . If I don't use relays on starter ignition and power could it damage something
bat9905
kreg357 
Platinum - Posts: 7,802
Platinum spaceThis member has made a donation to the12volt.com. Click here for more info.spaceThis member has been recognized as an authority in Electrical Theory. Click here for more info.spaceThis member has been recognized as an authority in Mobile Security and Convenience. Click here for more info.spacespace
Joined: January 30, 2009
Location: Pennsylvania, United States
Posted: November 10, 2013 at 7:18 PM / IP Logged  

If you mean using one Remote Starter ignition output wire to power two vehicle ignition wires, YES.

The manufacturer designed the vehicle with those circuits isolated for a reason.  I have heard of blown fuses

( fuse AM1) from combining Starter circuits in Toyota's...

It will be well worth your time to wire in the extra relay(s) to keep these circuits separate.   2007 Toyota FJ Cruiser Remote Start Pictorial -- posted image.

Soldering is fun!
bat9905 
Copper - Posts: 131
Copper spacespace
Joined: January 13, 2008
Location: Washington, United States
Posted: November 10, 2013 at 8:13 PM / IP Logged  
Ok thanks . I will be installing an audiovox aps 991c . It has two ignition outs but I'll have use a relay for the 2 start wires
bat9905
bat9905 
Copper - Posts: 131
Copper spacespace
Joined: January 13, 2008
Location: Washington, United States
Posted: November 23, 2013 at 3:44 PM / IP Logged  
Everything went great except the door triggers. I think the drivers door pin is RED / black . I noticed some wiring info says use the door ajar indicator wire purple / yellow but neither one went to ground when the door is opened. I'm not sure whether to use all triggers and diode isolate or maybe the door being opened for 3 hours made the becu unit to go to sleep
bat9905
hilock 
Member - Posts: 36
Member spaceThis member has made a donation to the12volt.com. Click here for more info.spacespace
Joined: November 18, 2010
Location: California, United States
Posted: January 03, 2014 at 6:46 PM / IP Logged  
Wanted to do an install pictorial for a 2010, this one is great so I'll just add some updates for the 2010. First the pictorial is pretty accurate even for a 2010.
The only real changes pertain to the bypass scenario. First step is deterring what key you have. Your master key is stamped with a "G" or "L". Mine was "L" and Consider this version unlucky since it's a bit more wiring than a "G" key
Just installed remote start in my 2010 FJ with the "L" stamped key. BTW this is also an 80 bit key.
Bottom line, the "L" key 2010 by pass install requires an annoying amount of additional wiring over the "G" key install.
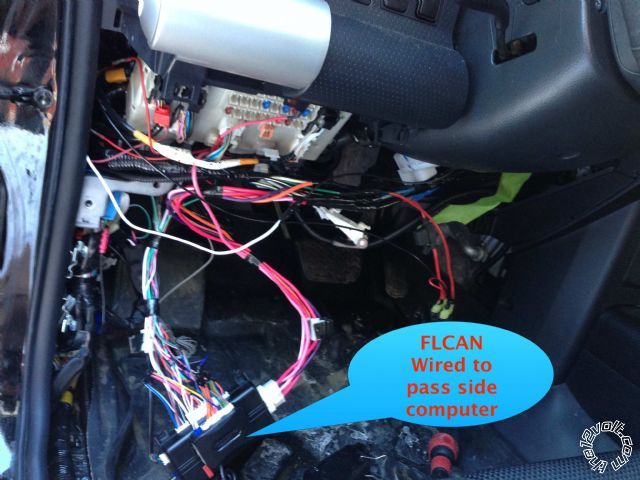
I used the FLCAN (IDatalink) and with the TL4 firmware (flashed myself). It worked like a champ. You should know you'll need to grab wires off the ECU on the passengers side. For me this meant running wires from passenger to driver side so the bypass and remote start could be near each other (used the D2D method).
Another important note........for this particular vehicle the bypass has only one feature, that feature is to allow remote start. Lock, unlock, and anything else you can think of will need to be wired directly (W2W).
Finally, Flashlogic/Idatalink provide good install instructions for the "L" key 2010 FJ.
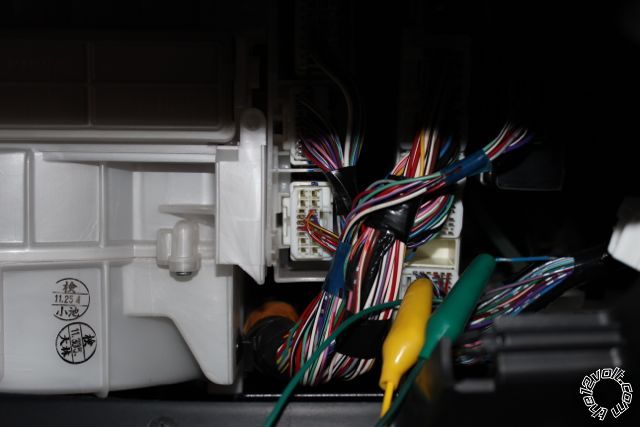
I'll be glad to help out if you want to ask any questions. Glad to have Remote start, glad to have done it myself and glad its DONE!2007 Toyota FJ Cruiser Remote Start Pictorial -- posted image.
Just to give you an idea of what harness you need to look for, the picture shows some test leads where I verified I had the correct wires before soldering in. Good luck
G-35 & FJ Cruiser Remote Start Viper 5301 & Pyton 4203--Alpine touchscreen A/V system w/Camera, Sat radio, SWI
hilock 
Member - Posts: 36
Member spaceThis member has made a donation to the12volt.com. Click here for more info.spacespace
Joined: November 18, 2010
Location: California, United States
Posted: January 04, 2014 at 2:26 PM / IP Logged  
2007 Toyota FJ Cruiser Remote Start Pictorial -- posted image.
G-35 & FJ Cruiser Remote Start Viper 5301 & Pyton 4203--Alpine touchscreen A/V system w/Camera, Sat radio, SWI
Page of 2

  Printable version Printable version Post ReplyPost New Topic
You cannot post new topics in this forum
You cannot reply to topics in this forum
You cannot delete your posts in this forum
You cannot edit your posts in this forum
You cannot create polls in this forum
You cannot vote in polls in this forum

  •  
Search the12volt.com
Follow the12volt.com Follow the12volt.com on Facebook
Tuesday, November 12, 2024 • Copyright © 1999-2024 the12volt.com, All Rights Reserved Privacy Policy & Use of Cookies
Disclaimer: *All information on this site ( the12volt.com ) is provided "as is" without any warranty of any kind, either expressed or implied, including but not limited to fitness for a particular use. Any user assumes the entire risk as to the accuracy and use of this information. Please verify all wire colors and diagrams before applying any information.

Secured by Sectigo
the12volt.com spacer
Support the12volt.com
Top
the12volt.com spacer