


constant to momentary relay circuit


Posted: February 16, 2012 at 9:12 AM / IP Logged
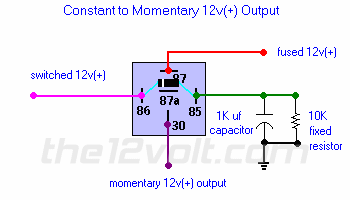 I am designing a custom dash for my 86 pickup, with custom warning lights, and I'm trying to build a circuit that will present power to all of the LEDs in the dash for about 3 seconds when I turn my ignition on (as a test feature to make sure all lights are working). I was thinking of using a circuit like this, and then diode-isolating the 30 output of the relay to each LED. I built a mock-up of this circuit on a breadboard, and everything is working, except for the timing.
Currently, with a 1K uF capacitor, it holds the circuit on for about 1/2 second. So I added 3 1K uF capacitors in parallel, and no change. I was hoping the increased capacitors would increase the charge time of the capacitors, but it doesn't look like that is the case. So I was thinking if I want to multiply the time by 6, could I get a 6K uF capacitor? But having a hard time finding one.
Any suggestions on what I can do?
Also, in the diagram above, I used the switched 12v for hot as well (in other words the pink and red wires above both go to switched (ignition) 12v.
When I energize the circuit and it holds the relay on for 1/2 second then closes, and I remove power from the circuit, I have to wait several minutes before I can do it again. If I apply power to the circuit again, nothing happens. I think it is waiting on the capacitors to discharge. Any thoughts?
Thanks.
I am designing a custom dash for my 86 pickup, with custom warning lights, and I'm trying to build a circuit that will present power to all of the LEDs in the dash for about 3 seconds when I turn my ignition on (as a test feature to make sure all lights are working). I was thinking of using a circuit like this, and then diode-isolating the 30 output of the relay to each LED. I built a mock-up of this circuit on a breadboard, and everything is working, except for the timing.
Currently, with a 1K uF capacitor, it holds the circuit on for about 1/2 second. So I added 3 1K uF capacitors in parallel, and no change. I was hoping the increased capacitors would increase the charge time of the capacitors, but it doesn't look like that is the case. So I was thinking if I want to multiply the time by 6, could I get a 6K uF capacitor? But having a hard time finding one.
Any suggestions on what I can do?
Also, in the diagram above, I used the switched 12v for hot as well (in other words the pink and red wires above both go to switched (ignition) 12v.
When I energize the circuit and it holds the relay on for 1/2 second then closes, and I remove power from the circuit, I have to wait several minutes before I can do it again. If I apply power to the circuit again, nothing happens. I think it is waiting on the capacitors to discharge. Any thoughts?
Thanks.

Posted: February 16, 2012 at 3:53 PM / IP Logged
Posted: February 28, 2012 at 3:01 PM / IP Logged
Posted: February 29, 2012 at 1:26 AM / IP Logged
Sorry, you can NOT post a reply.
This topic is closed.
 Printable version
| You cannot post new topics in this forum You cannot reply to topics in this forum You cannot delete your posts in this forum You cannot edit your posts in this forum You cannot create polls in this forum You cannot vote in polls in this forum |

| Search the12volt.com |
Follow the12volt.com 
Friday, April 24, 2026 • Copyright © 1999-2026 the12volt.com, All Rights Reserved • Privacy Policy & Use of Cookies

Friday, April 24, 2026 • Copyright © 1999-2026 the12volt.com, All Rights Reserved • Privacy Policy & Use of Cookies
Disclaimer:
*All information on this site ( the12volt.com ) is provided "as is" without any warranty of any kind, either expressed or implied, including but not limited to fitness for a particular use. Any user assumes the entire risk as to the accuracy and use of this information. Please
verify all wire colors and diagrams before applying any information.
