the12volt.com spacer
icon

remote starter shift stuck


Post ReplyPost New Topic
< Prev Topic Next Topic >
voltswagon 
Copper - Posts: 75
Copper spacespace
Joined: November 21, 2012
Location: Iowa, United States
Posted: November 21, 2012 at 6:05 PM / IP Logged  

Vehicle name:     2005 Colorado CC I4

Remote Starter:  Bulldog 500 Delux 2 way paging
Bypass Module:  Xpresskit PLJX

Got the car to start remotely.

Tested starter kill by pressing brake, works.

What doesn't work is, Can't shift to D or any gear with key to "ACC" or "ON"

Noticed that when engine starts, no dash no radio no anything is on which it should be.
Everything work as normal by using the key. Everything lights up.

So what wires controls this function, accessories wire is already hook up from RS to IG.

Bulldog and expresskit tech was very helpful until now.

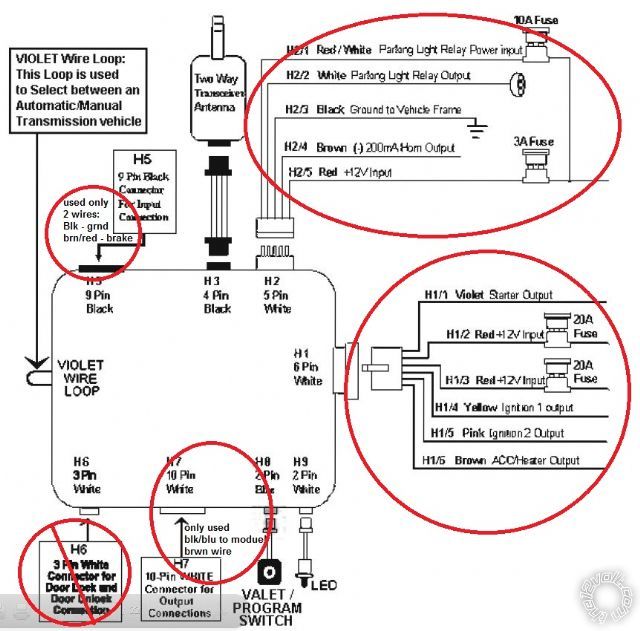
remote starter shift stuck -- posted image.

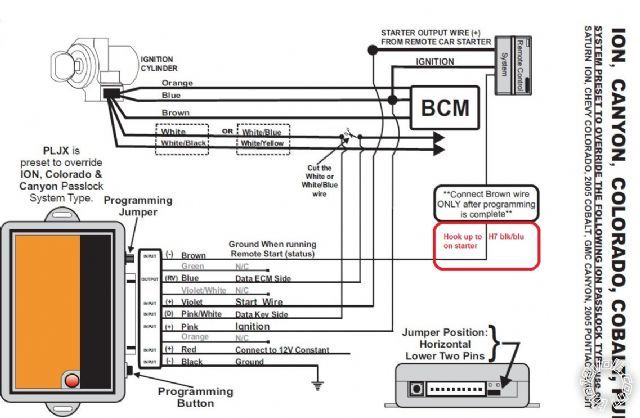
remote starter shift stuck -- posted image.

Dont Drive and Text, but
Do Text Then Drive
lurch228 
Silver - Posts: 1,338
Silver spacespace
Joined: August 08, 2012
Posted: November 22, 2012 at 12:21 AM / IP Logged  
Verify that H1/6 is hooked to and putting out (+)12v when remote started. And check the Remote starter 20amp fuses. If fuse is good and no (+)12v output on H1/6 then you probally have a bad internal relay in the unit.
Audiovox
Accessory 1 BROWN (+) IGNTION HARNESS
   WILL ALSO BE WHITE/ BROWN DEPENDING ON WHERE YOU CATCH THE WIRE
Directwire
Accessory WHITE/ red + ignition switch, green 6 pin plug, pin 1
Bulldog
ACCESSORY /HEATER BLOWER 1
WHITE/ RED to BROWN (+)
@ IGNITION SWITCH, PIN 1 or BCM, GRAY PLUG, PIN B7, SEE NOTE #2
NOTE #2: The BCM is located in the Passenger Kick Panel.
voltswagon 
Copper - Posts: 75
Copper spacespace
Joined: November 21, 2012
Location: Iowa, United States
Posted: November 22, 2012 at 10:30 AM / IP Logged  
yes verified h1/6 out 12v when remote start
yes verifies accessories out 12v when key start
no accessories out 0v when key takeover with brake kill
yes verified connection between them good contact
all 4 fuse from brain are intact.
tested with volt/ohmeter.
Now you're probably confused as I am.
Dont Drive and Text, but
Do Text Then Drive
lurch228 
Silver - Posts: 1,338
Silver spacespace
Joined: August 08, 2012
Posted: November 22, 2012 at 2:46 PM / IP Logged  
Sounds like a MUX issue with the vehicle Verify that the PLJX wires are not swapped to the vehicle Second Starter and then try resetting and re-programming the PLJX to the vehicle or course you will need to disconect the PLJX (-)brown from the remote start to do this. IE Repeat STEP 2 for PLJX.
Second Starter WHITE/ blue (resistor code), wht/yel (5V reference) mux ignition switch, green 6 pin plug, pins 4 and 5
Ignition WHITE/ green + ignition switch, green 6 pin plug, pin 3   
Second Ignition N/A       
Third Ignition N/A       
Accessory WHITE/ red + ignition switch, green 6 pin plug, pin 1   
Second Accessory same as second starter       
Keysense same as second starter     
Aslo try this:
TECH NOTE:
If experiencing trouble programming, try: A) Turn key to the ignition position, press on brake and place transmission into gear.
B) Now turn key to start position and release, continue with step “B” of previous programming.
voltswagon 
Copper - Posts: 75
Copper spacespace
Joined: November 21, 2012
Location: Iowa, United States
Posted: November 22, 2012 at 5:17 PM / IP Logged  

That's what I thought. 

I'd Contacted Xpresskit Tech, they said the purpose of the PLJX is to make it starts, which it did so it's not the module.

Here's what I'm confused about.  Its says:

System preset to overide the following ion passlock tyep use on: Saturn ION, Colorado, Cobalt, Canyon, Pursuit
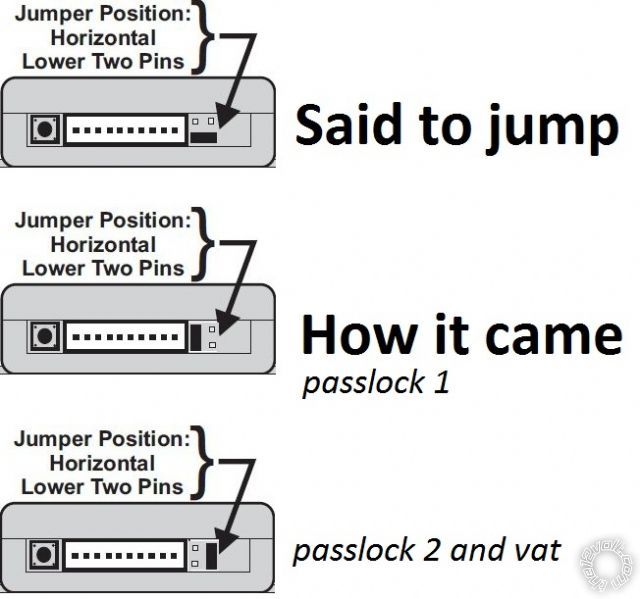
In the picture attached, it was jumped Vertical and but manual said to jump Horizontal(passlock1).  Also, I've read somewhere here that Colorado is passlock2.
Right now, I have it set at passlock1(the way it came), I will change it to Vertical per manual and see.

remote starter shift stuck -- posted image.

Dont Drive and Text, but
Do Text Then Drive
lurch228 
Silver - Posts: 1,338
Silver spacespace
Joined: August 08, 2012
Posted: November 22, 2012 at 5:33 PM / IP Logged  
The jumper is for timing settings for the different types of systems, as each has a different requirement as to when the different resistences need to be seen for the MUX. The MUX resistence uses the single wire to control multiple circuits. IE Keysense is one resistence, Starter 2 is another, and Second Accessory is yet another. Which the vehilce BCM controls via relays.
voltswagon 
Copper - Posts: 75
Copper spacespace
Joined: November 21, 2012
Location: Iowa, United States
Posted: November 22, 2012 at 6:00 PM / IP Logged  
Thanks for helping me trouble shoot this.  The tech from Bulldog and PLJX was stomped.  I'll try it tomorrow to reprogram the module.  I have to work tonight(yes, Thanksgiving).  So you agree, I should try the jumper on the first top picture?
Dont Drive and Text, but
Do Text Then Drive
lurch228 
Silver - Posts: 1,338
Silver spacespace
Joined: August 08, 2012
Posted: November 22, 2012 at 6:29 PM / IP Logged  
Yes it's required to operate correctly with you security system. Which is why you aren't getting the proper resistence on the MUX(Blue) data ECM side for the Accessory turn on.
voltswagon 
Copper - Posts: 75
Copper spacespace
Joined: November 21, 2012
Location: Iowa, United States
Posted: November 23, 2012 at 10:01 AM / IP Logged  
Wooh Hoooo! That was it. Just the wrong jumper. Retailer must of mess with the jumper prior to shipment or it was customer return because it wasn't set to default as it suppose to.
Also, I didn't even had to connect the RS acc wire. I might just use that for other output.
Thanks again LURCH228!
Now the main part is done. I can hook up the other options, lights and door and whatever is available.
Dont Drive and Text, but
Do Text Then Drive
lurch228 
Silver - Posts: 1,338
Silver spacespace
Joined: August 08, 2012
Posted: November 23, 2012 at 1:03 PM / IP Logged  
Good to hear that it works now. It's very important to follow all instructions and setting to the letter or you will have issues like yours. That why it's so important to read then read again and double and tripple check all wiring settings and jumpers especially the jumpers with the DEI stuff. And it will work right the first time and avoid these issues the majority of the time.

Sorry, you can NOT post a reply.
This topic is closed.

  Printable version Printable version Post ReplyPost New Topic
You cannot post new topics in this forum
You cannot reply to topics in this forum
You cannot delete your posts in this forum
You cannot edit your posts in this forum
You cannot create polls in this forum
You cannot vote in polls in this forum

  •  
Search the12volt.com
Follow the12volt.com Follow the12volt.com on Facebook
Friday, April 26, 2024 • Copyright © 1999-2024 the12volt.com, All Rights Reserved Privacy Policy & Use of Cookies
Disclaimer: *All information on this site ( the12volt.com ) is provided "as is" without any warranty of any kind, either expressed or implied, including but not limited to fitness for a particular use. Any user assumes the entire risk as to the accuracy and use of this information. Please verify all wire colors and diagrams before applying any information.

Secured by Sectigo
the12volt.com spacer
Support the12volt.com
Top
the12volt.com spacer