2006 Dodge Charger - Hemi V-8, automatic transmission, no factory alarm
Ultra Start U1272 Remote Start with Keyless Entry install. The 2006 and 2007 model years
are the same. This install can be done with relays for the Starter/Accessory MUX and relays
for the door locks and a spare key "in the box". Considering the time and comparing the
cost, the easiest way to do this install is with a full featured bypass module. All bypass module
manufacturers produce modules for this vehicle. Depending on your budget, you can go from a
basic system like this install ( $110 ) to a quick install T-Harness system with D2D communications
for a bit more.
This install used an iDatalink ADS AL CA module flashed with ADS AL(DL) CH5 firmware and
was connected to the U1272 R/S in the W2W mode. The W2W mode will allow the bypass module
to be connected to any remote start system. The U1272 is not an alarm system and does not
use the Door, Trunk or E-Brake Status outputs available from the iDatalink bypass module.
Below is a picture of the two modules bench prepped prior to the actual vehicle install.
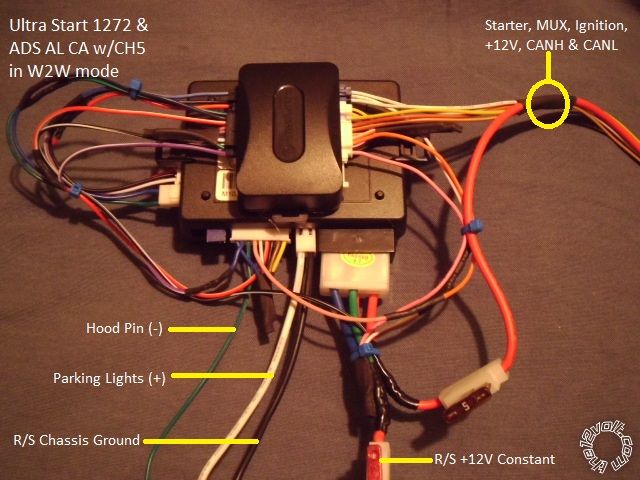
There will be only ten wires leaving the remote start / bypass assembly for connections
on the vehicle. Here is the wiring specific to the modules used :
U1272
6 Pin Ignition Harness
1 Yellow (+) Starter Output to vehicle 5 Pin ignition connector Starter (+) Pin 4 Pink/Dark Green
thru 5 Amp fuse and to ADS AL CA BLACK/ White Starter (+) Input
2 Green (+) Accessory Output not used
3 Red (+) +12V constant \ these 2 wires are combined into one and fused down
4 Red (+) +12V constant / to 20 Amps. Connect to +12V constant battery source.
5 White (+) Flex Relay Output not used
6 Blue (+) Ignition Output to ADS AL CA Pink Ignition wire and to ADS AL CA WHITE/ Red thru 1N4001 diode
2 Pin Harness
Black (-) Main Chassis Ground Chassis Ground
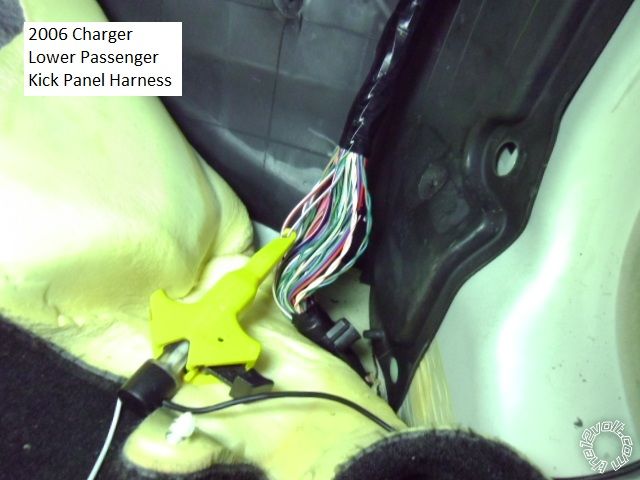
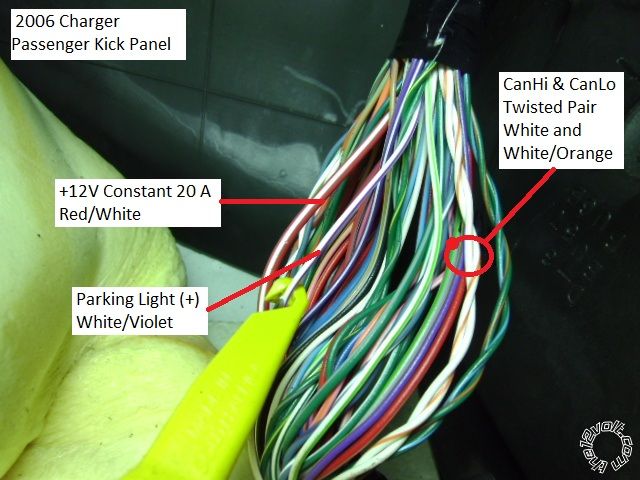
White Selectable Parking Light Output to vehicle WHITE/ Purple (+) Parking Light in PassKickPanel
*** set U1272 jumper to (+) Parking Light output
9 Pin Harness
1 Yellow (-) Rearm Output not Used
2 Brown (-) Disarm Output not used
3 Black (-) AUX1 Output not used
4 RED / White (-) Trunk Release to ADS AL CA RED / White Trunk (-) Input
5 WHITE/ Blue (-) Horn Output not used ( at customer request )
6 Pink (+) Brake Input to ADS AL CA Orange (+) Brake Output
7 GREEN / WHITE (-) Hood Pin Input to Hood Pin switch ( supplied in R/S kit )
8 Blue/White (AC) Tach Input to ADS AL CA PURPLE / White Tach ( AC ) Output
9 Blue (+/-) Glow Plug/WTS/Trigger Input not used
Lock Harness
Green (-) Lock to ADS AL CA GREEN/ Black Lock/Arm (-) Input
Blue (-) Unlock to ADS AL CA Blue/Black Unlock/Disarm (-) Input
3 Pin Bypass Harness Red +12V to ADS AL CA Red +12V Input
Black Ground to ADS AL CA Black Ground Input
WHITE/ Violet (-) GWR to ADS AL CA Blue/White GWR (-) Input
ADS AL CA ( previous U1272 connections not listed )7 Pin Connector
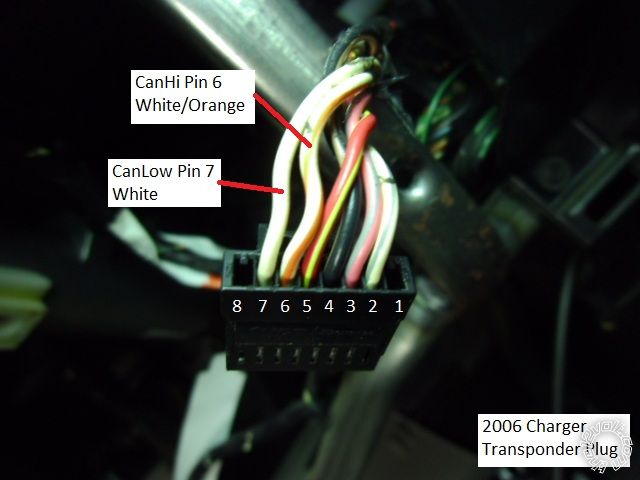
BROWN / Red CANH to vehicle WHITE/ Orange @ transponder connector Pin 6
BROWN / Yellow CANL to vehicle White @ transponder connector Pin 7
3 Pin White Connector
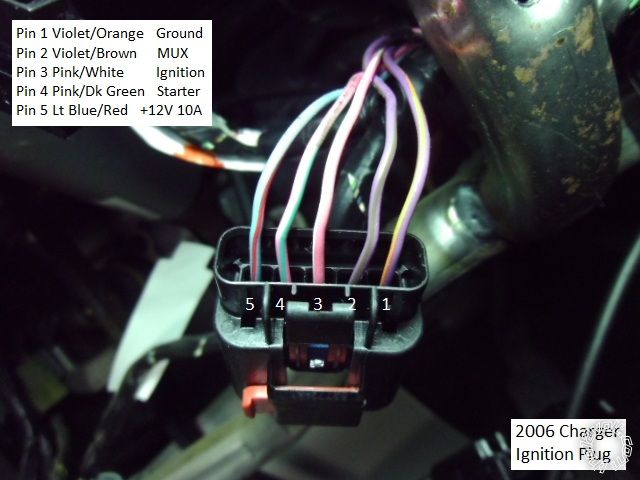
Yellow MUX to vehicle PURPLE / Brown MUX @ Ign connector Pin 2
3 Pin Blue Connector
White +12V to vehicle Light Blue/Red @ Ign connector Pin 5
WHITE/ Black Ignition (+) Output to vehicle Pink/White @ Ign connector Pin 3
Please download the ADS AL(DL) CH5 install guide for the detailed Type 1 wiring diagram at :
http://www.idatalink.com/support/get-install-guide/guide_id/9473
Disassembly :
The kick panel is a one piece assy and includes the door sill trim. Remove both driver & passenger side
by lifting the door sill ( 3 tabs ) and then lifting slightly and pulling straight back.
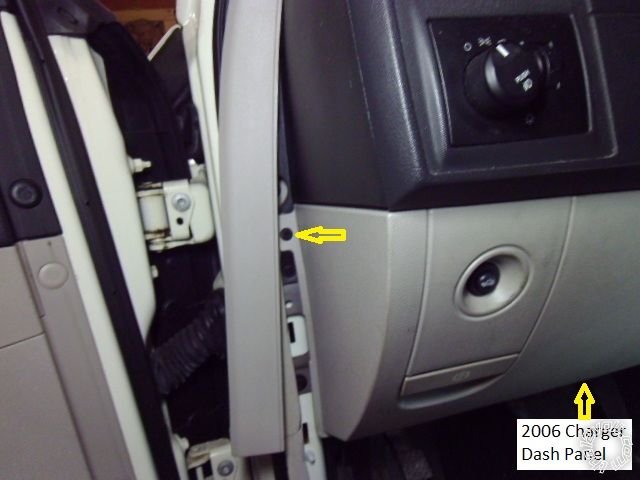
Remove the upper side dash trim piece shown to expose one lower dash panel retaining screw. Remove the other
lower dash panel retaining screw indicated with the yellow arrow, then pull the panel straight away from the
dash ( three clips along top edge ). Disconnect the Hood Release cable and trunk release harness. This will
expose the knee brace which is held in place by the four 10mm bolts indicated.
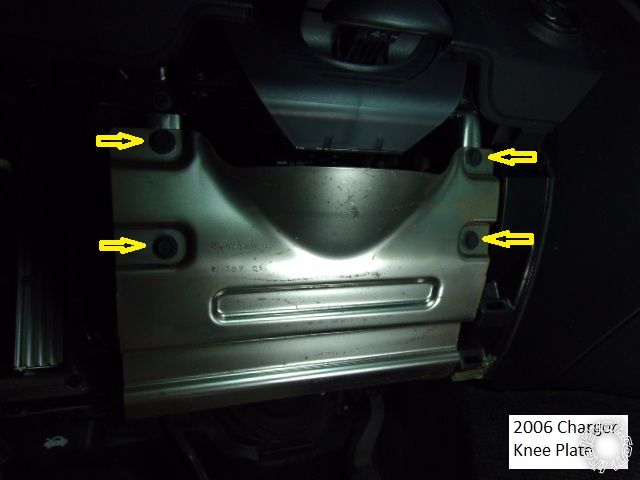
There is no need to remove the steering column covers but for better access to the ignition switch harnesses,
remove the instrument panel bezel. ( The main ignition harness is easy to reach but the transponder connector
is difficult.) There are 3 screws along the lower edge. Lower and fully extend the steering wheel, then gently
pull the ignition switch trim bezel out and then pull the instrument bezel away from the instrument cluster.
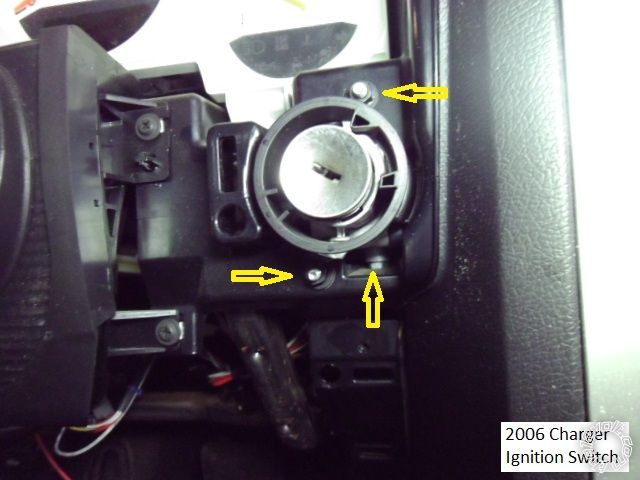
This will expose the ignition switch. The ignition switch is held in place by three 7mm nuts, shown below. The
nut at the bottom does not have to be removed, just loosened.
There is an insulation panel under the drivers dash ( not shown ) that is held in place by two fasteners along
the leading edge ( and the one dash panel screw removed earlier ) that is also removed during installation.
Installation :
There is plenty of room under the drivers dash for R/S placement. Aside from the Parking Light wire connection
in the PassKickPanel ( and possibly the R/S's +12V connection ) every thing is close and convenient. Here is a
picture of the R/S's chassis ground wire connection point.
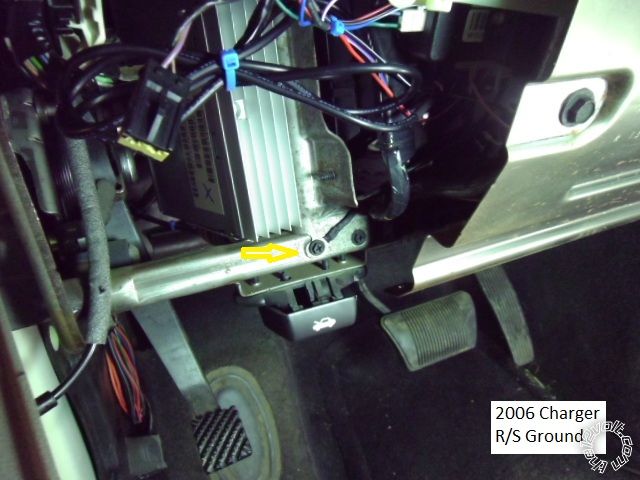
Here is a photo of the main ignition harness with the wires identified :
This is a shot of the transponder connector with the CAN wires indicated : ( Go by the pin location as the wire
colors can be different.)
Roll back the carpeting in the passenger kick panel, as shown below, for better access to the wire harness :
Here is s picture of the Parking Light wire :
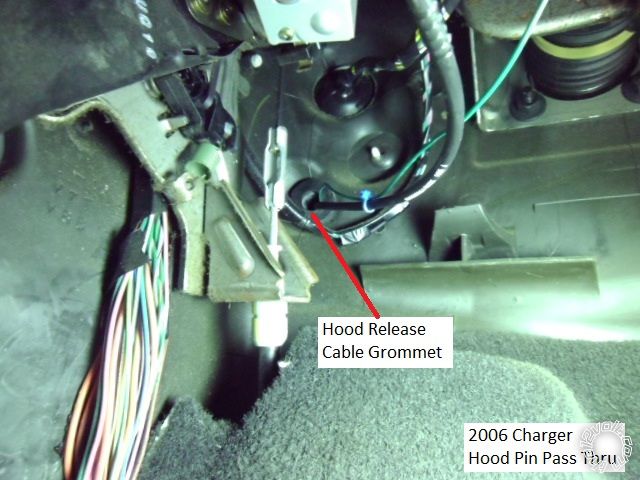
Firewall pass thru for the Hood Pin is available in several locations. The photo below shows the hood release
cable grommet under the drivers dash, in the left corner.
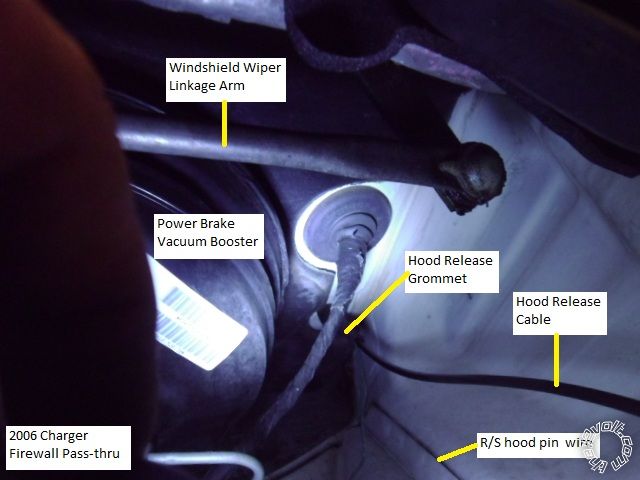
Remove the brake fluid reservoir panel cover in the engine compartment for better access to the hood release cable grommet
shown below :
As mentioned earlier, there are many bypass modules available for this vehicle. Going with a DATA style bypass
module will allow installation and programming with just one working key. Hardwiring the ignition connections
( solder, please! - no T-Taps or ScotchLocks ) in lieu of the T-Harness will save a few bucks.
Soldering is fun!
 Printable version


