the12volt.com spacer
icon

viper 5902 2008 f350 diesel


Post ReplyPost New Topic
< Prev Topic Next Topic >
clayton1985 
Member - Posts: 22
Member spacespace
Joined: January 05, 2013
Location: British Columbia, Canada
Posted: January 06, 2013 at 10:18 PM / IP Logged  
Yes the tach is connected and appears to be connected to the correct wire.
I know all but one wire is connected on the H3 harness, and 3 are connected to the same wire. I will go out and check.
clayton1985 
Member - Posts: 22
Member spacespace
Joined: January 05, 2013
Location: British Columbia, Canada
Posted: January 06, 2013 at 10:36 PM / IP Logged  
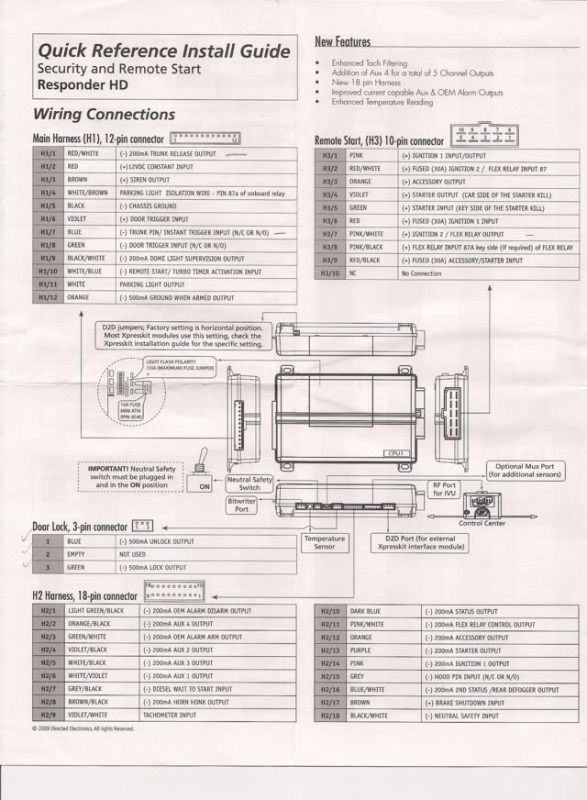
Ok here is what I got for the H3 harness...
viper 5902 2008 f350 diesel - Page 2 -- posted image.
H3/1 Pink wire is connected to WHITE/ Orange in Ign Harness
H3/2 RED / White is connected to WHITE/ Orange in Ign Harness
H3/3 Orange    is connected to PURPLE / Green in Ign Harness
H3/4 Violet    is connected to Blue/White   in Ign Harness
H3/5 Green     is connected to Blue/White   in Ign Harness
H3/6 Red       is connected to WHITE/ Orange in Ign Harness
H3/7 Pink/White is connected to WHITE/ Orange in Ign Harness
H3/8 Pink/Black has no connection
H3/9 RED / Black is connected to Brown(maybe gray)/green in Ign Harness
Thats those!
kreg357 
Platinum - Posts: 7,827
Platinum spaceThis member has made a donation to the12volt.com. Click here for more info.spaceThis member has been recognized as an authority in Electrical Theory. Click here for more info.spaceThis member has been recognized as an authority in Mobile Security and Convenience. Click here for more info.spacespace
Joined: January 30, 2009
Location: Pennsylvania, United States
Posted: January 07, 2013 at 3:52 AM / IP Logged  

Major problems here....

H3/1 Pink wire is connected to WHITE/ Orange in Ign Harness          OK

H3/2 RED / White is connected to WHITE/ Orange in Ign Harness       Blue/Red +12V constant  or Red @ SJB Black Plug H
H3/3 Orange    is connected to PURPLE / Green in Ign Harness          OK
H3/4 Violet    is connected to Blue/White   in Ign Harness    OK
H3/5 Green     is connected to Blue/White   in Ign Harness    OK
H3/6 Red       is connected to WHITE/ Orange in Ign Harness            Blue/Red +12V constant or Red @ SJB Black Plug H    
H3/7 Pink/White is connected to WHITE/ Orange in Ign Harness      BROWN / Yellow     ***set Viper to ACC2 Menu 3, UItem 8, Opt 2
H3/8 Pink/Black has no connection   OK
H3/9 RED / Black is connected to Brown(maybe gray)/green in Ign Harness      Blue/Red +12V constant or Red @ SJB Black Plug H

or more correctly ( with ACC1 and ACC2 in order )

H3/1 Pink wire  IGN1        WHITE/ Orange
H3/2 RED / White      Blue/Red +12V constant  or Red @ SJB Black Plug H
H3/3 Orange  ACC1         BROWN / Yellow
H3/4 Violet     Starter        Blue/White  cut truck side
H3/5 Green    Starter          Blue/White  cut Key switch side
H3/6 Red               Blue/Red +12V constant  or Red @ SJB Black Plug H
H3/7 Pink/White    ACC2             PURPLE / Green    ***set Viper to ACC2 Menu 3, Item 8, Opt 2
H3/8 Pink/Black                Not Used
H3/9 RED / Black      Blue/Red +12V constant  or Red @ SJB Black Plug H

Soldering is fun!
clayton1985 
Member - Posts: 22
Member spacespace
Joined: January 05, 2013
Location: British Columbia, Canada
Posted: January 07, 2013 at 10:20 AM / IP Logged  
Kreg,
Thanks man!    I leaving for a couple days for work so wont get a chance to mess around with it, but ill get to it as soon as im back and update.
Thanks!
lucasoil4u 
Copper - Posts: 317
Copper spacespace
Joined: May 11, 2009
Location: Minnesota, United States
Posted: January 07, 2013 at 3:05 PM / IP Logged  
Keep us updated! Tell the guy to get lost. He has no idea what he is doing and surprised the truck even still runs.
Mike M2 
Platinum - Posts: 2,652
Platinum spacespace
Joined: June 29, 2005
Location: United States
Posted: January 07, 2013 at 6:26 PM / IP Logged  

Getting constant from an ignition wire, priceless...

Don't let the guy near your truck...

Mike M2
Tech Manager
CS Dealer Services
clayton1985 
Member - Posts: 22
Member spacespace
Joined: January 05, 2013
Location: British Columbia, Canada
Posted: January 08, 2013 at 11:30 PM / IP Logged  
Dying to get working on this but still out of town.
Lol, so 3 of those wires need constant 12v?!?   Unreal.
He texted me today to let me know he had a new switch and should be good to go!   I havent replied yet....
clayton1985 
Member - Posts: 22
Member spacespace
Joined: January 05, 2013
Location: British Columbia, Canada
Posted: January 10, 2013 at 1:03 PM / IP Logged  
Ok.    Got wires re done last night. Just went out and hooked up batteries and plugged everything back into the brain. Hit the remote start button and......................................
30 secs later it starts!!!!!!
I still have to connect brake kill wire, hood pin switch and probably some aux items (heated seats, defrost maybe?)
I have one question right away though, after it started and was running I put key in ignition and turned to on/run position. Then I turned key off and removed and waited maybe a minute and didnt shut off. Would it be the turbo timer, or?   I hit the remote start button to shut down.
I would like to thank everyone, esp Kreg357 for the quick respones and great help/info. I really appreciate it.
I am mechanically inclined (do all my own work, install lift, exhaust, etc on my vehicles) I have always had a dislike for wires, id rather tear down an engine than deal with wires but this has made me feel alot more confident and comfortable working on electrical stuff!
Thanks!
Clayton
kreg357 
Platinum - Posts: 7,827
Platinum spaceThis member has made a donation to the12volt.com. Click here for more info.spaceThis member has been recognized as an authority in Electrical Theory. Click here for more info.spaceThis member has been recognized as an authority in Mobile Security and Convenience. Click here for more info.spacespace
Joined: January 30, 2009
Location: Pennsylvania, United States
Posted: January 10, 2013 at 2:37 PM / IP Logged  

Good job!  We are here to help.  Now you have to come up with a good story for your friends "installer".

The Viper will continue in remote start mode until it sees the Brake pedal input wire go to (+), the Hood Pin

wire go to (-) or you press the remote start button again.  If the key is in the ignition and turned to ON when
you step on the Brake Pedal ( called a "key take over" ) the Viper ends it's remote start control and the engine
continues to run because the key is ON.

The Brake input is mandatory and the Hood Pin input is a necessary safety feature.   Just make sure you

solder everything, insulate with a quality electric tape ( Scotch Super 33+ ) and secure all the R/S wires neatly
out of the way.  The 30 second "Wait to Start" delay sounds a bit long.  You can program the Viper for a fixed
15 second delay, instead.

Soldering is fun!
clayton1985 
Member - Posts: 22
Member spacespace
Joined: January 05, 2013
Location: British Columbia, Canada
Posted: January 10, 2013 at 4:10 PM / IP Logged  
Thanks!
I tried getting into programming mode before but couldnt get it figured out or perhaps he messed something else up too....
I just happened to order a bitwriter last week so that should show up soon.
Im going out to hook up brake wire, and finish tidying up the wires/brains.
Page of 4

  Printable version Printable version Post ReplyPost New Topic
You cannot post new topics in this forum
You cannot reply to topics in this forum
You cannot delete your posts in this forum
You cannot edit your posts in this forum
You cannot create polls in this forum
You cannot vote in polls in this forum

  •  
Search the12volt.com
Follow the12volt.com Follow the12volt.com on Facebook
Friday, July 18, 2025 • Copyright © 1999-2025 the12volt.com, All Rights Reserved Privacy Policy & Use of Cookies
Disclaimer: *All information on this site ( the12volt.com ) is provided "as is" without any warranty of any kind, either expressed or implied, including but not limited to fitness for a particular use. Any user assumes the entire risk as to the accuracy and use of this information. Please verify all wire colors and diagrams before applying any information.

Secured by Sectigo
the12volt.com spacer
Support the12volt.com
Top
the12volt.com spacer