the12volt.com spacer
icon

2013 camry excalbur al 1830 edbp with bla


Post ReplyPost New Topic
< Prev Topic Next Topic >
wabasha11 
Member - Posts: 8
Member spacespace
Joined: June 15, 2013
Location: California, United States
Posted: June 15, 2013 at 11:35 PM / IP Logged  
I am a rookie car alarm Installer and have a question. I am installing a the RS above in a 2013 Camry. I have the USB flasher. I plugged in the blade cartridge and flashed the TL5-EN Firmware for the car. In the install file for the BLADE unit, it shows that you need to connect the Power / Ignition / Acc. harness. Then it shows to connect The CANH, IMMO DATA, and the CANL all from the OBDII port. Then the Door lock Data to the blade harness and from the 18 pin 1830 unit to connect the Parking light (-) output and it tells you exactly where these the
1) 12V
2) ACC
3) CANH
3) CANL
4) Doorloack Data,
5) Ignition A and B
6) Immobilizer
7) Parking Lights
8) Starters 1 and 2
the locations, Camry plug and pin #. My question is if the blade cartridge is installed and these connections are made, Is that all that needs to be done? Or do I have to connect the other wires in the 1830 manual? The 18 harness for the 1830 shows to also make connections for Dome Lights Relay N/O(+/-)Input, the Dome Lights Relay output N/C (+/-) Input and the Door Lock Relay COM Output. the same holds true for the horn. Do I simply take the Dome Lights N/O and N/C and connect them to 12+ and the other to Ground with the COM connecting to the Dome Lights? The Dome Light is (-) so does it matter for the N/C and N/O connections which one goes to 12+ and which goes to ground? Same for the horn.
To clarify, my question are as follows:
1) Are the connections from the blade install manual all I need to connect
2) Do I need to connect the 18 pin harness Dome and Horn wiring?
3) If so, does it matter which ones go to 12V and Ground or can I choose?
4) For the COM connections to the dome and horn, do I have to make an adjustment so the 1830 unit gives a (-) output?
5) With the Blade wired and the dome light and horn, is that all the wiring that needs to be done?
6) Do I need to go in and program the unit for a (-) output for these circuits?
I hope I am making sense.
Thanks
tr
wabasha11 
Member - Posts: 8
Member spacespace
Joined: June 15, 2013
Location: California, United States
Posted: June 15, 2013 at 11:39 PM / IP Logged  
I forgot to ask if I need to even use the 6 Pin aux, 3 Pin Sat. Relay Port (Red), " " (Blue. and 4 pin door lock port? It shows to connect red wires to 12+ for the 3 port and 4 pin locks and the other wires are showing optional. The pink is channel 3 output but I won't be installing it to anything and finally, my Camry is not Push Start, it is an SE with standard 80G key.
tr
kreg357 
Platinum - Posts: 7,783
Platinum spaceThis member has made a donation to the12volt.com. Click here for more info.spaceThis member has been recognized as an authority in Electrical Theory. Click here for more info.spaceThis member has been recognized as an authority in Mobile Security and Convenience. Click here for more info.spacespace
Joined: January 30, 2009
Location: Pennsylvania, United States
Posted: June 16, 2013 at 5:08 AM / IP Logged  
The quick answer is -- the iDatalink install diagram shows most all of the necessary connections. It does not
go into great detail on the R/S side of things because the Blade cartridge can be used on the Compustar or
some Excalbur systems. Basically, follow the Install guide #11177 Type 2 diagram using the wiring chart. You
will need an additional relay to support all the ignition wires ( 2 IGN, 2 Starter and 1 ACC ).
Usually, Dome Light Supervision is not required on newer vehicles because the Dome Light will come with
an Unlock and go off ( fade out ) with a Lock. Test to verify.
As for the optional Horn connection, you will have to run that wire from the Excalbur to the Camry. If the
Excalbur's Horn output is (-) you should be able to make a direct connection the the Camry's horn wire.
Horn Trigger    Lt. Blue (-)    @ dash fuse box, white 40 pin plug (3D), pin 15
Please note that If the Camry does not have the Factory Hood Pin ( Factory Alarm system ) you will also need
to install the Excalbur kits' hood pin and connect that to the Excalbur's Hood Pin input wire.
In this application, the Factory remotes will not work during a remote start so you will have to use the
Excalbur remotes. ( With some vehicles, like the 2010 & 2011 Camry's, it will allow the Factory remotes
to operate during a remote start.)
Here is a link to a similar install on a 2011 RAV4 using the ADS AL CA bypass module instead of the
Blade cartridge : https://www.the12volt.com/installbay/forum_posts.asp~TID~133996~PN~1   You will
see a lot of similarities.
Soldering is fun!
wabasha11 
Member - Posts: 8
Member spacespace
Joined: June 15, 2013
Location: California, United States
Posted: June 16, 2013 at 7:46 PM / IP Logged  
Thanks. I am using the excalibur 1830 model 2 way. I have the blade cartridge installed in the excalibur compatible model so the alarm has a 20 pin and an 18 pin harness that both plug in the 1830 alarm. The 20 harness for the blade and the 18 for the Excalibur. I am using the 11177 type 2 and have all the wires identified and tested.   I actually bought the oem hood switch and installed it so I would be able to avoid installing and running a wire through the firewall. But my 2 isses are the 18 harness for the excalibur (when I refer to the 1830 or the excalibur I am refering to the same thing. The model number of the excalibur alarm / RS system). The 18 harness on the 1830 tells says there are 3 horn wires. 1 for the "com" and the other 2 for either 12+ or chassis ground. The 2 wires both say the same thing. I am assuming they need to be connected for power for the relay. One question is does it matter which wire goes to 12+ and which goes to ground?   Can I just splice them in at the brain to the main 12+ and the main ground? Then that would leave to "com" wire. Does this go to the horn (-) wire?
From the comments you made, do I even need to hookup the 3 dome light wires at all? They use the same principal of "com" and 12 + wire and chassis ground wire.
What am I using the relay for? Can someone please explain?    
I think I understand that the horn needs to havee an activation means so would I install as I explained above and through the firmware/flashing it allows you to also set all adjustments. To me, logically the horn needs to activate from the "unlock" setting. The other 2 option settings I think are ignition and accessory. So I have to select one of them. I did look at the RAV4 install but am still a little confused.
The Camry does not have an OEM alarm but as I mentioned, I installed the OEM hood switch in the latch and plugged it in to the 2 or 3 pin connector that was sitting there not being used so since I did so I am assuming the 1830 will know through the OBDII the hood status and no additional wiring will be required.
Thanks for the help.
tr
kreg357 
Platinum - Posts: 7,783
Platinum spaceThis member has made a donation to the12volt.com. Click here for more info.spaceThis member has been recognized as an authority in Electrical Theory. Click here for more info.spaceThis member has been recognized as an authority in Mobile Security and Convenience. Click here for more info.spacespace
Joined: January 30, 2009
Location: Pennsylvania, United States
Posted: June 16, 2013 at 9:12 PM / IP Logged  
While I am familiar with the Compustar Systems that use the iDatalink Blade cartridge, I have
never used any Excalibur units. I did download the install guide for your 1830 system so here
goes :
The only wires that need to be connected on the 18 Pin Harness are :
Black to Chassis Ground ( you can tie in all other wires needing ground )
Brown to siren
WHITE/ Black Flashing Light to Camry Parking Lights (-) Black @ Body ECU on dash fuse box, white 30 pin plug, pin 30
Optional
Blue/Black Horn Relay Output to Camry Horn (-)
Violet/Black Horn Relay Input to chassis ground
BROWN / Black - not used
Dome Light - probably won't need
Hood Pin if Blade does not pick up the factory switch you installed.   Easy test : Get everything
working, do a remote start and lift the hood. The engine should shutdown.
The Horn is optional. I imaging the Siren chirps with door lock commands...
The Excalibur 1830 is capable of supplying two Ignitions, one Starter and one Accessory. That
leaves the Camry's Starter2 circuit. You can accomplish this using a 30/40 Amp SPDT relay and
a fuse holder with a 20 Amp fuse, wired as follows :
Relay Pin 85 to Excalibur 3 Pin Sat. Port,   Green (-) Start Output
Relay Pin 86 and 87 to +12V Constant with fuse holder & fuse
Relay Pin 30 to Camry Light Green Starter2 (+)
Relay Pin 87a   not used - insulate.
Soldering is fun!
wabasha11 
Member - Posts: 8
Member spacespace
Joined: June 15, 2013
Location: California, United States
Posted: June 16, 2013 at 10:40 PM / IP Logged  
Can't I use the horn instead of the siren? I was trying to avoid the siren. I understand the rest. But to clarify, the relay is because there are 2 starter wires on the camry, starter 1 lt. green position 3 on 8 pin camry harness and starter 2 blue position 7 on same 8 pin camry harness. Since there are 2 starter wires on the camry, I need the second starter to engage using the relay? Is that the logic for the relay?
The only wires that need to be connected on the 18 Pin Harness are :
Black to Chassis Ground ( you can tie in all other wires needing ground )
Brown to siren .Can I leave out the siren?
WHITE/ Black Flashing Light to Camry Parking Lights (-) Black @ Body ECU on dash fuse box, white 30 pin plug, pin 30
Optional
Blue/Black Horn Relay Output to Camry Horn (-)
Violet/Black Horn Relay Input to chassis ground Because the horn is negative?
BROWN / Black - not used
Dome Light - probably won't need Because the dome should pickup from the 20 Pin Blade ?
Hood Pin if Blade does not pick up the factory switch you installed.   Easy test : Get everything
working, do a remote start and lift the hood. The engine should shutdown.
The Horn is optional. I imaging the Siren chirps with door lock commands...
The Excalibur 1830 is capable of supplying two Ignitions, one Starter and one Accessory. That
leaves the Camry's Starter2 circuit. You can accomplish this using a 30/40 Amp SPDT relay and
a fuse holder with a 20 Amp fuse, wired as follows : So I can tap into the 12+ from the main Excalibur harness for this and tie both 12+ together for the relay into the fuse, then connect to the tap into the main 12+ ?
Relay Pin 85 to Excalibur 3 Pin Sat. Port,   Green (-) Start Output negative output will trigger the relay and feed 12+ to the Starter 2 ?
Relay Pin 86 and 87 to +12V Constant with fuse holder & fuse As mentioned above ?
Relay Pin 30 to Camry Light Green Starter2 (+)
Relay Pin 87a   not used - insulate
I think I understand the rest. If Dome Light does not work, then what would the alternative be? This circuit is important for door sensing.
Thanks a lot for your help. I didn't realize how much the blade cut out so many connections. Amazing. If I used the other newer unit that they make (my apologies, I forget the name of it) I would be able to use the factory keyless entry to activate the RS I think.
Will I be able to use the keyless entry still for just locking / unlocking the doors if I do not choose to set the alarm or operate the RS?
tr
kreg357 
Platinum - Posts: 7,783
Platinum spaceThis member has made a donation to the12volt.com. Click here for more info.spaceThis member has been recognized as an authority in Electrical Theory. Click here for more info.spaceThis member has been recognized as an authority in Mobile Security and Convenience. Click here for more info.spacespace
Joined: January 30, 2009
Location: Pennsylvania, United States
Posted: June 17, 2013 at 6:53 AM / IP Logged  
Wow, a lot of questions. Again not an Excalibur user but...
You can leave the siren disconnected and use the horn. See programming option 15.
Yes, the vehicle needs a (-) Horn connection, so the Excalibur's Horn Relay Input is connected
to chassis ground.
The Blade doesn't directly control the Dome Light. If a Unlock command also turns on the
Dome Light, the vehicle controls that.
Depending on the current needs of the ignition wires and the Excalibur itself, you might
not be able to join all the Excalibur and extra relay power wires into one. Typically, I make
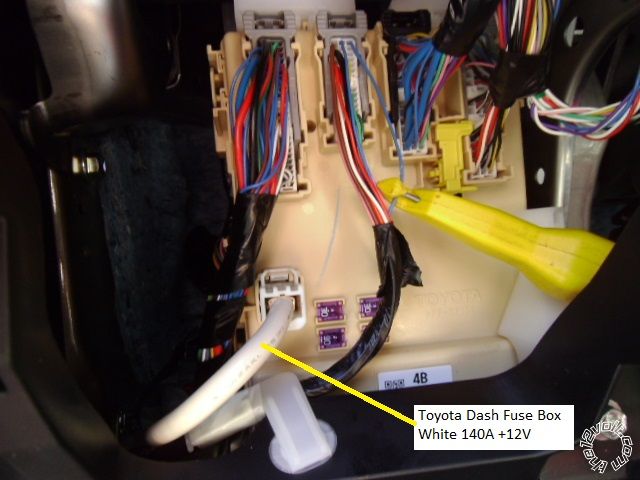
my power connection(s) at the thick White wire at the Dash Fuse Box. Generic Toyota
picture below :
2013 camry excalbur al 1830 edbp with bla -- posted image.
The Factory remotes should continue to work the same after the Excalibur install.
Soldering is fun!
wabasha11 
Member - Posts: 8
Member spacespace
Joined: June 15, 2013
Location: California, United States
Posted: June 24, 2013 at 8:46 PM / IP Logged  
So I finally got around to hooking it up. I wired the 2 ignitions, the accessory, and the 2 starters (starter # 2 by relay as suggested from the three port red harness) and I made the immobilizer and the other 2 CanH and CanL connections at the OBD port. The parking lights to the black 30 pin # 30 and the doorlock to pin 16 (blue) on the same 30 harness. I made the 12+ connection to the main white power. First thing I did when I plugged everything in is I turned the key to on and off and the Blade unit went to blue for 2 sec then shut off so I know it programmed the key to the immobilizer according to the programming directions. But when I remote start, I hear the relay in the brain click and the remote shows it starting yet nothing happens. I thought it may be due to the hood pin switch so I ran the Grey/Red wire from the 20 Pin Blade harness to ground and then the grey 18 pin harness wire to the pin switch and installed it and nothing happened either. I did not connect the horn or the siren but I did ground the horn wire and the dome light just in case I needed to hook them up but did not hook the dome light or the horn wires to the vehicle. I have the flasher unit and I flashed the correct firmware and left the factory settings. I went through the rundown of the installer and the user programming options to see if I could find something that needs to be changed in the programming but could not find anything that jumped out. Any ideas? Oh and by the way, the factory remote unlocks, but when you lock, it beeps as if you just had the keyless entry and locked the car with a door open. The trunk release, lock, and unlock all work on the Excalbur remotes. But going with the most simple wiring, where might I have gone wrong?
Thanks.
tr
kreg357 
Platinum - Posts: 7,783
Platinum spaceThis member has made a donation to the12volt.com. Click here for more info.spaceThis member has been recognized as an authority in Electrical Theory. Click here for more info.spaceThis member has been recognized as an authority in Mobile Security and Convenience. Click here for more info.spacespace
Joined: January 30, 2009
Location: Pennsylvania, United States
Posted: June 24, 2013 at 9:42 PM / IP Logged  
Might not be able to assist too much ( Excalibur ). There are several things that should be checked.
1.   Being as the Blade supplies a nice Tach signal, set the AL-1830 to Tach Mode ( Installer Feature #6 ) and
do the Tach Learn process.
2.   Ensure that the AL-1830 is not in Manual Trans mode. Change Installer Option 5 to Auto Trans.
3. Triple check all your connections to ensure the correct vehicle wires and a good solder joints.
4. Use a DMM to check if the two Starter outputs, AL-1830 Violet and External SPDT Relay Pin 30, go to
+12V at any point of a R/S attempt. Also verify both Ignition outputs go to +12V.
Here are the AL-1830 R/S LED diagnostic flash codes.
REMOTE START DIAGNOSTICS (GREEN LIGHT):
The remote start system can also indicate which zone caused the last remote
start cycle was ended. To see this indicator, place the system into alarm valet mode.
Immediately after the chirp, the GREEN status light will flash to indicate what caused
remote start to end.
1 FLASH: Run time expired.
2 FLASHES: Brake pedal was pressed.
3 FLASHES: Engine stalled or a bad tach signal.
4 FLASHES: Received transmitter command to stop.
5 FLASHES: Gear selector was moved from park(or the parking brake was released).
6 FLASHES: The alarm was triggered or low battery voltage.
The Blades' LED will also show Red or Blue indications to point you in the right direction.
If I understand the other problem with the factory remote FOB's not doing a Lock correctly,
that is a problem. The added R/S & Blade should not change normal vehicle operation if installed
correctly. If you have the Factory Alarm system and popping the hood will set off the Factory
alarm, do not ground the Blade Gray/Red wire. You can also try a Factory Reset on the Blade
and then reprogram to the car with the ignition key again.
Soldering is fun!
kreg357 
Platinum - Posts: 7,783
Platinum spaceThis member has made a donation to the12volt.com. Click here for more info.spaceThis member has been recognized as an authority in Electrical Theory. Click here for more info.spaceThis member has been recognized as an authority in Mobile Security and Convenience. Click here for more info.spacespace
Joined: January 30, 2009
Location: Pennsylvania, United States
Posted: June 24, 2013 at 9:48 PM / IP Logged  
I'm sure you did it but being as it wasn't mentioned, the AL-1830 Black wire on the 18 Pin connector should go to a very solid, clean, paint free, chassis ground point using a soldered on terminal ring.
Soldering is fun!
Page of 2

  Printable version Printable version Post ReplyPost New Topic
You cannot post new topics in this forum
You cannot reply to topics in this forum
You cannot delete your posts in this forum
You cannot edit your posts in this forum
You cannot create polls in this forum
You cannot vote in polls in this forum

  •  
Search the12volt.com
Follow the12volt.com Follow the12volt.com on Facebook
Wednesday, May 8, 2024 • Copyright © 1999-2024 the12volt.com, All Rights Reserved Privacy Policy & Use of Cookies
Disclaimer: *All information on this site ( the12volt.com ) is provided "as is" without any warranty of any kind, either expressed or implied, including but not limited to fitness for a particular use. Any user assumes the entire risk as to the accuracy and use of this information. Please verify all wire colors and diagrams before applying any information.

Secured by Sectigo
the12volt.com spacer
Support the12volt.com
Top
the12volt.com spacer