the12volt.com spacer
icon

Headrest Monitor How To, 91 Accord


Post ReplyPost New Topic
< Prev Topic Next Topic >
Velocity Motors 
Moderator - Posts: 12,488
Moderator spaceThis member has made a donation to the12volt.com. Click here for more info.spaceThis member has been recognized as an authority in Electrical Theory. Click here for more info.spaceThis member has been recognized as an authority in Fabrication. Click here for more info.spaceThis member has been recognized as an authority in Mobile Audio and Video. Click here for more info.spaceThis member has been recognized as an authority in Mobile Security and Convenience. Click here for more info.spacespace
Joined: March 08, 2002
Location: Manitoba, Canada
Posted: March 17, 2006 at 8:27 PM / IP Logged  

Here's some simple steps and photo's on how to install a headrest monitor into a removable headrest. The techniques outlined in this step by step is my own personal techniques and experiences so please feel free to modify the way it is done here. Let's begin:

Headrest Monitor How To, 91 Accord - Last Post -- posted image.

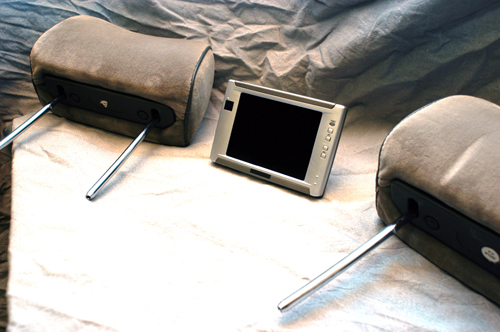
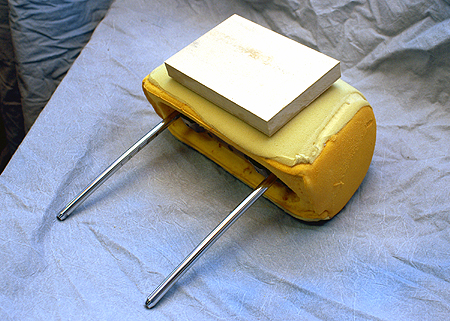
Take the head rest(s) off the vehicle and size up the monitor to the back of the head rest to ensure that it will have enough room side to side and top to bottom to support the size monitor that you wish to install. In this case we are installing a 5 ˝” TFT LCD color monitor. The casing dimensions area is 6 ˝” x 4 ˝” so be sure you double check this before you begin the project.

Headrest Monitor How To, 91 Accord - Last Post -- posted image.

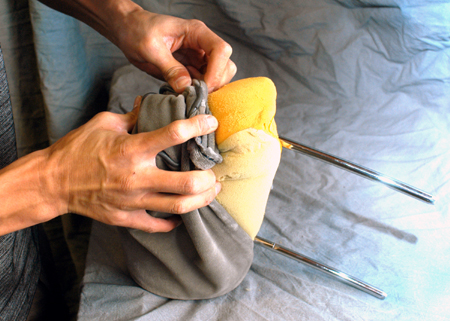
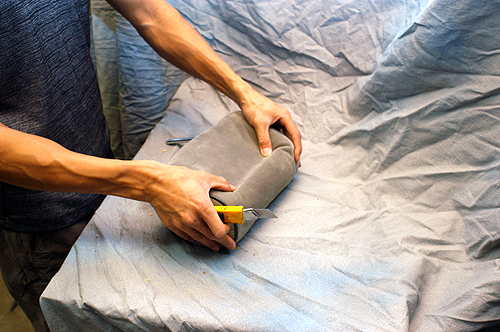
On this particular headrest you can unzip or unclip the headrest cover off the foam. You will need to work the cloth and sponge to one side as the fabric is very tight around the sponge. Don’t be afraid to use a little elbow grease during this portion of the installation as it will probably speed up the process.

Headrest Monitor How To, 91 Accord - Last Post -- posted image.

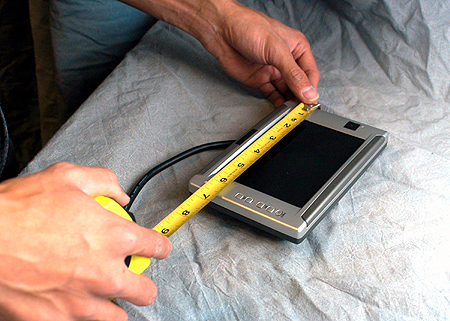
The next step is to measure the outside dimensions of the LCD monitor and cut your self a template so you can transfer this to the fabric portion of the headrest with accuracy.

Headrest Monitor How To, 91 Accord - Last Post -- posted image.

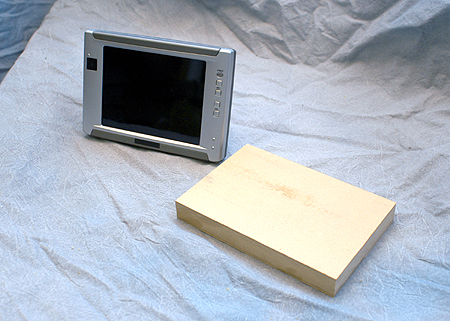
Here we have a piece of MDF ( medium density fiberboard ) cut to the outside dimensions of the LCD monitor and ready to transfer the template to the sponge part of the headrest.

Headrest Monitor How To, 91 Accord - Last Post -- posted image.

Measure the center of the headrest and position the MDF template over the sponge. Take a fine tipped felt marker and trace the template on the sponge headrest.

Headrest Monitor How To, 91 Accord - Last Post -- posted image.

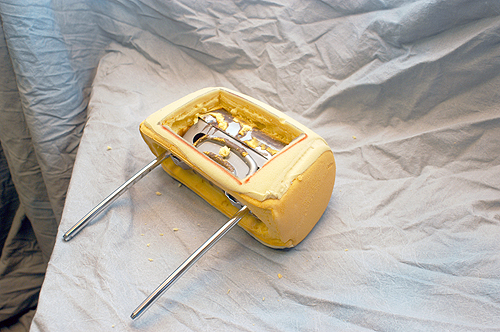
Take an Exacto or utility knife and carefully cut the traced out template. Make sure that you cut deep enough to be able to remove the entire traced out area. Peel back the sponge where it was cut and remove all the sponge within this area. In this case the sponge was attached with glue to the back plate which caused a bit of a sticky situation.

Headrest Monitor How To, 91 Accord - Last Post -- posted image.

After you have taken out the sponge and clean up back plate of any glue residue and stuck on sponge, try a test fit of the screen. Now you are ready for the cloth portion of the installation.

Headrest Monitor How To, 91 Accord - Last Post -- posted image.

You will need to refit the cloth cover back over the sponge headrest. This step will be easier now that you have taken out a large portion of the sponge. Position the cover back to normal and take your fingers and push the cloth so you see a definite line as to where the sponge edge is. From this point take the knife and cut about 5/8” inside of that edge. DO NOT cut any closer as you need this extra material to tuck under the screen when it’s time. When you are done you should have a smaller cutout area than the MDF template.

Headrest Monitor How To, 91 Accord - Last Post -- posted image.

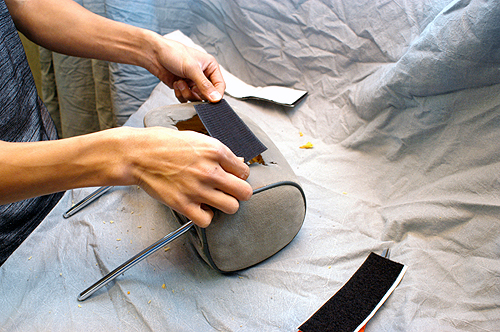
After you have cleaned up the back plate and the hole has been cut out you can take 2” strips of Velcro ( use the double sided tape Velcro ) and stick the strips to the back plate. When you trim the cloth make sure that you cut in a reverse “V” shape into the corner on all 4 sides of cutout so that the material folds properly when you insert the screen. ** TIP: You can make youself a bracket as well to screw the screen into place instead of the Velcro.

Headrest Monitor How To, 91 Accord - Last Post -- posted image.

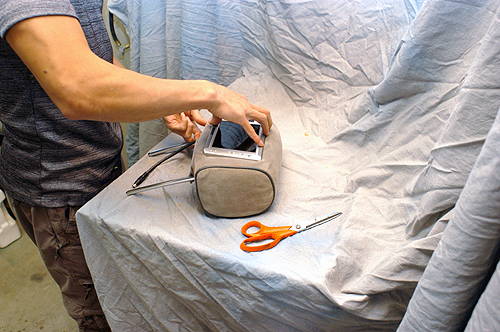
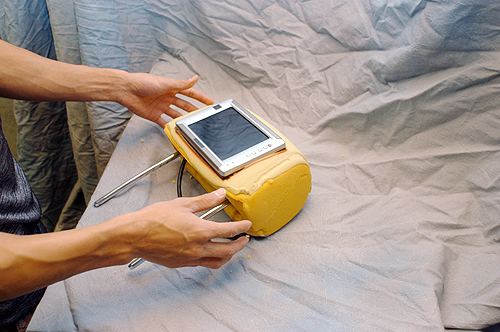
Apply the other side of the Velcro to the backside of the LCD monitor. Now it’s time to install the monitor into the headrest. Make sure that you slip the M-bus connector through the headrest leg before you put things back together.

Headrest Monitor How To, 91 Accord - Last Post -- posted image.

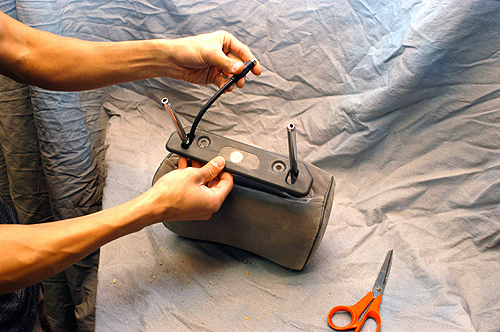
Time to put everything back together again and make sure that you slipped the M-bus connector through the plastic seam cover plate before re-installing the plugs.

Headrest Monitor How To, 91 Accord - Last Post -- posted image.

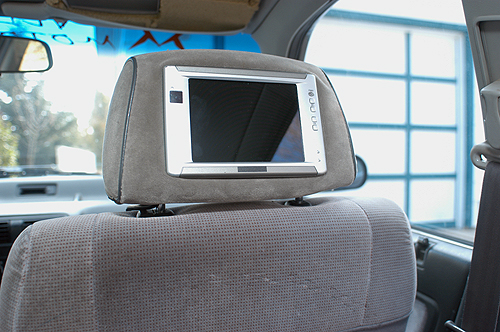
Take the finished product to the vehicle and reinstall it onto the seat. Slip the M-bus connector down inbetween the seat and connect to the junction box or audio/video selector module to the monitor and your done.

Headrest Monitor How To, 91 Accord - Last Post -- posted image.

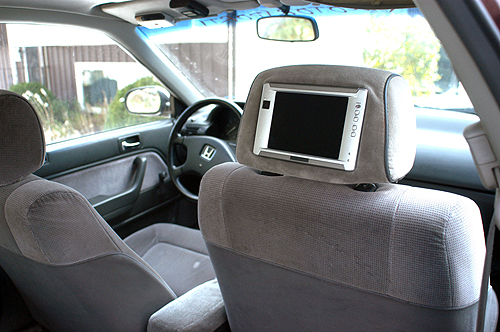
Another shot of the finished product. If you have seats without the removable headrests, you can follow the same steps as above, but you will need to add a metal plate to attach the screen to. There are not any braces in those types of seats and custom fabrication is required.

Jeff
Velocity Custom Home Theater
Mobile Audio/Video Specialist
Morden, Manitoba CANADA
xscash 
Copper - Posts: 317
Copper spacespace
Joined: March 05, 2006
Location: United States
Posted: March 17, 2006 at 8:30 PM / IP Logged  
looks good. nice job jeff
Velocity Motors 
Moderator - Posts: 12,488
Moderator spaceThis member has made a donation to the12volt.com. Click here for more info.spaceThis member has been recognized as an authority in Electrical Theory. Click here for more info.spaceThis member has been recognized as an authority in Fabrication. Click here for more info.spaceThis member has been recognized as an authority in Mobile Audio and Video. Click here for more info.spaceThis member has been recognized as an authority in Mobile Security and Convenience. Click here for more info.spacespace
Joined: March 08, 2002
Location: Manitoba, Canada
Posted: March 17, 2006 at 8:31 PM / IP Logged  
Thank you.
Jeff
Velocity Custom Home Theater
Mobile Audio/Video Specialist
Morden, Manitoba CANADA
xscash 
Copper - Posts: 317
Copper spacespace
Joined: March 05, 2006
Location: United States
Posted: March 18, 2006 at 12:27 PM / IP Logged  

jeff im sure you do  this alot  but i thought i would tell  you how i do it.my  normal install has a headrest shroud.

i remove the shroud...center it on the headrest. use masking tape to outline the shroud. i then cut the headrest a bit smaller than my outline....heres the thing.....i round the cuts on the corners. when i strech the material it wont rip at the cut......i then cutout the foam inside a bit larger than the opening.....i insert the shroud all the way in and pull the material over it .....then i insert the wire just as you did and carefully press fit the lcd into the shroud.....this pinches the material tightly and smoothly......this serves 2 purposes.....first---it holds the lcd firmly without any type of fasteners  and secondly---- if someone pushes on the headrest material , it cant move or pull out.  ....very clean look....ive gotten pretty good at this type of install and can do each tv in about 6-8 min.   great profit potental.

just thougt i would share.  ill take some pics of my next job and post em.

XS

autofan01 
Member - Posts: 20
Member spacespace
Joined: May 04, 2003
Location: South Africa
Posted: March 18, 2006 at 5:45 PM / IP Logged  
Thanks Jeff, very informative! But can you please explain in a little more detail as to how you ran the cable down the seat. Does it actually run down inside the backrest?
Nicolas
Velocity Motors 
Moderator - Posts: 12,488
Moderator spaceThis member has made a donation to the12volt.com. Click here for more info.spaceThis member has been recognized as an authority in Electrical Theory. Click here for more info.spaceThis member has been recognized as an authority in Fabrication. Click here for more info.spaceThis member has been recognized as an authority in Mobile Audio and Video. Click here for more info.spaceThis member has been recognized as an authority in Mobile Security and Convenience. Click here for more info.spacespace
Joined: March 08, 2002
Location: Manitoba, Canada
Posted: March 18, 2006 at 5:52 PM / IP Logged  
Nicolas, you will need to un-solder the M-Bus cable from the monitor and cut a small hole into the top of the seat. Use a gromet plug to cover the hole and pass the wire through the gromet.Then use super glue to hold the gromet in place to the fabric. Route the wire under the seat and reattach the wires you un-soldered back onto the monitor.
Jeff
Velocity Custom Home Theater
Mobile Audio/Video Specialist
Morden, Manitoba CANADA
autofan01 
Member - Posts: 20
Member spacespace
Joined: May 04, 2003
Location: South Africa
Posted: March 18, 2006 at 6:15 PM / IP Logged  
Hey, thanks for the quick reply! Appreciated.
rallysport 
Copper - Posts: 172
Copper spacespace
Joined: April 10, 2004
Location: United States
Posted: April 10, 2006 at 1:24 PM / IP Logged  
is that a 92ish accord?
Velocity Motors 
Moderator - Posts: 12,488
Moderator spaceThis member has made a donation to the12volt.com. Click here for more info.spaceThis member has been recognized as an authority in Electrical Theory. Click here for more info.spaceThis member has been recognized as an authority in Fabrication. Click here for more info.spaceThis member has been recognized as an authority in Mobile Audio and Video. Click here for more info.spaceThis member has been recognized as an authority in Mobile Security and Convenience. Click here for more info.spacespace
Joined: March 08, 2002
Location: Manitoba, Canada
Posted: April 10, 2006 at 10:07 PM / IP Logged  

This is a 1991 Accord. Same as the 90, 92 & 93.

Jeff
Velocity Custom Home Theater
Mobile Audio/Video Specialist
Morden, Manitoba CANADA

Sorry, you can NOT post a reply.
This topic is closed.

  Printable version Printable version Post ReplyPost New Topic
You cannot post new topics in this forum
You cannot reply to topics in this forum
You cannot delete your posts in this forum
You cannot edit your posts in this forum
You cannot create polls in this forum
You cannot vote in polls in this forum

  •  
Search the12volt.com
Follow the12volt.com Follow the12volt.com on Facebook
Friday, March 29, 2024 • Copyright © 1999-2024 the12volt.com, All Rights Reserved Privacy Policy & Use of Cookies
Disclaimer: *All information on this site ( the12volt.com ) is provided "as is" without any warranty of any kind, either expressed or implied, including but not limited to fitness for a particular use. Any user assumes the entire risk as to the accuracy and use of this information. Please verify all wire colors and diagrams before applying any information.

Secured by Sectigo
the12volt.com spacer
Support the12volt.com
Top
the12volt.com spacer