


first fg attempt 98 protege
Home /
the12volt's Install Bay /
Fiberglass, Fabrication, and Interiors / first fg attempt 98 protege ( Topic Closed)


Posted: January 26, 2007 at 6:00 PM / IP Logged
 Yay
Yay
 Fiberboard floor laid (minus cover for spare tire well) and trunk masked and waxed for fiberglass


 The whole thing was a sticky mess, partly from the tape and wax, partly from the resin not having cured fully because the car was outside in the cold all night.
I mananged to pry it out though, and solved the sticky resin problem by brushing on an extra coat with a bit more catalyst to make sure it cured right through and made a nice shell of resin on the outside.
After that dried, I reinforced the sides with an extra layer of matte (the mold is made of 2 layers) because they were a bit too bendy, and went for lunch.
I then noticed some spots still hadn't cured so I busted out the resin again.
After that was good and hard, I masked off the outline of where I wanted to cut (loosely following some felt tip marker lines that showed through the fiberglass*) and trimmed it with a little sawzall type dealy.
It fits like a glove, it's not trouble to fit in the trunk and it's just tight enough to not wiggle and jiggle and make noise, and it looks nearly flush, I am very satisfied with the results. The 3/8" fiberboard bottom and back make it plenty strong, especially since it's supported by the sides of the trunk.
*Cool Tip that I found out by accident:
If you draw a pattern for cutting etc. on the masking tape after you've waxed it, the fiberglass soaked with resin will also soak up the ink, so when the part is pulled, your pattern should still be visible through the fiberglass.
The whole thing was a sticky mess, partly from the tape and wax, partly from the resin not having cured fully because the car was outside in the cold all night.
I mananged to pry it out though, and solved the sticky resin problem by brushing on an extra coat with a bit more catalyst to make sure it cured right through and made a nice shell of resin on the outside.
After that dried, I reinforced the sides with an extra layer of matte (the mold is made of 2 layers) because they were a bit too bendy, and went for lunch.
I then noticed some spots still hadn't cured so I busted out the resin again.
After that was good and hard, I masked off the outline of where I wanted to cut (loosely following some felt tip marker lines that showed through the fiberglass*) and trimmed it with a little sawzall type dealy.
It fits like a glove, it's not trouble to fit in the trunk and it's just tight enough to not wiggle and jiggle and make noise, and it looks nearly flush, I am very satisfied with the results. The 3/8" fiberboard bottom and back make it plenty strong, especially since it's supported by the sides of the trunk.
*Cool Tip that I found out by accident:
If you draw a pattern for cutting etc. on the masking tape after you've waxed it, the fiberglass soaked with resin will also soak up the ink, so when the part is pulled, your pattern should still be visible through the fiberglass.

Posted: January 29, 2007 at 11:30 PM / IP Logged
Posted: February 03, 2007 at 2:45 PM / IP Logged
Posted: February 04, 2007 at 2:53 PM / IP Logged

 That's with the 'looped fleece' stretched over the mold and the rings, to form the shape of the box. That got soaked with resin and I let it harden. After that, two more layers of mat.
Then I trimmed off the excess fleece and glass:
That's with the 'looped fleece' stretched over the mold and the rings, to form the shape of the box. That got soaked with resin and I let it harden. After that, two more layers of mat.
Then I trimmed off the excess fleece and glass:
 Test fitted:


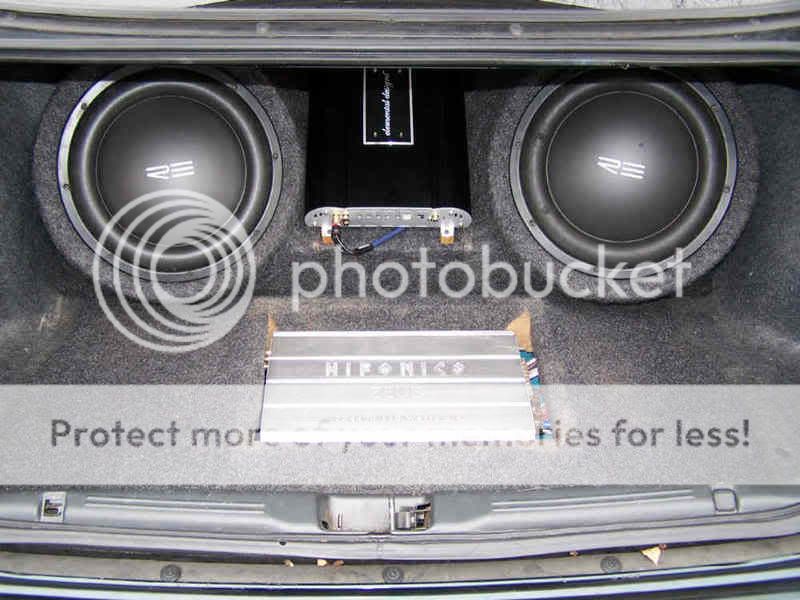
 And mounted the subs:
 The amp is sitting on top of the spare tire, which is still accessable with no trouble. I kinda broke the left side of the floor which was pretty flimsy, so I'm not quite done under the carpet yet, but it's "complete" enough for now.
I've ordered two 12" blue cold cathodes to provide the lighting, and the next project is getting the subs to work...got some wiring crap or something to fix, blah. They're both pretty beat looking so I'm looking for some replacements - still W010s though
The amp is sitting on top of the spare tire, which is still accessable with no trouble. I kinda broke the left side of the floor which was pretty flimsy, so I'm not quite done under the carpet yet, but it's "complete" enough for now.
I've ordered two 12" blue cold cathodes to provide the lighting, and the next project is getting the subs to work...got some wiring crap or something to fix, blah. They're both pretty beat looking so I'm looking for some replacements - still W010s thoughPosted: February 13, 2007 at 8:27 PM / IP Logged

Posted: February 16, 2007 at 2:45 PM / IP Logged
Posted: February 17, 2007 at 5:38 PM / IP Logged
Posted: February 26, 2007 at 1:59 PM / IP Logged
Posted: March 02, 2007 at 7:30 AM / IP Logged
Posted: March 03, 2007 at 3:14 PM / IP Logged
 Printable version
| You cannot post new topics in this forum You cannot reply to topics in this forum You cannot delete your posts in this forum You cannot edit your posts in this forum You cannot create polls in this forum You cannot vote in polls in this forum |

| Search the12volt.com |
Follow the12volt.com 
Wednesday, April 1, 2026 • Copyright © 1999-2026 the12volt.com, All Rights Reserved • Privacy Policy & Use of Cookies

Wednesday, April 1, 2026 • Copyright © 1999-2026 the12volt.com, All Rights Reserved • Privacy Policy & Use of Cookies
Disclaimer:
*All information on this site ( the12volt.com ) is provided "as is" without any warranty of any kind, either expressed or implied, including but not limited to fitness for a particular use. Any user assumes the entire risk as to the accuracy and use of this information. Please
verify all wire colors and diagrams before applying any information.
