the12volt.com spacer
icon

pneumatics controller wiring


Post ReplyPost New Topic
< Prev Topic Next Topic >
thekid760 
Member - Posts: 9
Member spacespace
Joined: March 17, 2013
Location: California, United States
Posted: March 17, 2013 at 7:42 PM / IP Logged  
Hello everyone, this is my first post, I hope it's in the correct forum. I am not new to cars or mechanics, however wiring is a place I struggle in.
I have some pneumatics on my truck and am looking for a way to wire them up efficiently.
I have a air source switching controller (lets call it the controller now) and an air shut-off switch. When the controller is active, the switch must also be. But I also want to be able to turn the switch on independently of the controller.
I am thinking that 2 in-cab SPST switches will be necessary. the first going to a dual output relay which will power both at the same time. The second will go to a standard SPST relay which will only power the switch.
Here is a crude wiring diagram I made:
pneumatics controller wiring -- posted image.
Any help, input, suggestions, bitches, or complaints are welcomed.
I am a visual person, so diagrams are helpful.
Thanks again.
Electric-Tarded
oldspark 
Gold - Posts: 4,913
Gold spacespace
Joined: November 03, 2008
Location: Australia
Posted: March 17, 2013 at 11:43 PM / IP Logged  
Ok, to me the description is ambiguous, but here goes...
An FYI - the 2 LHS switches only need ground if they are illuminated. Otherwise great! - you include fuses and that they are powered by switched power - IGN +12V or whatever.
Re fuses, the LHS switch fuses could be combined. So too the power fuses to each relay #30 .
EG - a 1A or 5A etc fuse for the switches (1A should be more than enough for 2 relay coils and switch indicator LEDs), and a 10A or 20A or 30A etc fuse for the controller and switch box.   
The switched power may have its own suitable fuse that you can use instead...
[ Then the normal rules - fuses shall be as close to the power source as practicable; should be rated for the max normal current plus about 20% - 30%; and the fuses MUST NEVER exceed the smallest cable rating (downstream). ]   
A NOTE re the RHS switch box. I assume that is a ground required for the "switch box" (just like the controller) as opposed to it being a switch that connects the input +12V to ground. (And hence why fuses should always be fitted!)
As you have it, the switch box will have +12V whenever the top relay is off, ie, whenever switched power or Switch 1 is/are off, AND the switch box will also have +12V when both switched power and Switch 2 are on.
The Controller will only have +12V when both switched power and Switch 1 are on.
thekid760 
Member - Posts: 9
Member spacespace
Joined: March 17, 2013
Location: California, United States
Posted: March 18, 2013 at 11:05 AM / IP Logged  
Oldspark:
Thanks for the reply and helpful insight. I will rework the diagram and repost later. I don't have much time now so this post will be relatively short.
I will put both switches to a fused ignition power, so let's always assume they will have power to them as I have no use for them when the truck is off. I will combine the power lines to them.
The switch box is just a NO air shutoff, this one:
http://www./itm/110881515304?ssPageName=STRK:MEWNX:IT&_trksid=p3984.m1439.l2649
It has two yellow wires so it may not need to be grounded.
The control box is also a simple pilot air solenoid same as 4v410-15 below:
http://www.mettlertools.com/Valve_Image/400SeriesSpecs.pdf
I'm assuming it'll need a ground but also unsure.
To hopefully clarify:
When switch 1 is activated - I want power to be sent to the control box and the switch box. And both be turned off when the switch is turned off.
When switch 2 is activated - I want power to only turn on the switch box, and turn it off when deactivated.
I was thinking: since both the control box and switch box are low power draw and short duration use can I just skip the relays and use a fused SPDT on-off-on switch?
Like this one:
http://www.weisd.com/test/WEISD_TBL_view.php?editid1=PHI30-16520
Clear as mud?
Electric-Tarded
thekid760 
Member - Posts: 9
Member spacespace
Joined: March 17, 2013
Location: California, United States
Posted: March 18, 2013 at 3:10 PM / IP Logged  
Looking back, I do beleive that both items dont need to be grounded.
Here is the revised diagram, how does it look?
pneumatics controller wiring -- posted image.
Thanks again.
Electric-Tarded
oldspark 
Gold - Posts: 4,913
Gold spacespace
Joined: November 03, 2008
Location: Australia
Posted: March 18, 2013 at 7:03 PM / IP Logged  
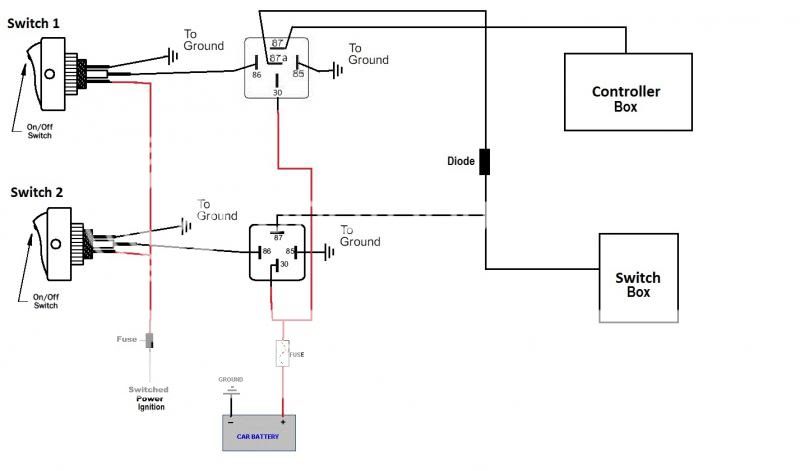
That diagram is fine, though the diode can be omitted. (Series didoes are used to isolate different signals or different power sources. But since your power sources are the same (#30), it doesn't matter if the relays #87 & #87a cross-connect them. It's the same if the switches are used instead of the relays (assuming a lit switch's light is from #87 which is what you'd want).
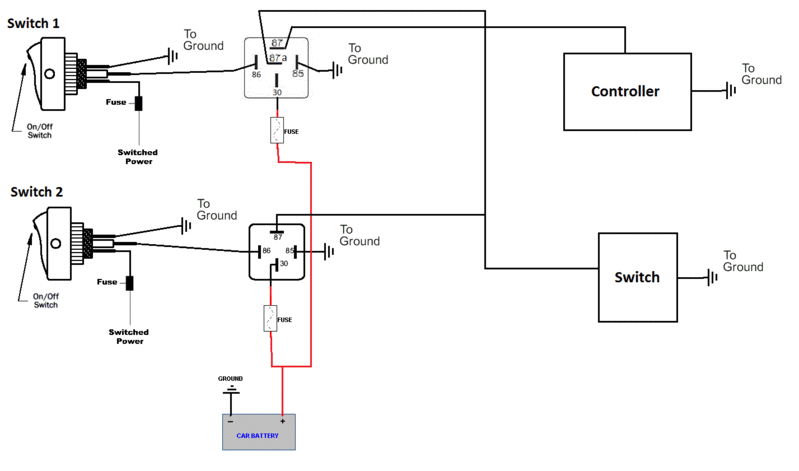
Both solenoids (valves) need to be grounded. They need +12V on one end to actuate, but the other end must be grounded to "return" the current.
FYI - electricity can only flow in a loop, eg battery+ thru the load (light, solenoid, resistor) out thru the -ve end (or GND) back into the battery-. Break that circuit and current flow stops.
The eBay #110881515304 is 12V and hopefully you've chosen the DC12V version of the 400 Series.
Current wise, the 4v410-15 solenoid is 4.8W hence (from P=IV => I=V/P) 4.8W/12V = 0.4A - let's assume 0.5A and allow/design for 1A.
I can't see any power or current rating for eBay 110881515304, but it's probably similar.
Hence 12V switches with contact ratings of 1A or should be fine.
The switches you linked are 20A rated to they are well overrated. (That's not an electrical problem, maybe just cost & size.)
But omitting the relays means that the Switched Power Ignition (IGN) needs to carry the full solenoid load instead of the 500mA (max) of the relay coils.
But those solenoids seem to be low current - ie, 500mA & ?? - maybe 1A or 2A total, and that's not a big difference, and it can probably be taken from an existing fused IGN circuit. (Choose one that isn't critical, else is "logically matched" to what you are doing - ie, if this solenoid fuse blows, it doesn't matter if the fuel pump or engine or brake lights or flashers (whatever is chosen) also stops working. But beware solenoid spikes - more on that later.)
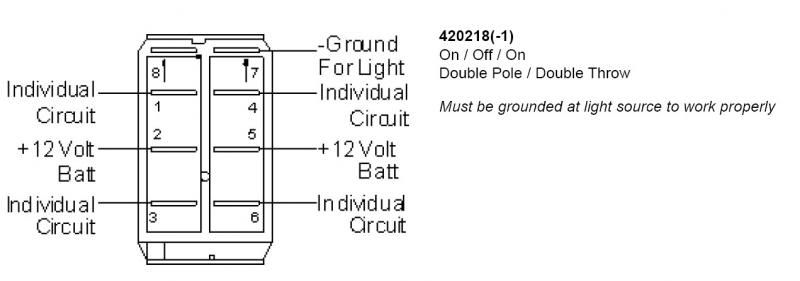
Re the switches, they are center-off (3 position) and you may prefer 2 position. And they are DPDT but maybe the 2nd pole is used for the lamp?
If the top changeover switch is centre-off, you must switch it to either end. If you leave it in the middle, the controller (and the valve [switch box]) will be off.
But there should be 2-position equivalents available.
And you can omit the relays since an SPDT switch does the switching you require. (IE - SPDT aka 2-way aka change-over; of say 1A or higher rating)
And the on-off switch is merely an SPDT with the unused "throw" (position) left unconnected.
But for SPDT lit switches, you want to be able to select which of the outputs light the indicator (since you'd want the 2-way unlit in its [/]normal to controller box position (ie, when in the off position).
And like anything electrical (ie, the loop), the switch lamps/s must have their own GND (as shown in your diagrams).
But never confuse the lamp GND terminal with other terminals. If it's a common lit on-off (SPST) switch with 3 terminals, the GND will be at one end with the +12V supply at the opposite end, and the switched load from the center terminal. Any other combination and you'll connect or switch the +12V input direct to GND, and that's called a short. (And without proper fusing, that's called smoke & fire & expense etc!)
Some switches could have different arrangements so be careful. (And yes, I think many of us have made mistakes on lit switches!)   
More FYI:
Those switches are fine other than being 3 position, though if you can think of something else you want that is independent of those solenoids, they may be handy.
But I usually won't use switches that big - unless I want a BIG switch for physical reasons (looks, gloves, etc).
That's for various reasons...
Electrically, if I need to switch "big" currents, I prefer a relay. In part that's because I don't like switches (even 20A) carrying more than a few Amps. Hence I'll add relays. (Relays tend to last, switches tend to fail.)
It also means I can use smaller (and cheaper) switches that only need to switch typical 60mA to 250mA relay coils - ie, 0.5A or preferably 1A rated switch contacts. And there are many more switches to chose from.
It also means thinner wiring to the switch - ie, in the cabin etc. The relays can be anywhere with their minimal heavy wiring to the loads, and for things like headlights etc, as short as practicable (ie, the relay is between the battery and light; the heavy light wire does not have to go into the cabin etc).
In your case however, the loads are small so it's not a big issue. If those switches are what you want, use them. (Relays could be added, but IMO that's adding more complication unless fusing is an issue...)
Re "spikes". Breaking current to relay coils and solenoids causes a reactive voltage spike (like an ignition coil). That can damage sensitive components/electronics.
Now, all vehicle loads should have their own spike +12V & GND supply resilience (not necessarily for their inputs & outputs though).
But it may be pertinent to add a quenching aka spike-suppressing diode across each solenoid, especially if tapping in to an existing fused IGN circuit. (As many say, it's cheap insurance. Besides, it certainly helps keep the electrics clean from spikes & noise etc.)
That's easy - a diode across each coil/solenoid with the band or line end towards the +ve terminal/wire; the other end to GND.
For coils/solenoids up to 0.5A, 1N4004 or 1N4007 diodes are fine.
For coils/solenoids up to 1.5A, 1N5404 or 1N5408 diodes are required.
(For both above IN400x & 1N540x, and last number of 4 and above is fine. The numbers I've given tend to be the common versions available.)
BTW - such quenching diodes are often places across relay coils. (Relay coils are "solenoids" - ie, wound loops of wire - but let's not go there for now!)
Geez, that became a ramble and a half - way too much for a "simple" job like this LOL!
But it includes my usual FYIs and extra bits in an attempt to enable you to reach your final "perfect" solution. Hence all the options...
Ignore the irrelevant or confusing bits, or focus on one or a few and reread the others later. It is confusing at first but eventually all comes together... (And then you realise how simple it all is, but just how many considerations (spikes, switch lamps) and options (relays?, separate fused circuits?) are available!)     
Not that I tackled fusing in depth, but if tapping into and existing fuse you won't need to add one. However all your wiring should have a current rating equal to or higher than that fuses' rating (eg, 10A or 15A etc). Otherwise insert an additional smaller fuse before your smaller wiring.
I hope that all makes sense. AND that I haven't made an error or missed something...!
thekid760 
Member - Posts: 9
Member spacespace
Joined: March 17, 2013
Location: California, United States
Posted: March 18, 2013 at 8:41 PM / IP Logged  
Wow, that was a lot to read, and I am very grateful for you taking the time to write it all and help me out.
It's going to take me a bit to absorb it all and I'll have more questions. But for now a few things come to mind:
- I chose that switch for two reasons
       #1 - I wanted clean in-cab ergonomics so I already have a marine type switch panel and this matches those and will pop right in place of and un-used spdt.
       #2 - I wanted the on-off-on because my normal operations require both circuits to be off, and there are only two cases that they need to be on, which is also why they need to be separated. I was thinking that building in a non-powered for my normal operations will greatly minimize any wear/tear and faults, which is also why the air shut-off valve I chose is a N/O type.
- I'm glad I can omit the relays as that should make things much simpler. I struggle a bit in automotive wiring, but am learning a lot.
- For my low amp operations should I be using the 1N4004 diodes?
- I did order the 12vdc 4v410-15 so thats a non-issue, I just used that part number to make it easier on you, as it was listed on that page already.
- I will make sure I ground both the controller and switch box, I had a brain fart on grounds.
That is all for now. any more questions, comments, or suggestions are always welcomed...
Electric-Tarded
oldspark 
Gold - Posts: 4,913
Gold spacespace
Joined: November 03, 2008
Location: Australia
Posted: March 18, 2013 at 9:27 PM / IP Logged  
Yeah - 1N400x's are rated for 1A current (1N540x are 3A).
But as spike suppression diodes (reverse biased across coils as opposed to in series as used for isolation) they need to handle the spike voltage - typically ~200V but rarely above 400V for 12V & 24V relays - and the spike current.
The spike current ROT (Rule Of Thumb) is double the coil current. EG - your 0.4A coil means 0.8A spike hence the 1A 1N400x is fine. And to handle the up to 400V spike, the 1N4004 or 1N4007 (which have 400V & 1,000V PIV = Peak Inverse (reverse) Voltage ratings - ie, they can withstand reverse voltages of 400V & 1kV respectively).
If your other coil/solenoid is 1A, then you need a 2A diode, hence the 1N540x series which have a 3A rating. (Or you could use two 1N4004 etc in parallel, or "risk"(?) a single 1N4004.)
When using diodes in series circuits for inter-circuit isolation etc - eg, combining multiple inputs from a single switch or combining multiple outputs), for 12V & 24V systems they need only be (say) 15V & 30V PIV, or hence the "lowest" 1N4001 or 1N5401 with 50V PIV.
BUT, getting the 400V 1N4004 suits all such applications (series isolation & coil spike quenching), and in general only the 1N4004 & 1N4007 (and equivalent 1N5404 & 1N5408) are manufactured these days - they cost the same to produce etc, and "one size" fits all (smaller PIV ratings).
Hence you'll often see the 1N4004 specified. Nobody bothers with the 1N4001 & -02 and other intermediate PIV ratings anymore.
They are typically only ~25c each and often down to 5c each in packs of 10 or 50 etc. Hence many suggest getting a pack. That's spares in case you connect a spike diode back to front (which shorts +ve to -ve/GND and blows the diode), or future projects that add extra inputs or outputs or more relays etc.
They are also used for polarity protection on circuits, and to protect circuit inputs from transients (spikes etc) above and below their +ve & -ve supplies - eg, voltages above +12V or below 0V/GND. Also to provide voltage drops (reduce voltages) etc.
Ah, more ramble...
BTW - you therefore have a reason for those switches. And since you do want an OFF position, 3 position is applicable. (You seem to have a handle on that - you just simplified your system and diagram for us. It's the same circuit etc - it just doesn't show the center-off.)
Now, do you want the 2-way to show one color for the controller and another for the switch box (and be off when off)? If so, get a switch with a bi-color LED, or a switch into which a bi-color LED can be substituted. Though a separate light/LED/bezel can be used...
thekid760 
Member - Posts: 9
Member spacespace
Joined: March 17, 2013
Location: California, United States
Posted: March 18, 2013 at 10:54 PM / IP Logged  
I'm going to have to read the diode info above a few more times to get a grasp, that just rattled the cage a bit.
I already ordered the switch so I'm going to use it, and probably just wire up a separate LED with bezel into my dash.
Here's my attempt at yet another diagram. I have a feeling I'll need your help a few more times to get it right.
pneumatics controller wiring -- posted image.
And The schematic for the switch I ordered:
pneumatics controller wiring -- posted image.
I understand concepts, but the specifics are cloudy.
Electric-Tarded
oldspark 
Gold - Posts: 4,913
Gold spacespace
Joined: November 03, 2008
Location: Australia
Posted: March 19, 2013 at 1:50 AM / IP Logged  
Geez - I didn't even think of the single DPDT switch wired like that - I was so fixated on the 2 single switches! pneumatics controller wiring -- posted image. How obvious... Damned noobs Juniors coming in and showing us me up! pneumatics controller wiring -- posted image.
That diagram is spot on. You even have the quenching diodes the correct way.
I may as well disappear for a week or two.
Re diodes, see the links at the top of the page, eg Diodes re isolation, and Relays or more specifically (as examples) Special Applications which often show a diode for spike quenching, and others for isolation.
thekid760 
Member - Posts: 9
Member spacespace
Joined: March 17, 2013
Location: California, United States
Posted: March 19, 2013 at 10:20 AM / IP Logged  
Oldspark:
I appreciate all of you help, I wouldn't of gotten to the simplified setup without your direction.
I will read those sections, I gotta give my eyes a break after the endless reading I did yesterday on switches, relays, diodes, and LED's...
It'll be a few weeks at least until I get it up and running but I'll post up how it works.
Electric-Tarded
Page of 2

  Printable version Printable version Post ReplyPost New Topic
You cannot post new topics in this forum
You cannot reply to topics in this forum
You cannot delete your posts in this forum
You cannot edit your posts in this forum
You cannot create polls in this forum
You cannot vote in polls in this forum

  •  
Search the12volt.com
Follow the12volt.com Follow the12volt.com on Facebook
Thursday, May 16, 2024 • Copyright © 1999-2024 the12volt.com, All Rights Reserved Privacy Policy & Use of Cookies
Disclaimer: *All information on this site ( the12volt.com ) is provided "as is" without any warranty of any kind, either expressed or implied, including but not limited to fitness for a particular use. Any user assumes the entire risk as to the accuracy and use of this information. Please verify all wire colors and diagrams before applying any information.

Secured by Sectigo
the12volt.com spacer
Support the12volt.com
Top
the12volt.com spacer