the12volt.com spacer
icon

2004 gmc denali ads alsl gm1


Post ReplyPost New Topic
< Prev Topic Next Topic >
dromoser 
Member - Posts: 7
Member spacespace
Joined: December 18, 2013
Location: Illinois, United States
Posted: January 01, 2014 at 11:56 AM / IP Logged  
I am installing a Panther (Audiovox) PA620-C with an Idatalink ADS-ALSL-GM module in my 2004 Yukon XL Denali.
I flashed the module with the latest firmware (ADS-ALSL-GM1 - v.4.9) in 2 way data mode as recommended on the website.
I wired the module to the vehicle and the RS in data mode according Type 3 wiring diagram in the ADS-ALSL-GM1 install manual for the module. That is:
   d2d cable
   PURPLE / white tach output from module to tach input on RS
   orange data wire on module to pin 2 on OBDII connector
   ignition 1 output from RS to pink ignition input on module
I wired in 1-way data mode because the RS is only 1 way.
I wired the RS as follows:
- main power harness (2-12 volt constant/ignition 1 & 2 / acc / starter - all show power appropriately)
   - parking light harness (parking lights working ok)
- brake shut down (shows current when brake is depressed)
Now, when trying to do the installation mode programming, I cannot get it to blink at all. And, the RS isn't programming the tach rate or work at all (except for flashing parking lights when I hit the lock/unlock buttons on the remote.)
1) Should I have flashed the module in 1-way instead of the recommended 2-way?
2) If not, any other suggestions as to what to try next?
kreg357 
Platinum - Posts: 7,783
Platinum spaceThis member has made a donation to the12volt.com. Click here for more info.spaceThis member has been recognized as an authority in Electrical Theory. Click here for more info.spaceThis member has been recognized as an authority in Mobile Security and Convenience. Click here for more info.spacespace
Joined: January 30, 2009
Location: Pennsylvania, United States
Posted: January 01, 2014 at 3:39 PM / IP Logged  

If I'm not mistaken, I think Audiovox uses the DBI D2D communication protocol.  In this case, the correct firmware would be DBI-ALSL-GM1.

Try re-flashing it with this firmware.   To set the Installation Mode, start with no harness connected to the module, hold the programming button and plug in the 4 Pin D2D harness.  The LED should start blinking Red, release the button.  After a few seconds the LED will start doing a slow, Green, one blink pattern.  Press and hold the programming button, the LED will go solid Green for 2 seconds and then go out.  Release the button and plug in the remaining harnesses.  Proceed with vehicle programming. 

In case you haven't seen it, here is a link to a Pictorial on the vehicle :  https://www.the12volt.com/installbay/forum_posts.asp~TID~133000~PN~1

Soldering is fun!
dromoser 
Member - Posts: 7
Member spacespace
Joined: December 18, 2013
Location: Illinois, United States
Posted: January 01, 2014 at 4:56 PM / IP Logged  
Thanks for the pictorial and the advice about the alternative firmware.
That said, between my original post and your reply, I decided to just hardwire the module, so I reflashed with a "hard wired" version of the same firmware I'd used. THEN I got a flashing green light and was able to register the module in "hardwired mode".
Now, in trying to set the tach rate for the RS, I can't get it to learn the tach rate. I disconnected the tach wire from module and hard wired it directly from the fuel injector. When the truck is running, I can verify that there's a grounded pulse through the wire, but the RS won't program the tach rate.
Any thoughts? Should I go back and reflash with the firmware you suggested and try that?
kreg357 
Platinum - Posts: 7,783
Platinum spaceThis member has made a donation to the12volt.com. Click here for more info.spaceThis member has been recognized as an authority in Electrical Theory. Click here for more info.spaceThis member has been recognized as an authority in Mobile Security and Convenience. Click here for more info.spacespace
Joined: January 30, 2009
Location: Pennsylvania, United States
Posted: January 01, 2014 at 5:17 PM / IP Logged  

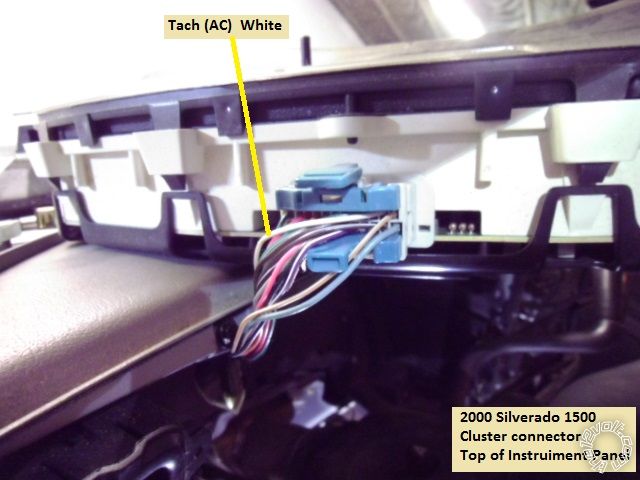
No, I actually prefer the W2W hard-wire method myself ( as seen in the Pictorial ).  As noted at the end of the Pictorial, the GM1 firmware will occasionally have problems supplying a tach signal, so going directly to a vehicle tach source is a good idea.  On that vehicle, I think I would pull the instrument cluster and catch the tach signal there.  The bezel trim just pulls off and there are four 7mm screws to remove.  The instrument panel harness has plenty of slack, so you can just leave it connected while soldering on the wire.  It is probably the only White in the connector and has a nice strong signal.  Here is a photo of a similar vehicle :

2004 gmc denali ads alsl gm1 -- posted image.

More info from ReadyRemote :

Tachometer    White (ac)        @ instrument cluster, gray 24 pin plug, pin A5

Soldering is fun!
dromoser 
Member - Posts: 7
Member spacespace
Joined: December 18, 2013
Location: Illinois, United States
Posted: January 01, 2014 at 5:27 PM / IP Logged  
Thanks so much, again! I'll give that a try!   (fingers crossed...)
dromoser 
Member - Posts: 7
Member spacespace
Joined: December 18, 2013
Location: Illinois, United States
Posted: January 02, 2014 at 5:52 PM / IP Logged  
Well, unfortunately, that didn't work either. Looks like there's a strong tach signal coming through, but the RS just isn't responding to it.
I suppose I need to find out if the Panther PA620-C has a misprint in the manual or if there is an alternative for programming the tach signal.
Any other thoughts?
Thanks again.
kreg357 
Platinum - Posts: 7,783
Platinum spaceThis member has made a donation to the12volt.com. Click here for more info.spaceThis member has been recognized as an authority in Electrical Theory. Click here for more info.spaceThis member has been recognized as an authority in Mobile Security and Convenience. Click here for more info.spacespace
Joined: January 30, 2009
Location: Pennsylvania, United States
Posted: January 02, 2014 at 6:02 PM / IP Logged  
Do you have a link to the Panther PA620-C install guide? Not my brand so I am not familiar with it's programming or any quirks.
While not my first choice, you could try going back to D2D with a bypass re-flash to DBI D2D. Then you could see if the Tach signal goes through D2D OK.
With the brands I use, that White Tach wire at the instrument panel connector always works.
Soldering is fun!
dromoser 
Member - Posts: 7
Member spacespace
Joined: December 18, 2013
Location: Illinois, United States
Posted: January 02, 2014 at 6:40 PM / IP Logged  
I couldn't find one on their website so I scanned one and uploaded it. You can find it here:
http://www.newsong-fellowship.com/Panther_PA-620C_Remote_Start_Manual.pdf
I'm going to give them a call tomorrow morning to see if there is some exception/alternative. If they can't help me, I'll give the re-flash a try. Thanks again.
Chris Luongo 
Platinum - Posts: 3,746
Platinum spaceThis member consistently provides reliable informationspace
Joined: May 21, 2002
Location: Massachusetts, United States
Posted: January 03, 2014 at 7:20 AM / IP Logged  
I've installed many of the previous-generation of the 620, when it was called the Prestige APS-620 and then the APS-620N.
That unit should have no trouble sensing tach on your car, and it does have a voltage-sensing mode that works pretty well too.
Generally tach is preferred if you can get it, but even if you don't like to use voltage sensing, it's a great troubleshooting tool.
Try the following:
1: Change programming from tach to voltage
2: Change the voltage level to the other (non-default) setting
3: Change crank time to either 1.5 or 2.0 seconds. (Your car has built-in anti-overcrank from the factory, you can hold the key to the Start position as long as you like and you still won't overcrank the starter.)
After that, try the remote starter again and see if it works.
---If it still doesn't work, you have other problems; troubleshoot and fix them before worrying about tach.
---If it does work, and all functions (lock unlock bypass horn etc) work too, then you can decide between leaving it as-is, or doing a little more work on your tach connection.
dromoser 
Member - Posts: 7
Member spacespace
Joined: December 18, 2013
Location: Illinois, United States
Posted: January 03, 2014 at 10:28 AM / IP Logged  
Thanks for the suggestion on going to voltage sensing. However, I went out this morning to do that and thought I'd test it one more time and it worked.
Everything is good to go. Thanks again Kreg and Chris for your help.
Page of 2

  Printable version Printable version Post ReplyPost New Topic
You cannot post new topics in this forum
You cannot reply to topics in this forum
You cannot delete your posts in this forum
You cannot edit your posts in this forum
You cannot create polls in this forum
You cannot vote in polls in this forum

  •  
Search the12volt.com
Follow the12volt.com Follow the12volt.com on Facebook
Tuesday, May 7, 2024 • Copyright © 1999-2024 the12volt.com, All Rights Reserved Privacy Policy & Use of Cookies
Disclaimer: *All information on this site ( the12volt.com ) is provided "as is" without any warranty of any kind, either expressed or implied, including but not limited to fitness for a particular use. Any user assumes the entire risk as to the accuracy and use of this information. Please verify all wire colors and diagrams before applying any information.

Secured by Sectigo
the12volt.com spacer
Support the12volt.com
Top
the12volt.com spacer