the12volt.com spacer
icon

01 dodge ram 1500 with avital 4103


Post ReplyPost New Topic
< Prev Topic Next Topic >
jsl6v8 
Member - Posts: 8
Member spacespace
Joined: January 09, 2014
Location: Missouri, United States
Posted: January 09, 2014 at 10:51 AM / IP Logged  
So I've purchased an Avital 4103 remote start/keyless entry system, its a bit beyond anything I've done before on a vehicle although really I figure worse case scenario I blow some fuses and have to reshrink wrap and solder some cables. Needless to say I'm still quite a bit nervous about cutting into and messing with any wires on my truck let alone ignition wires. That said, first thing I'm going to do is a walk through talk through on where all the wires are going to connect, if you see any errors please let me know. I have a 01 Ram 1500 Wiring diagram that I got from the forum. I'm not using a DBALL or any sort of bypass, if thats something I need please let me know but I don't believe I do.
WIRING INFORMATION: 2001 Dodge Ram
WIRE WIRE COLOR LOCATION
12V CONSTANT WIRE RED and PINK/BLACK Ignition harness
STARTER WIRE YELLOW Ignition harness
12V IGNITION WIRE DARK BLUE Ignition harness
SECOND 12V IGNITION WIRE BLACK/ ORANGE Ignition harness
12V ACCESSORY WIRE BLACK/ WHITE Ignition harness
POWER DOOR LOCK (5-wire reverse polarity) ORANGE / PURPLE In White Connector In Driver’s Kick Panel Coming From Driver’s Door
POWER DOOR UNLOCK (5-wire reverse polarity) PINK/PURPLE In White Connector In Driver’s Kick Panel Coming From Driver’s Door
PARKING LIGHTS (+) BLACK / YELLOW Behind Headlight Switch.
DRIVER DOOR TRIGGER (-) TAN In Green Connector Of Module Right Of Steering Column
PASSENGER DOOR TRIGGER (-) BLACK/ LIGHT BLUE In Green Connector Of Module Right Of Steering Column
FACTORY ALARM ARM AND DISARM LT.GREEN/ ORANGE Harness Coming Into Vehicle From Driver’s Door
Factory alarm arms with a negative trigger through a 644 ohm resistor. Factory alarm disarms with a negative trigger through a 1500 ohm resistor. Relays must be used.
TACHOMETER WIRE BLACK/ GRAY (GRAY/BLACK (diesels)) Ignition coil Harness In Engine Compartment Running Along Firewall
DIESEL WAIT-TO-START (-) ORANGE / BLACK Harness In Engine Compartment Running Along Firewall
BRAKE WIRE (+) WHITE/ TAN At Brake Pedal Switch
HORN TRIGGER (-) BLACK/ RED At Harness At Steering Column
LEFT FRONT WINDOW UP LT.BLUE At Driver Window Motor Inside Door
LEFT FRONT WINDOW DOWN WHITE At Driver Window Motor Inside Door
RIGHT FRONT WINDOW UP BROWN / WHITE Harness In Driver’s Kick From Driver Door
RIGHT FRONT WINDOW DOWN PURPLE / WHITE Harness In Driver’s Kick From Driver Door
Obviously a lot of these wires I won't need for the remote start, for instance my truck doesn't have an alarm or at the very least if it does I don't know about it, don't use it, don't intend on using it and am thus not worried about it. I also won't be messing with the windows, I'm not a diesel, I don't need the driver/passenger door triggers, I don't think I need the tach since the Avital 4103 has a virtual tach (no clue how that works something about recognizing an increase in voltage that signals the alternator has started) but I might install it anyway.
Main Harness (H1)
So the H1/1, H1/2, H1/3, H1/4, and H1/5 won't connect to anything from what I understand(haven't decided if I'm just going to cut the wires and then electrical tape the ends or electrical tape them the length they are in case they are needed in the future.
H1/6 will connect to the horn trigger BLACK/ red wire in the steering column harness
H1/7 Nothing
H1/8 Ground wire, haven't decided where yet but I'm sure there is all sorts of metal things that are out of the way I can drill into there
H1/9 Parking light BLACK / YELLOW wire behind the headlight switch
Heavy Gauge Relay, 6 pin Connector
1 12v Ignition Wire Dark Blue in the Ignition Harness
2 Starter Wire Yellow in Ignition Harness
3 Accessory BLACK/ White wire in Ignition harness
4 High Current 12v Input Red wire Ignition harness
5 Second Ignition BLACK/ Orange wire Ignition harness
6 High current 12v input Pink/Black wire Ignition harness
Remote Start harness (H3)
H3/1 Neutral Safety Switch Connect to toggle switch and ground somewhere (Where do people normally put the toggle?)
H3/2 Tachometer meter BLACK/ Gray in ignition coil in engine compartment (or left out if using virtual tach)
H3/3 Brake WHITE/ tan wire at brake pedal switch
H3/4 Hood Pin Switch somewhere in the hood (I just need to find a good place to put it)
H3/5 Blank
Satellite harness
1 listed as a status output (I think this is if you use bypass modules?)
2 listed as 2nd accessory output, don't have a 2nd accessory on wiring diagram
3 Second starter, don't have a 2nd starter on wiring diagram
4 3rd ignition, don't have a 3rd ignition on wiring diagram
NOTE: as far as I can tell from my wiring diagram currently I don't believe I need this harness at all. Can anyone confirm I don't need this for me?
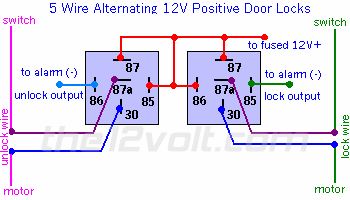
Door Lock 3 pin Connector
1 unlock 5 pin relay 1 pin goes to the pink/purple power door unlock wire in the drivers kick panel
2 empty not used
3 lock goes to 5 pin relay 1 pin goes to ORANGE / purple wire in drivers kick panel
Using wiring diagram found on the forum here https://www.the12volt.com/installbay/forum_posts.asp~TID~109609
Do I need to connect the alarm wire if I don't have an alarm/don't use it? Also will I be connecting all the +12v power to the same wire?
I appreciate anyone/everyones help in confirming I'm on the right track before I start cutting things up.
jsl6v8 
Member - Posts: 8
Member spacespace
Joined: January 09, 2014
Location: Missouri, United States
Posted: January 09, 2014 at 1:56 PM / IP Logged  
Ok did some more reading, since my car key is black (which means it doesn't have a chip) I shouldn't need a bypass. If someone could take a look at the rest of my wires are just verify I'm on the right track I'd really appreciate it. Install manual on the avital 4103 is found here http://www.directeddealers.com/manuals/IG/Avital/N4103_2008-07_web.pdf
I think at this point my main concerns are the satellite harness which I'm fairly certain I don't need at all. And verification that I don't need to connect the H1/1-H1/5 wires to anything.
blanx218 
Silver - Posts: 654
Silver spacespace
Joined: September 23, 2008
Location: Pennsylvania, United States
Posted: January 09, 2014 at 8:10 PM / IP Logged  
You're pretty much on point with most of it. You are correct on the important stuff. Heres what I'd do if this was my install. The heavy gauge ignition harness just as you described.
The 4 pin satellite harness throw away you wont need it. The 8 pin harness use the parking lights, ground and horn as you said. Cut the rest off a few inches from the brain and shrink wrap or tape them.
In the 5 pin harness use the brake as you said. Tach is optional but recommended. The BLACK/ white neutral safety and grey hood pin would be where I do things differently. I wouldnt do both the switch and a hood pin. Hood pins corrode pretty easily If you get alot of snow from the road salt. I normally install just the switch and advise my customers that they can disable the remote start with that switch if they are having any work done to the vehicle.
Finally, for the keyless entry you will need 2 relays to operate the door locks. Look in the relay diagrams section for 5wire/reverse polarity locks. It will tell you how to wire them up.
jsl6v8 
Member - Posts: 8
Member spacespace
Joined: January 09, 2014
Location: Missouri, United States
Posted: January 09, 2014 at 8:33 PM / IP Logged  
blanx218 wrote:
You're pretty much on point with most of it. You are correct on the important stuff. Heres what I'd do if this was my install. The heavy gauge ignition harness just as you described.
The 4 pin satellite harness throw away you wont need it. The 8 pin harness use the parking lights, ground and horn as you said. Cut the rest off a few inches from the brain and shrink wrap or tape them.
In the 5 pin harness use the brake as you said. Tach is optional but recommended. The BLACK/ white neutral safety and grey hood pin would be where I do things differently. I wouldnt do both the switch and a hood pin. Hood pins corrode pretty easily If you get alot of snow from the road salt. I normally install just the switch and advise my customers that they can disable the remote start with that switch if they are having any work done to the vehicle.
Finally, for the keyless entry you will need 2 relays to operate the door locks. Look in the relay diagrams section for 5wire/reverse polarity locks. It will tell you how to wire them up.
Thank you very much for your reply, only question on the 5wire/reverse polarity relays do I need to connect that wire for the factory alarm if I'm not using/don't have a factory alarm installed, and would I be daisy chaining all the 12v powers together to 1 constant 12V power wire on the truck?. Once again thank you very much, your post has sky rocketed my confidence level in doing this.
blanx218 
Silver - Posts: 654
Silver spacespace
Joined: September 23, 2008
Location: Pennsylvania, United States
Posted: January 09, 2014 at 8:44 PM / IP Logged  
you can daisy-chain all the constant power wires from the relays together.then you would use the green and blue lock and unlock wires to trigger the relays. Then pinned 87a and 30 would go to the lock and unlock wires in the vehicle which need to be cut. Were you able to find the diagram?
jsl6v8 
Member - Posts: 8
Member spacespace
Joined: January 09, 2014
Location: Missouri, United States
Posted: January 09, 2014 at 8:53 PM / IP Logged  
blanx218 wrote:
you can daisy-chain all the constant power wires from the relays together.then you would use the green and blue lock and unlock wires to trigger the relays. Then pinned 87a and 30 would go to the lock and unlock wires in the vehicle which need to be cut. Were you able to find the diagram?
Yes, I found the diagram in another thread someone had posted, I had it linked in my first post but its
https://www.the12volt.com/installbay/forum_posts.asp~TID~109609
So on the unlock I have 87 and 85 as 12v power, 87a as the avital unlock wire, 30 as the unlock wire from my truck and 86 blank since I don't have a factory alarm.
On the lock side I have 87 and 86 as 12v power, 87A as the avital lock wire, 30 as the lock wire from the truck and 85 as blank due to the factory alarm
Sound right?
jsl6v8 
Member - Posts: 8
Member spacespace
Joined: January 09, 2014
Location: Missouri, United States
Posted: January 09, 2014 at 8:58 PM / IP Logged  
Actually looking at it again I'm thinking the alarm outputs are where I'm suppose to connect the wires from the Avital at which point I'm a little confused on what the 87A wire is.
jsl6v8 
Member - Posts: 8
Member spacespace
Joined: January 09, 2014
Location: Missouri, United States
Posted: January 09, 2014 at 8:59 PM / IP Logged  
01 dodge ram 1500 with avital 4103 -- posted image.
blanx218 
Silver - Posts: 654
Silver spacespace
Joined: September 23, 2008
Location: Pennsylvania, United States
Posted: January 09, 2014 at 9:35 PM / IP Logged  
Disregard the word alarm from anything about the remote start or this diagram. On 1 relay connect pin 85 to the blue unlock wire and pins 87 and 86 to +12V constant. Pins 87 and 30 both go to the unlock wire in the truck. Once you locate and test the unlock wire in the truck (pink/purple) cut it. Connect the switch side of the wire to pin 87 and the motor side to pin 30. The switch side is the side of the wire that goes to +12V when you press the unlock button on the door after its been cut. Repeat the same for lock.
jsl6v8 
Member - Posts: 8
Member spacespace
Joined: January 09, 2014
Location: Missouri, United States
Posted: January 09, 2014 at 9:39 PM / IP Logged  
Thank you again, I really appreciate all the help, that clears up all my questions. Ill post again when I got it all put together, Im going to try to take pictures along the way. Probably going to start saturday, and hopefully finish saturday.
Page of 2

  Printable version Printable version Post ReplyPost New Topic
You cannot post new topics in this forum
You cannot reply to topics in this forum
You cannot delete your posts in this forum
You cannot edit your posts in this forum
You cannot create polls in this forum
You cannot vote in polls in this forum

  •  
Search the12volt.com
Follow the12volt.com Follow the12volt.com on Facebook
Sunday, April 28, 2024 • Copyright © 1999-2024 the12volt.com, All Rights Reserved Privacy Policy & Use of Cookies
Disclaimer: *All information on this site ( the12volt.com ) is provided "as is" without any warranty of any kind, either expressed or implied, including but not limited to fitness for a particular use. Any user assumes the entire risk as to the accuracy and use of this information. Please verify all wire colors and diagrams before applying any information.

Secured by Sectigo
the12volt.com spacer
Support the12volt.com
Top
the12volt.com spacer