the12volt.com spacer
icon

Focal Beryllium BMW


Post ReplyPost New Topic
< Prev Topic Next Topic >
robolop 
Copper - Posts: 157
Copper spacespace
Joined: October 26, 2008
Posted: January 10, 2010 at 10:23 AM / IP Logged Link to Post Post Reply Quote robolop

squires500 wrote:
im assuming you will make some form of diaphragm with the Plexiglas pieces sliding together and apart for to allow noise in and out???

yep, good guess!

robolop 
Copper - Posts: 157
Copper spacespace
Joined: October 26, 2008
Posted: January 10, 2010 at 10:26 AM / IP Logged Link to Post Post Reply Quote robolop

Here the little test I did. When you check it out, it's quite simple really.

The spring you see, pulls the diaphragm to close. On the lever, I put a bigger plate, so I can see how long I need to make my transmittion.

The more I pull the cable out, the more slowly it close and opens, and the less force the motor needs.

I really like the speed that it opens and close now.

I just need to make a descent piece of aluminum that will stand onto the motor.

Here a picture, I'm going to make a little movie, and post it offcourse.

Focal Beryllium BMW - Page 10 -- posted image.

robolop 
Copper - Posts: 157
Copper spacespace
Joined: October 26, 2008
Posted: January 10, 2010 at 10:26 AM / IP Logged Link to Post Post Reply Quote robolop

These things will end up in the hole of the diaphragm. First 3 aluminum bars of 10 mm thick.

Focal Beryllium BMW - Page 10 -- posted image.

Here I had to have a clean flat side of 4 centimeters aprox.

I put  them next to each other, screwed them tight(for safety), and stretched them out.
Then I planted in the uppermill, and milled a flat side.

Focal Beryllium BMW - Page 10 -- posted image.

Focal Beryllium BMW - Page 10 -- posted image.

On the top of the bars you could see I screwed them, so afterwards...I disced this off..

Focal Beryllium BMW - Page 10 -- posted image.

 I divided this equaly, and tightened this on the back.

Focal Beryllium BMW - Page 10 -- posted image.

Now you can see why I needed a flat side

Focal Beryllium BMW - Page 10 -- posted image.

Once I had this, I screwed on a piece of aluminum tube of 10cm diameters.

This tube will get much shorter, but now, I don't know how much exactly...

Focal Beryllium BMW - Page 10 -- posted image.

Here the frontview, looks a bit like a little nuclear reactor or so.

Focal Beryllium BMW - Page 10 -- posted image.

This was the easy part...and now I have to make something to get in that tube.

And I think it's gonna be... COOL. (i hope)

robolop 
Copper - Posts: 157
Copper spacespace
Joined: October 26, 2008
Posted: January 10, 2010 at 10:27 AM / IP Logged Link to Post Post Reply Quote robolop

I’ve been busy milling some rings in aluminum for the diaphragm, and believe me, many hours have passed.

This is a ring of 8mm thick that will get into the middle, around the big tube.
How I make a ring, you all should know by know, but here you can see how I made a flange on it.

Focal Beryllium BMW - Page 10 -- posted image.

It’s super easy to do so. You take a right mill, and take a little plank of mdf wood.

Focal Beryllium BMW - Page 10 -- posted image.

This plank you put on top of the mill.

Focal Beryllium BMW - Page 10 -- posted image.

By pulling the plank away, the mill gets free on the front…and here you keep on the aluminum piece.

It’s kind of a glider you have.
Here you can see the result, and you can see the MDF ring is still mounted on. This one stays on, so I can get a better grip on the part.

Focal Beryllium BMW - Page 10 -- posted image.

One ring finished

Focal Beryllium BMW - Page 10 -- posted image.

This little ring will get on the inside, and I made this of anodized material. Did this to have some contrast.

Focal Beryllium BMW - Page 10 -- posted image.

The upper ring needs to be abdraded firmly now, cause I’m going to polish it.

Focal Beryllium BMW - Page 10 -- posted image.

Here you can see how it’ll look. In the centre in the middle, a logo or so will be added, but still don’t know what …

Focal Beryllium BMW - Page 10 -- posted image.

Then I started again but making the middle ring.

Measured correctly, and made it with MDF at first. Drawed it out on 8mm aluminum, and sawed it out. Taped them on each other, and held it to the mill.

Focal Beryllium BMW - Page 10 -- posted image.

Focal Beryllium BMW - Page 10 -- posted image.

robolop 
Copper - Posts: 157
Copper spacespace
Joined: October 26, 2008
Posted: January 10, 2010 at 10:27 AM / IP Logged Link to Post Post Reply Quote robolop

This was the result.

Focal Beryllium BMW - Page 10 -- posted image.

Here you can see I made a double flange.

Focal Beryllium BMW - Page 10 -- posted image.

Then I made another ring of anodised aluminum of 2mm thick.

Focal Beryllium BMW - Page 10 -- posted image.

Here you can see this piece fits into the outer flange.

Focal Beryllium BMW - Page 10 -- posted image.

Here you can see that this will all get mounted on the diaphragm

Focal Beryllium BMW - Page 10 -- posted image.

Focal Beryllium BMW - Page 10 -- posted image.

Then I needed to make the outer and final ring.

This will be tightened, against all of my principles, with 6 screws. Had the opportunity to glue it, but doubted if that would look good

Focal Beryllium BMW - Page 10 -- posted image.

Here you can see I made 2 more flanges.

Focal Beryllium BMW - Page 10 -- posted image.

See this all mounted.on.

Focal Beryllium BMW - Page 10 -- posted image.

Focal Beryllium BMW - Page 10 -- posted image.

With a little cube of 5mm thick, I want to show you how I will tighten this  Around the diaphragm will get a lot of carbon fibre, I can stop nicely on the aluminum, and I can roll the ring against it, for a perfect finish.

Focal Beryllium BMW - Page 10 -- posted image.

Focal Beryllium BMW - Page 10 -- posted image.

  I’m pretty satisfied about the mill-work. There has been a lot of work on this, but in the meanwhile that’s long forgotton..

What’s next now you ask… Well the dull, boring jobs as usual. Rubbing, abrading, ….and holding everything to the polish-brush.
In the meanwhile a friend of mine, who has a big lathe (turning bench?) made me some axis, who will get placed onto the window-wiper-motor.
These are only 8mm diameter on the top, and so it will all open and close more slowly…and this was how I wanted it.

Focal Beryllium BMW - Page 10 -- posted image.

My last last problem with the opening and closing, I managed to solve.

The steel cable turned on nicely onto the axis, but when it need to go the other direction, it got loose cause the cable was to stiff, and the spring didn’t have enoughtcounter balance.
A simple trick… I used nylon. The kind they use to catch silurus-fish, it’s has traction limit of 120kg, and is nicely supple / elastic.
Now it’ll rolls in sweet and all the problems are gone.

Focal Beryllium BMW - Page 10 -- posted image.

robolop 
Copper - Posts: 157
Copper spacespace
Joined: October 26, 2008
Posted: January 10, 2010 at 10:28 AM / IP Logged Link to Post Post Reply Quote robolop

I was getting sick of loving in the trunk with a normal during lamp. I had about 3 of those, and throwed them all in the bin today. No more donut hole lamp in my trunk.

I got to the store, and got me some normal 20 watts lights, and a couple of meters of cable. Hanged it in the trunk in a descent way, so it didn't bother me.
It's a little update, but it's so luxurious now, really, and it gives me some warmth also.

Focal Beryllium BMW - Page 10 -- posted image.

Focal Beryllium BMW - Page 10 -- posted image.

So the diaphragm will stay, like it sits now. As you can see, I raised it for a couple of centimeters.

I managed to do so by setting the backrest of the rearseat 3 cm more straight. The 2 toggles where the seat klicks into, I replaced.

Focal Beryllium BMW - Page 10 -- posted image.

Focal Beryllium BMW - Page 10 -- posted image.

As long as I have the car, no one has ever sat in the back, so not going to let that bother me.

Now I have only one more problem, and that's the spring I need to place.
It'll get tight for that I think, but that problem I'm used to by now :)

robolop 
Copper - Posts: 157
Copper spacespace
Joined: October 26, 2008
Posted: January 10, 2010 at 10:29 AM / IP Logged Link to Post Post Reply Quote robolop

I kept myself busy with improving the diaphragm. The biggest problems are gone, and I'm satisfied how it all works now.

The first thing I need to have, was a good slider/conductor where the nylon wire slides over when the diaphram opens and closes.
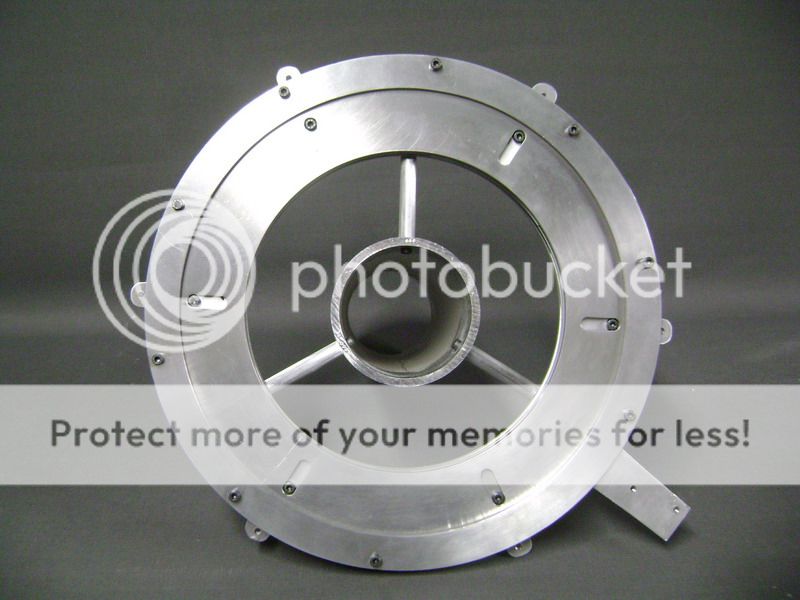
Cause a roller would be perfect for the job, I editted one with the disc.
The meaning of this was that I needed a sloth where the cable nicely stays in turn.I immediately put a screw in the roller with the propper roundels so it all was TIGHTEN.

Focal Beryllium BMW - Page 10 -- posted image.

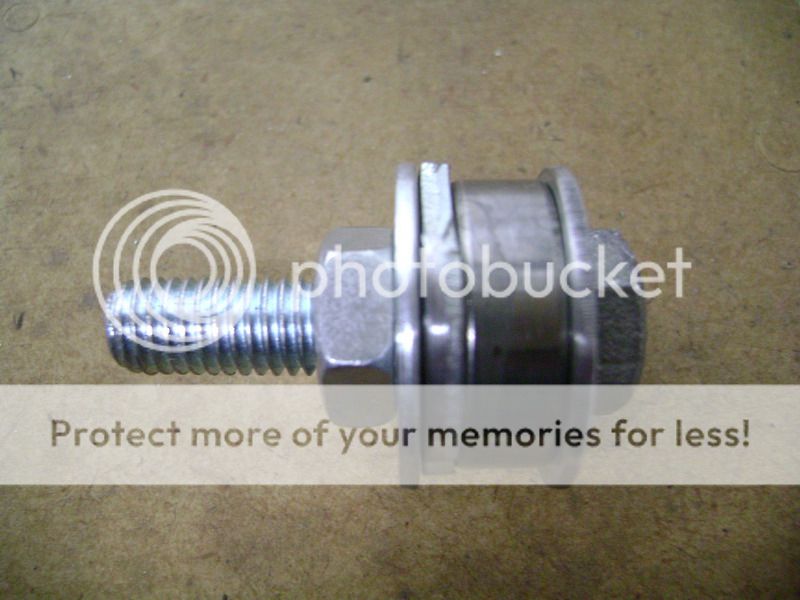
The I put it in my drilling machine, and put in the center of my mill.

Focal Beryllium BMW - Page 10 -- posted image.

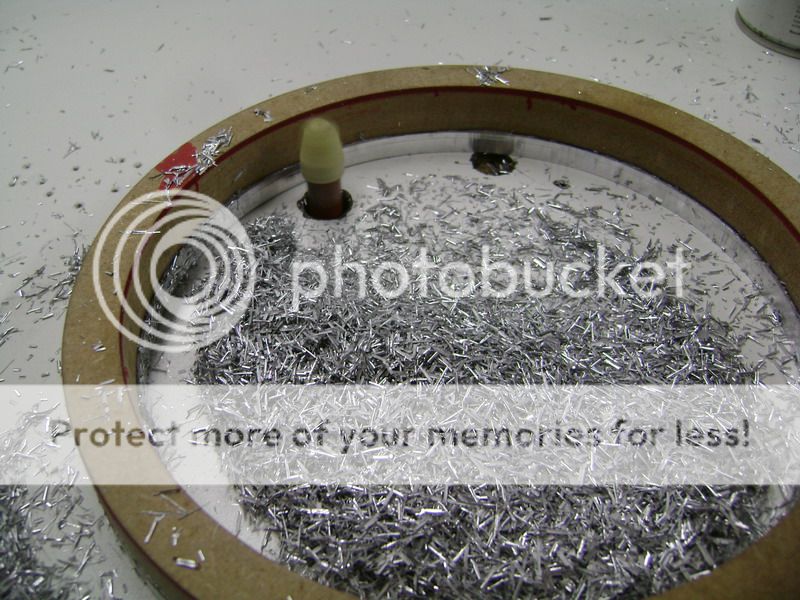
As you can see, fireworks were early this year :-) but it went perfect.

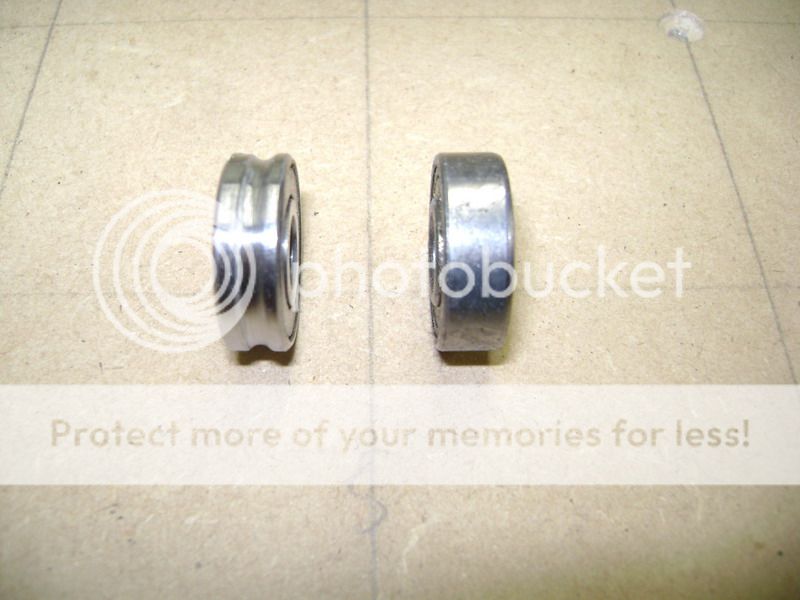
After that I just let it turn, and held a piece of sandpaper against it, to smoothen' it some more.
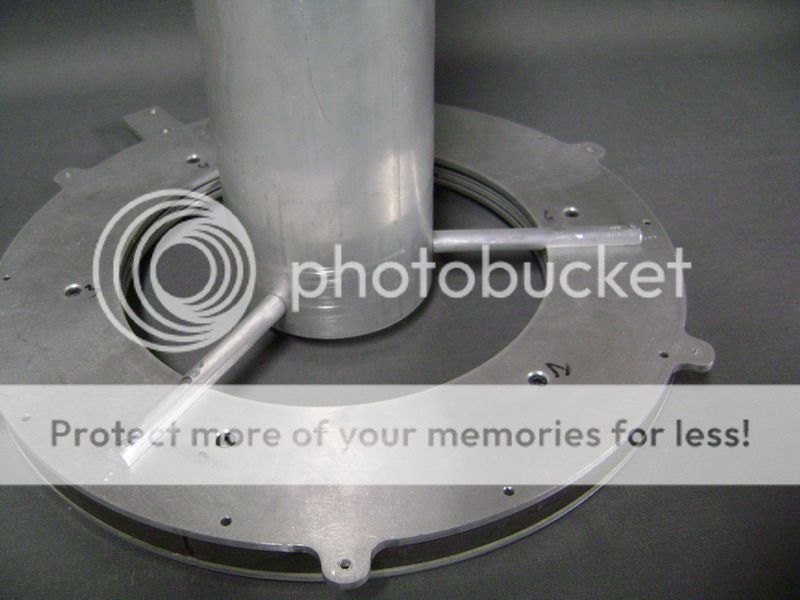
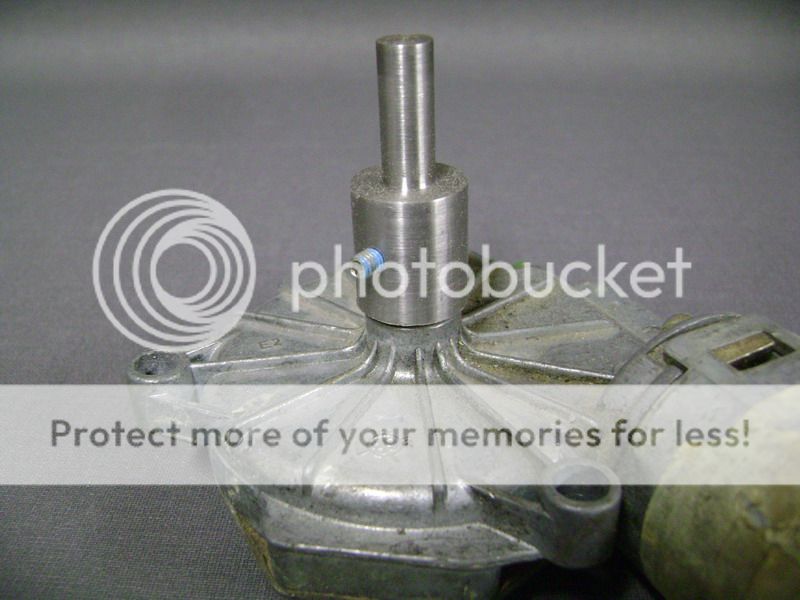
On the left you can see the roller, tuned by Robolop.

Focal Beryllium BMW - Page 10 -- posted image.

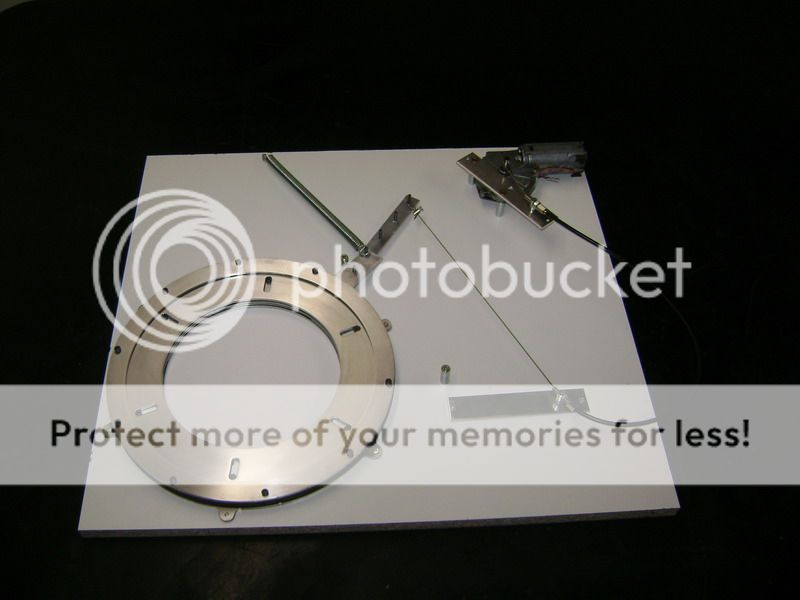
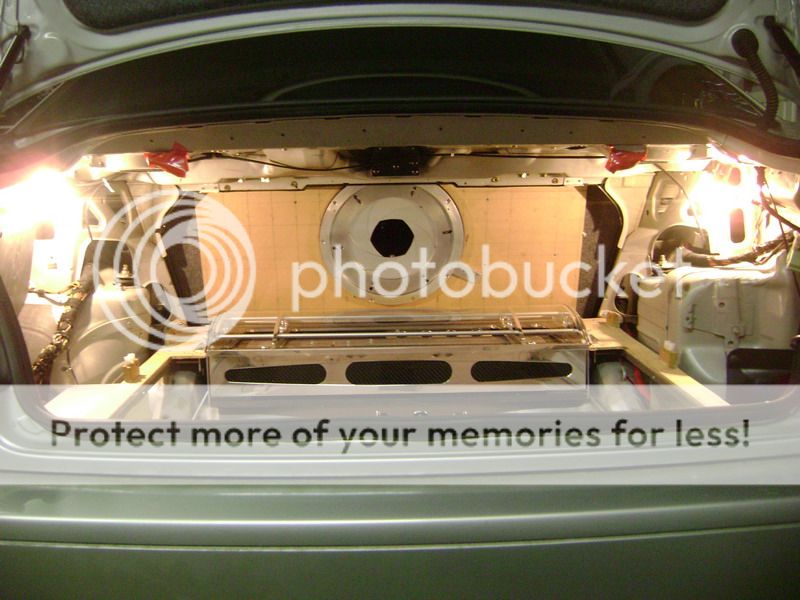
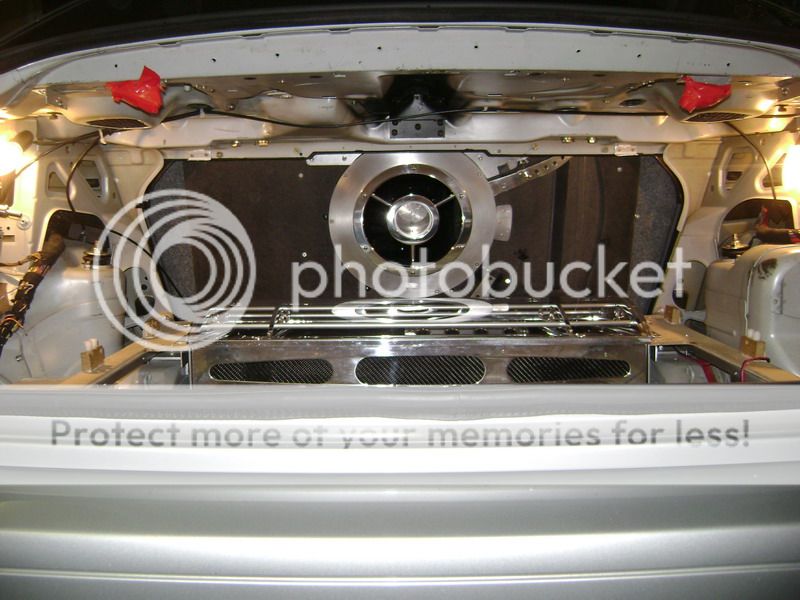
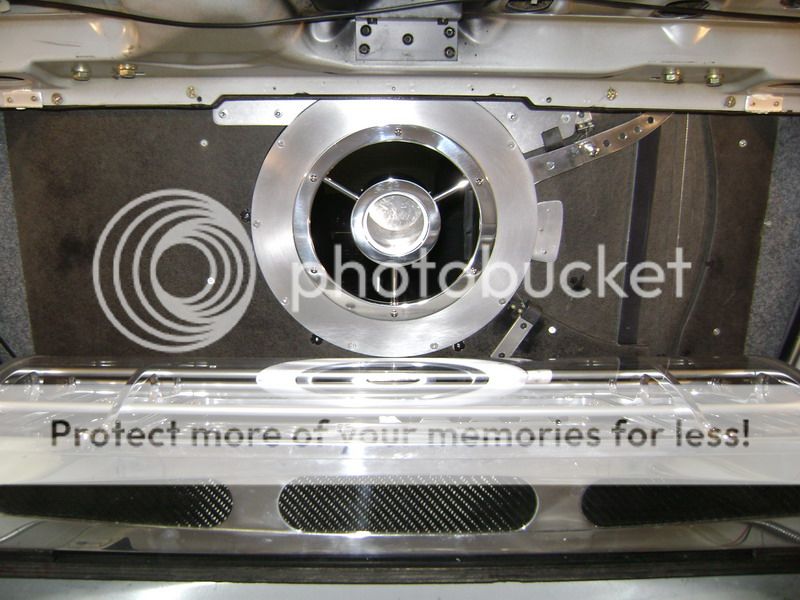
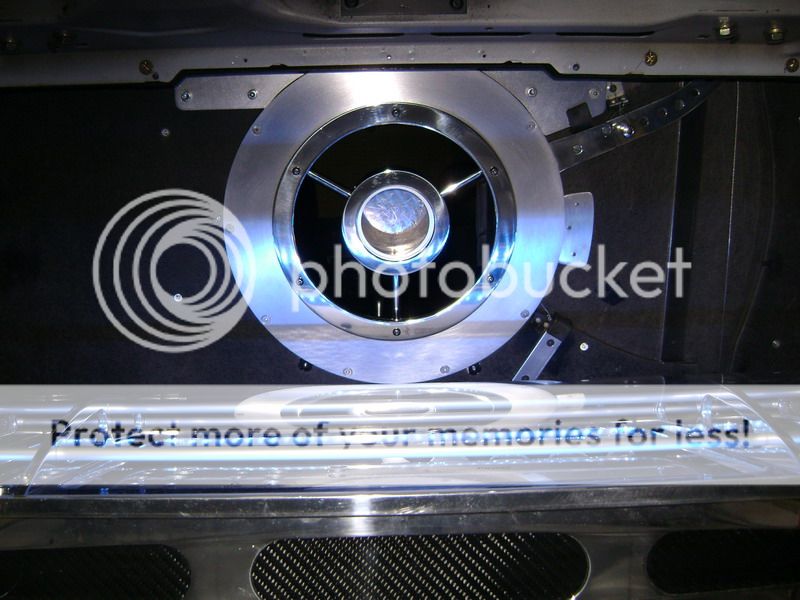
Here you can see the total picture of the MDF board as it'll come into the trunk.

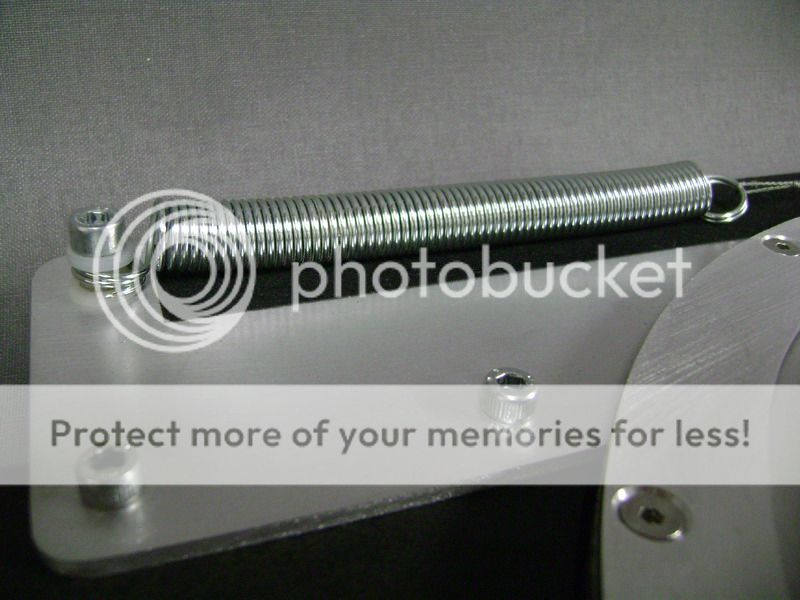
My biggest concern is the spring. I really want to get this out of sight. Since I had some place between the seat I put it there.
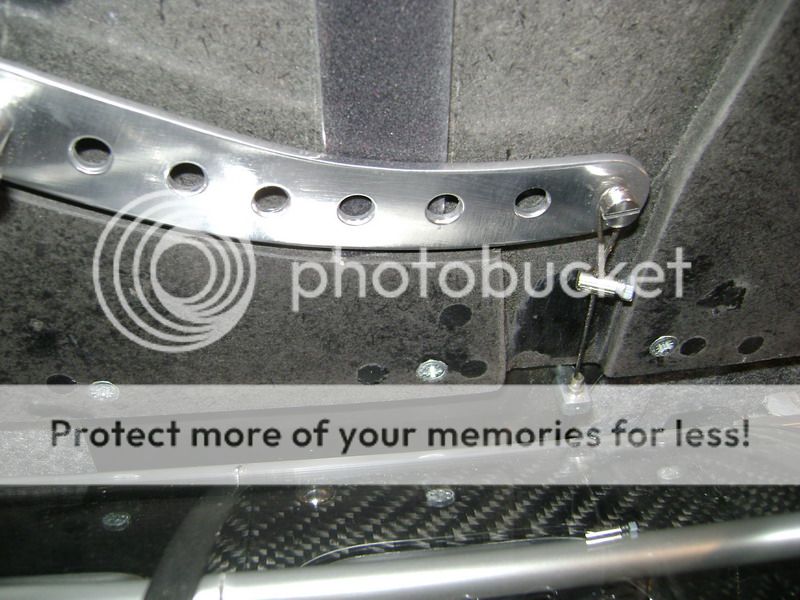
I had to make a seperate piece of aluminum to mount it all on. To do this, I first had to tighten the MDF on the back of the rearseat, and after that I could screw on the aluminum.
I had to make this in 2 pieces, cause it all was to big to get in between.

Focal Beryllium BMW - Page 10 -- posted image.

Underneath the spring, I taped a piece of vilt, so it can't make any noise. I'm planning of adding something around the spring to reduce vibration and noise towards zero.

Focal Beryllium BMW - Page 10 -- posted image.

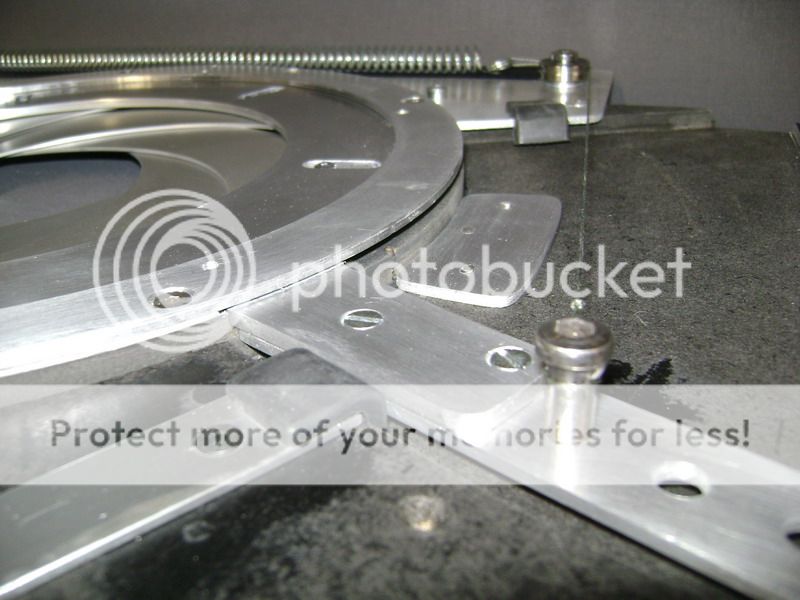
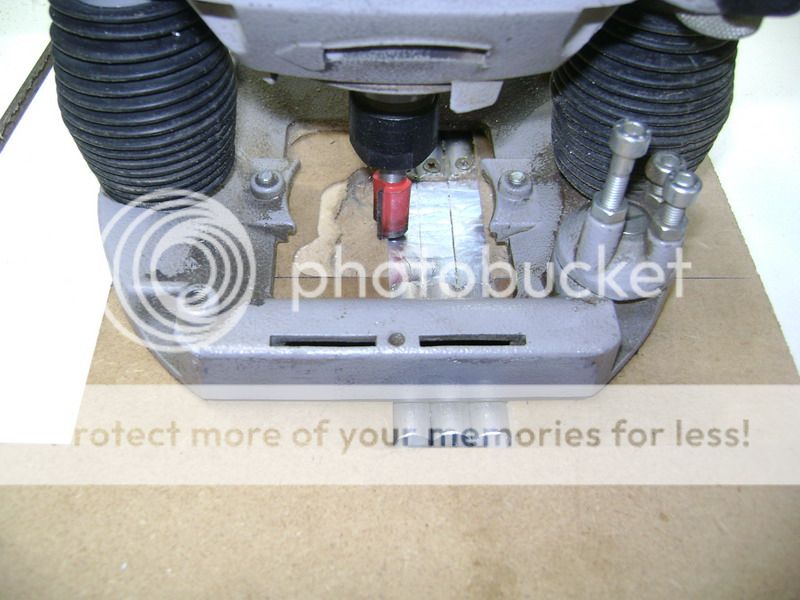
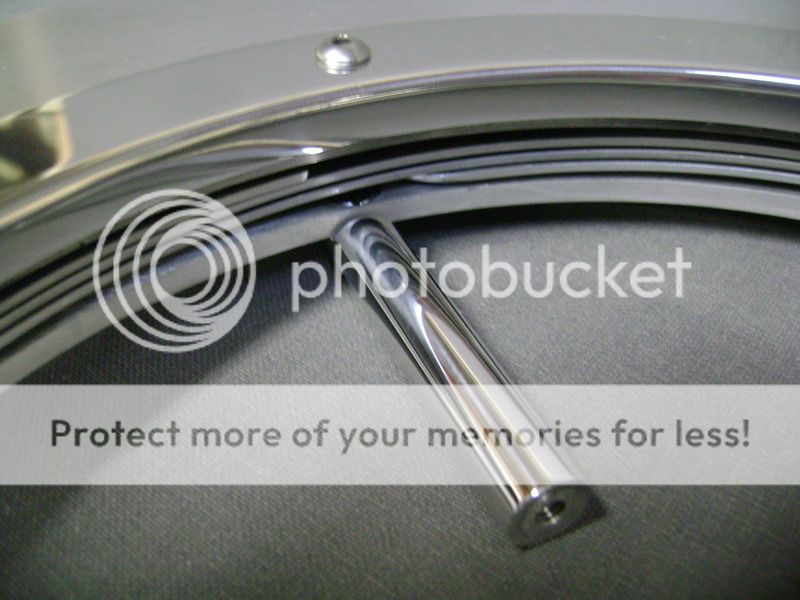
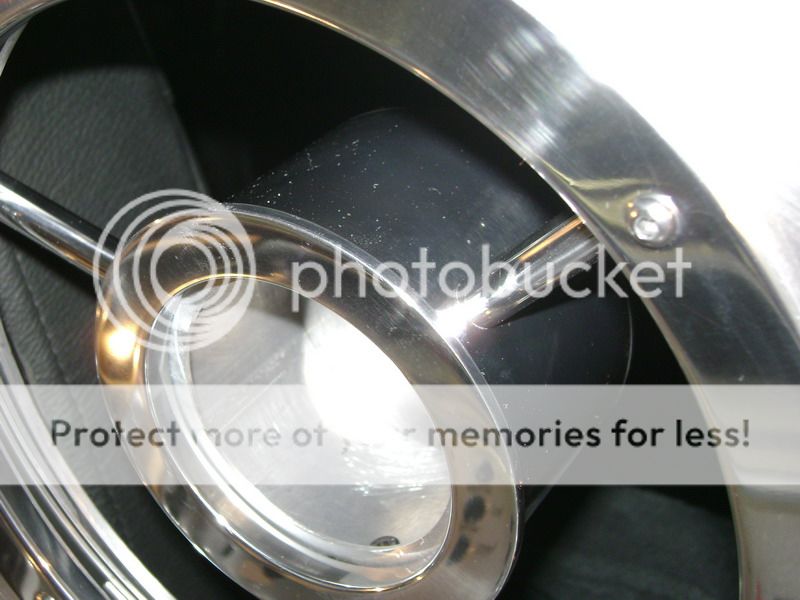
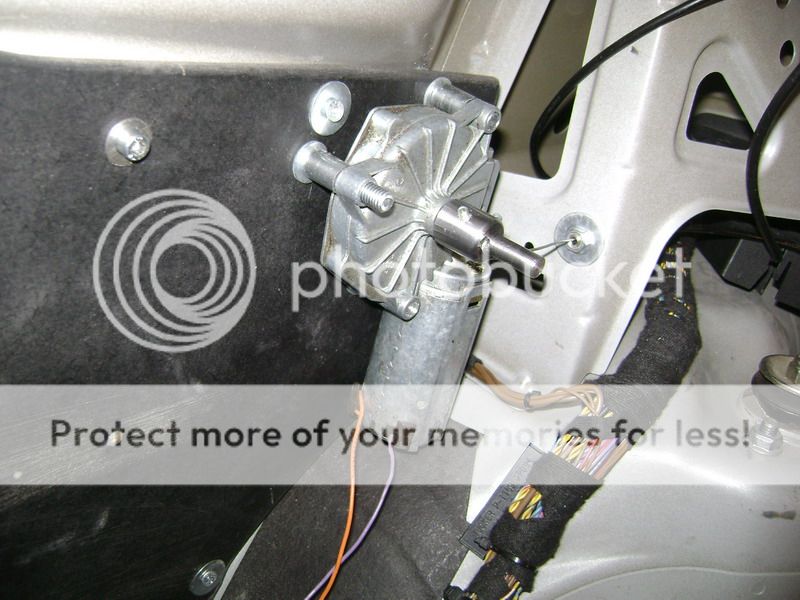
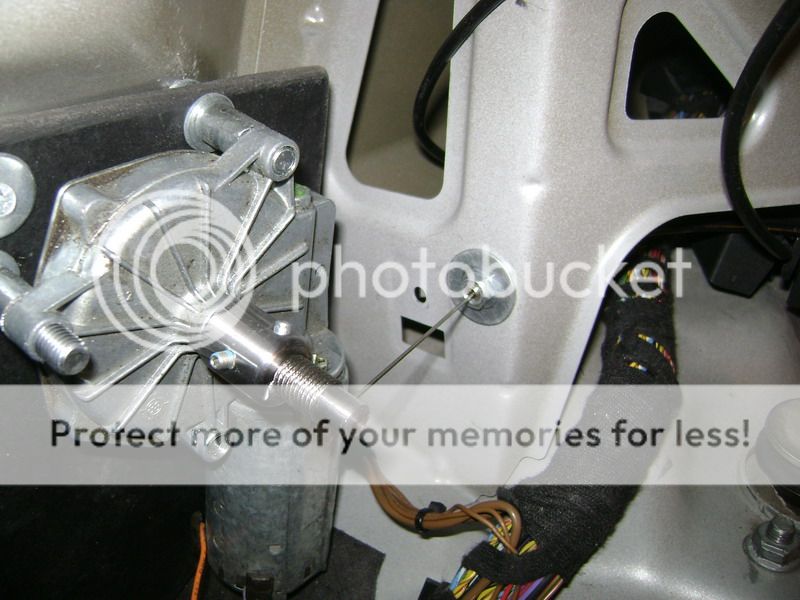
Here you can see the tuned roller, within the cable, that's in connection with the lever.

Focal Beryllium BMW - Page 10 -- posted image.

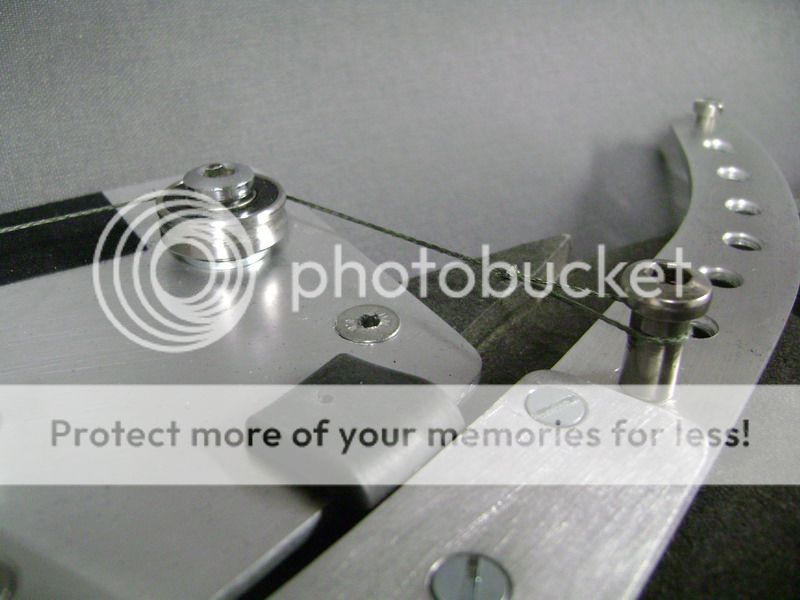
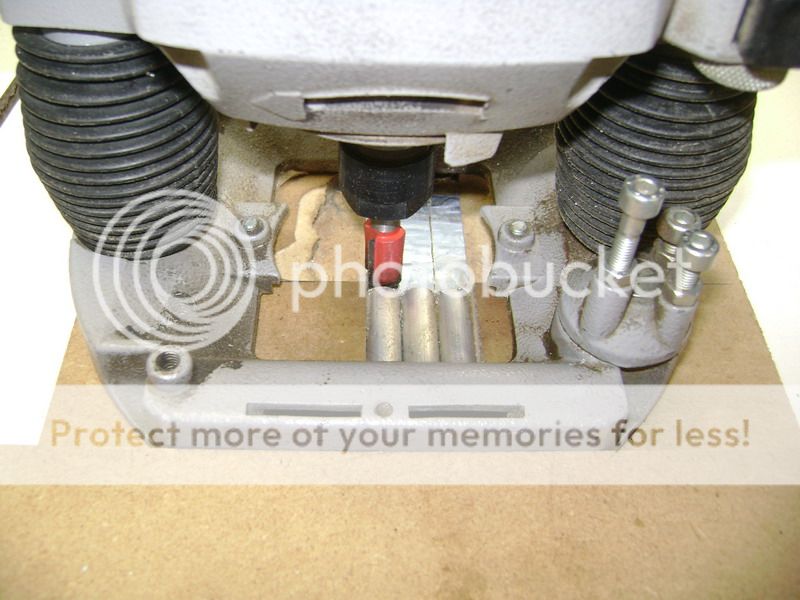
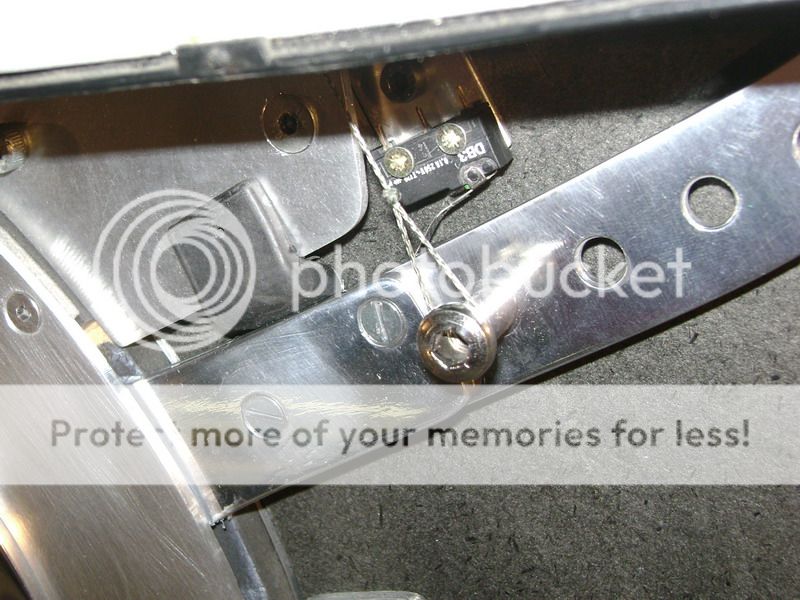
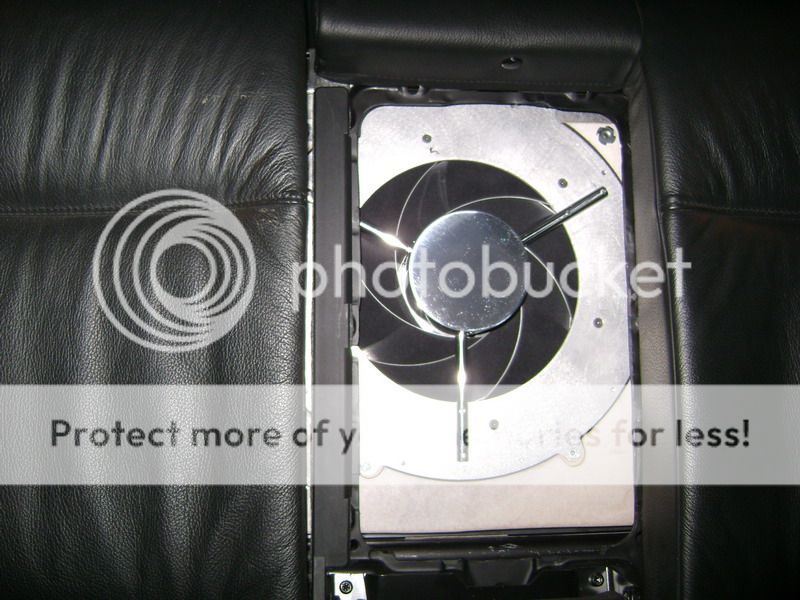
 Here you can see it working when closed.

 Focal Beryllium BMW - Page 10 -- posted image.

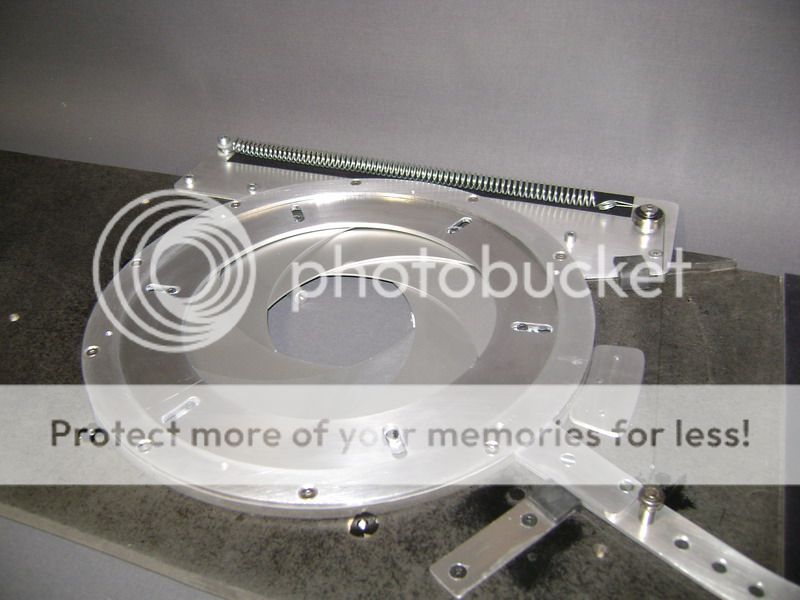
You can also see I added some rubbers, where the lever stops.

Focal Beryllium BMW - Page 10 -- posted image.

Here the inox-cable will lay into, witch stands in connection with the windowwipermotor.

Focal Beryllium BMW - Page 10 -- posted image.


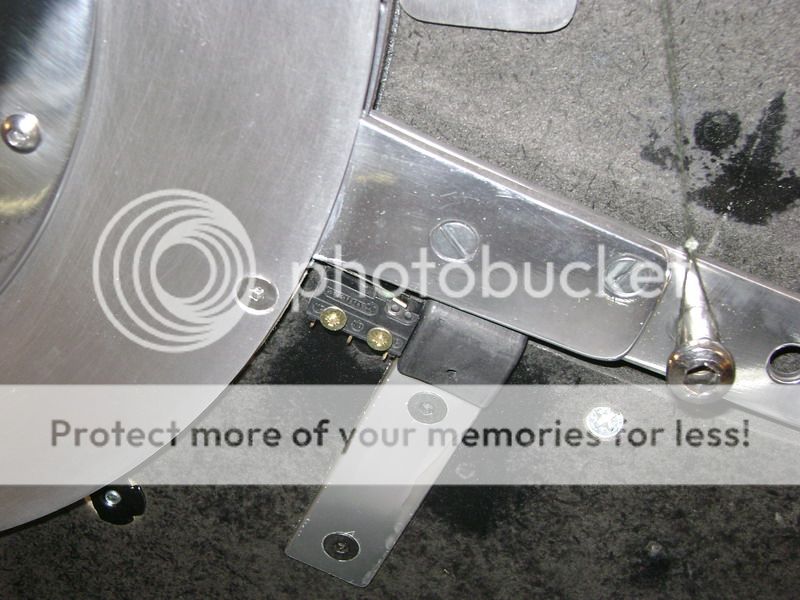
The motor is already firmly tightened in the trunk, besides the end loop contacts, it's all ready to mount in the bimmer.
As for now, I'm really satisfied with how it all works and looks.

This I cannot say about Marilyn Manson his performance yesterday in the Lotto Arena here in Belgium.

The donut hole didn't feel like performing according to me, he stopped after an hour.

the loser.

robolop 
Copper - Posts: 157
Copper spacespace
Joined: October 26, 2008
Posted: January 10, 2010 at 10:31 AM / IP Logged Link to Post Post Reply Quote robolop

I did some improvements on the diaphragm. A lot of rings I made ended up in the bin. Sometimes these things happen.

This time it was the outer ring. This one is tightened with 6 screws.

Focal Beryllium BMW - Page 10 -- posted image.
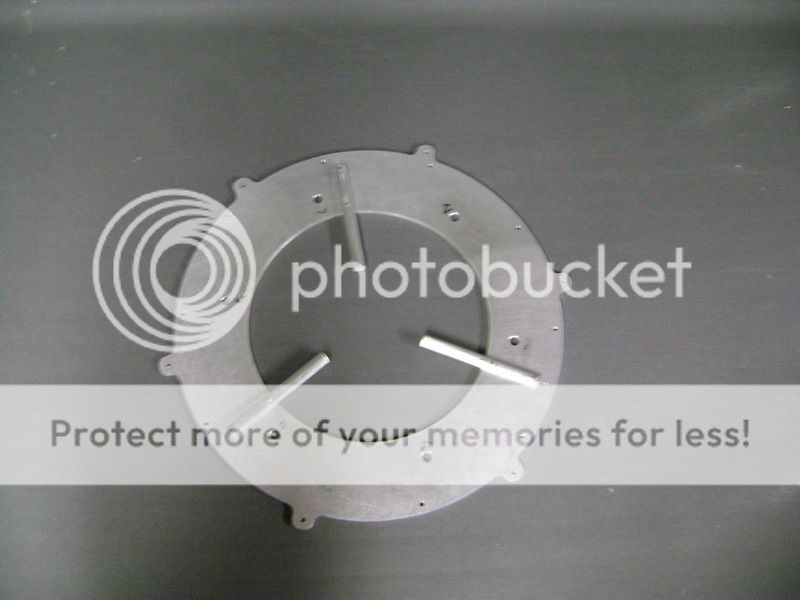
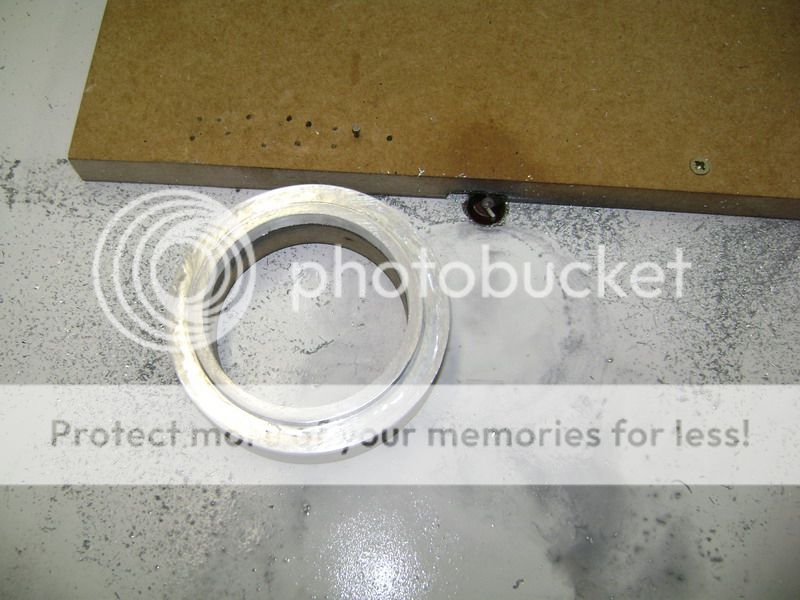
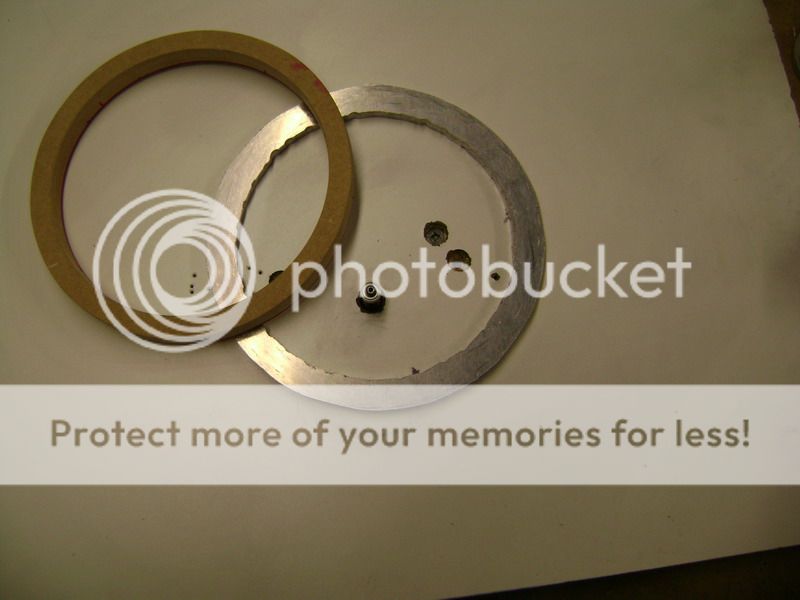
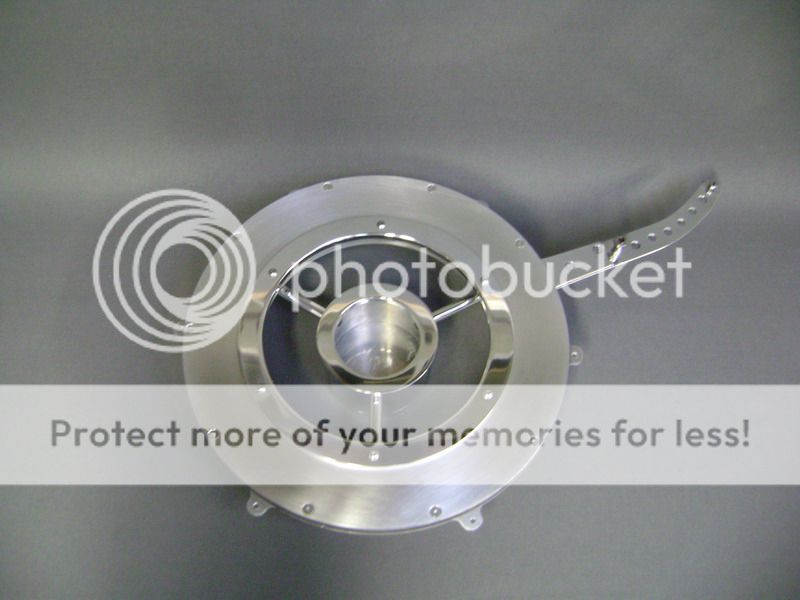
The inner ring stayed the same.

Focal Beryllium BMW - Page 10 -- posted image.

This is what's left of the tube. You can see I made a aluminium little cover for it. Now it's nicely finished when the armrest is down.


Focal Beryllium BMW - Page 10 -- posted image.

Focal Beryllium BMW - Page 10 -- posted image.

Focal Beryllium BMW - Page 10 -- posted image.

The 3 toggles where the little cup is tightened with, are now polished too.

Focal Beryllium BMW - Page 10 -- posted image.

Here you can see the backside.

Focal Beryllium BMW - Page 10 -- posted image.

This will be the frontside.

Focal Beryllium BMW - Page 10 -- posted image.

The meaning of all this is that I'm planning of working it all into one part towards the outer polished ring. Of the rest you won't see anything.

I would like to do this in carbon fibre, so I'll get a nice contrast between the 2 materials.

Focal Beryllium BMW - Page 10 -- posted image.

 This is how it sits in the car, and I've got plenty of space up and down there.

Focal Beryllium BMW - Page 10 -- posted image.

Focal Beryllium BMW - Page 10 -- posted image.

Focal Beryllium BMW - Page 10 -- posted image.

Here's the transmission with the steel cable.

Focal Beryllium BMW - Page 10 -- posted image.

the "end-loop-contacts"

Focal Beryllium BMW - Page 10 -- posted image.

Focal Beryllium BMW - Page 10 -- posted image.

Here's the motor who brings movement in all of this.

Focal Beryllium BMW - Page 10 -- posted image.

What I feared the most, is how the cable was going to roll itself on. I managed to solve this simply by putting the supply out of the centre, of the axis' motor.

this works perfectly. and believe me, I tried this many times, never  malfunctioned.

Focal Beryllium BMW - Page 10 -- posted image.

robolop 
Copper - Posts: 157
Copper spacespace
Joined: October 26, 2008
Posted: January 10, 2010 at 10:31 AM / IP Logged Link to Post Post Reply Quote robolop

First of all I would like to wish everyone a good and healthy 2010. May your dreams come true, and have a lot of fun. In life only a few things count, and enjoying is one of them.

About me… I’m satisfied with what I’ve done and made, but on top of my list there are the 2 heavenly hours I heard Metallica playing in Werchter, although Fergie did a good job too.
About the Ice, the diaphragm I made was a bull’s eye. I never thought I’d make something like this. And what’s more important, is that I managed to add something more into the trunk that’s electric.
The counter is now on 3, and sure hope it will rise even more.
I took some pictures of the lighting and the amplifierbox.

Focal Beryllium BMW - Page 10 -- posted image.

Focal Beryllium BMW - Page 10 -- posted image.

Focal Beryllium BMW - Page 10 -- posted image.

Focal Beryllium BMW - Page 10 -- posted image.

Focal Beryllium BMW - Page 10 -- posted image.

What I’m going to do next is to remove the amplifierbox.

When I made the aluminum box 2 years ago, I considered the fact that some changes may have come… Well, change is here…

The Precision Power amp is going out, and will have to make way for the new 2 amplifiers.

The big amount of work to get the PPI nicely covered is for the bin, but I know in the back of my head this could happen.

What’s going to happen with the other amplifiers, will be (according to me) even nice looking and even have more power.

Will sort it out.

robolop 
Copper - Posts: 157
Copper spacespace
Joined: October 26, 2008
Posted: January 10, 2010 at 10:33 AM / IP Logged Link to Post Post Reply Quote robolop

Here you can see how the diaphragm looks, seen from the interior of the car.

Focal Beryllium BMW - Page 10 -- posted image.

You can see that the diaphragm doesn’t sit in the center of the armrest.

What you see, won’t stay this way. It all needs to get finished, like when the armrest is down, it will look nice and complety ready

Focal Beryllium BMW - Page 10 -- posted image.

Page of 17

  Printable version Printable version Post ReplyPost New Topic
You cannot post new topics in this forum
You cannot reply to topics in this forum
You cannot delete your posts in this forum
You cannot edit your posts in this forum
You cannot create polls in this forum
You cannot vote in polls in this forum

  •  
Search the12volt.com
Follow the12volt.com Follow the12volt.com on Facebook
Tuesday, May 7, 2024 • Copyright © 1999-2024 the12volt.com, All Rights Reserved Privacy Policy & Use of Cookies
Disclaimer: *All information on this site ( the12volt.com ) is provided "as is" without any warranty of any kind, either expressed or implied, including but not limited to fitness for a particular use. Any user assumes the entire risk as to the accuracy and use of this information. Please verify all wire colors and diagrams before applying any information.

Secured by Sectigo
the12volt.com spacer
Support the12volt.com
Top
the12volt.com spacer