the12volt.com spacer
icon

2001 gmc yukon xl and clifford 50.7x


Post ReplyPost New Topic
< Prev Topic Next Topic >
shortcircuit161 
Silver - Posts: 556
Silver spaceThis member has made a donation to the12volt.com. Click here for more info.spacespace
Joined: August 29, 2010
Location: United States
Posted: January 13, 2012 at 7:19 PM / IP Logged  
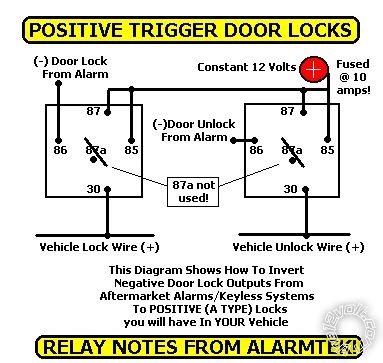
The power lock wires require a positive trigger. The 3 pin lock harness (which only has 2 wires) only gives a negative output so you will need relays or a door module such as the DEI 451M to convert the negative pulses to positive ones.
Blue - unlock output
Green - Lock output
If not using the 451M, you would wire 2 relays like this
2001 gmc yukon xl and clifford 50.7x - Page 2 -- posted image.
On the Yukon, the power lock wires are in the Brown Plug of the BCM
Lock - Light Blue (pin A4)
Unlock - White (pin A3)
shortcircuit161 
Silver - Posts: 556
Silver spaceThis member has made a donation to the12volt.com. Click here for more info.spacespace
Joined: August 29, 2010
Location: United States
Posted: January 13, 2012 at 7:46 PM / IP Logged  
Primay 12 pin harness on the Viper system
H1/1 - RED / White (for trunk) - not used since the trunk unlocks with the rest of the doors
H1/2 - Red - goes to a 12v constant wire (Red from ignition harness)
H1/3 - brown - connects to the red positive wire of the siren
H1/4 - WHITE/ brown - not used (just cut and tape)
H1/5 - black - chassis ground
H1/6 - violet - not used (just cut and tape)
H1/7 - Blue - connects to pink/black for trunk trigger at BCM it's the light blue plug, pin B10
H1/8 - Green - connects to tan door trigger at BCM purple plug
H1/9 - BLACK/ white - connects to gray/black at BCM blue plug
H1/10 - WHITE/ blue - not used
H1/11 - white - connects to negative parking light white wire at BCM blue plug, pin A5 (make sure to set the polarity on the remote start brain to negative trigger for the lights)
H1/12 - orange - not used
shortcircuit161 
Silver - Posts: 556
Silver spaceThis member has made a donation to the12volt.com. Click here for more info.spacespace
Joined: August 29, 2010
Location: United States
Posted: January 13, 2012 at 8:09 PM / IP Logged  
The 18 pin harness should be fairly simple but I can post info on that one also if needed. Hope that helps you!
marshallstone 
Member - Posts: 5
Member spacespace
Joined: January 05, 2012
Location: California, United States
Posted: January 16, 2012 at 11:48 PM / IP Logged  
I could use the 18 pin harness as well but i should be able to figure it out. man great work really appreciate your help!!!
shortcircuit161 
Silver - Posts: 556
Silver spaceThis member has made a donation to the12volt.com. Click here for more info.spacespace
Joined: August 29, 2010
Location: United States
Posted: January 17, 2012 at 8:26 AM / IP Logged  
Sure, not a problem at all.
H2/1 LIGHT GREEN/ BLACK (-) 200mA OEM ALARM DISARM OUTPUT
connects to light green at BCM, purple plug, pin B3
H2/2 ORANGE / BLACK (-) 200mA AUX 4 OUTPUT
optional - not needed in this setup
H2/3 GREEN / WHITE (-) 200mA OEM ALARM ARM OUTPUT
arms on lock with door open - you would have to split this wire into two ends and place diodes (1 amp 1N400x) with the band facing the GREEN / WHITE wire. Connect one end to the DOOR TRIGGER wire and the other to the LOCK wire.
H2/4 VIOLET/BLACK (-) 200mA AUX 2 OUTPUT
optional - not needed in this setup
H2/5 WHITE/ BLACK (-) 200mA AUX 3 OUTPUT
optional - not needed in this setup
H2/6 WHITE/ VIOLET (-) 200mA AUX 1 OUTPUT
optional - not needed in this setup
H2/7 GREY/BLACK (-) DIESEL WAIT TO START INPUT
not used for this vehicle
H2/8 BROWN / BLACK (-) 200mA HORN HONK OUTPUT
black wire at BCM, brown plug, pin A9
H2/9 VIOLET/WHITE TACHOMETER INPUT
any fuel injector's uncommon wire OR at the ECM, plug labeled "red", pin 10, The ECM (Engine Control Module) is located near the battery, down low, between the fender and the fan under the black plastic cover. Might just be easier to go to an injector.
H2/10 DARK BLUE (-) 200mA STATUS OUTPUT
used to power the Ground when running input of the bypass unit
H2/11 PINK/WHITE (-) 200mA FLEX RELAY CONTROL OUTPUT
optional - not needed in this setup
H2/12 ORANGE (-) 200mA ACCESSORY OUTPUT
optional - not needed in this setup
H2/13 PURPLE (-) 200mA STARTER OUTPUT
optional - not needed in this setup
H2/14 PINK (-) 200mA IGNITION 1 OUTPUT
optional - not needed in this setup
H2/15 GREY (-) HOOD PIN INPUT (N/C OR N/O)
connects to your hood pin that came with the alarm
H2/16 BLUE/WHITE (-) 200mA 2ND STATUS /REAR DEFOGGER OUTPUT
optional - not needed in this setup (can be setup to turn on the rear defroster but i don't know which wire controls it on your vehicle)
H2/17 BROWN (+) BRAKE SHUTDOWN INPUT
white at the brake switch
H2/18 BLACK/ WHITE (-) NEUTRAL SAFETY INPUT
if it's automatic, connect with your ground. if it's manual, connect to the parking brake wire (light blue wire at the parking brake switch)
Hope that helps!! I'm sorry I didn't post it before. Let us know if you need any other info. It's our pleasure to help you.
Page of 2

Sorry, you can NOT post a reply.
This topic is closed.

  Printable version Printable version Post ReplyPost New Topic
You cannot post new topics in this forum
You cannot reply to topics in this forum
You cannot delete your posts in this forum
You cannot edit your posts in this forum
You cannot create polls in this forum
You cannot vote in polls in this forum

  •  
Search the12volt.com
Follow the12volt.com Follow the12volt.com on Facebook
Tuesday, September 16, 2025 • Copyright © 1999-2025 the12volt.com, All Rights Reserved Privacy Policy & Use of Cookies
Disclaimer: *All information on this site ( the12volt.com ) is provided "as is" without any warranty of any kind, either expressed or implied, including but not limited to fitness for a particular use. Any user assumes the entire risk as to the accuracy and use of this information. Please verify all wire colors and diagrams before applying any information.

Secured by Sectigo
the12volt.com spacer
Support the12volt.com
Top
the12volt.com spacer