the12volt.com spacer
icon

f350 diesel remote starter


Post ReplyPost New Topic
< Prev Topic Next Topic >
super03duty 
Member - Posts: 24
Member spacespace
Joined: December 28, 2012
Location: Michigan, United States
Posted: December 30, 2012 at 9:09 AM / IP Logged  
SYSTEM WIRES PIN#      TRUCK WIRE LOCATION
H10. 20 PIN CONNECTOR   
Black / White Wire: (-) Neutral Safety Switc h Input        H1       GROUND 
Black / Violet Wire: (-) 200 mA Channel 6 Programmable Output       H2       NOT USED 
Pink Wire: 2-Step Unlock /Factory Disarm /Sensor By-pass    H3       PINK/LTGREEN           KICK PANEL
White Wire: (-) 200mA Dome Light Control Output        H4      BLK/LT BLUE     PASS KICK PANEL
Black / Red Wire: (-) 200 mA Channel 5 Programmable Output          H5      NOT USED 
Bl ack / Green Wire: ( -) 20 0mA Chann el 4 Programmable Output   H6        NOT USED 
Gray Wire: (-) 200mA Channel 2 (Trunk) Output H7       NOT USED 
Brown / White Wire: (-) 200mA Horn Output (P rogrammable) H8        BLUE  STEERING COLUMN
Yellow Wire: (-) 200mA Ig nition 3 Control Output           H9       NOT USED 
Blue / Black Wire: (-) 200mA Accessory 2 Control Output          H10      BLUE/LT GREEN       IGNITION HARNESS
Blue Wire:(-) Zone 2 Negative Hood/Trunk trigger         H20      HOOD SWITCH
White / Green Wire: (-) Diesel Wait-To-Start Input          H19     VLT/OR-WT/LTGN 
White / Blue Wire: (-) Instant Start and Turn Off Input     H18  
Green Wire : Zone 3 (-) Negative Door Pin Trigger         H17     NOT USED 
Violet Wire: Zone 3 (+) Positive Door Trigger      H16     BLK/BLUE (+)   KICK PANEL
White / Red Wire: Tachometer Signal Input        H15      WHT/PINK (-)         BCM
White / Black Wire: (-) Negative Hood Pin Safety Shut Down    H14       HOOD SWITCH
White / Violet Wire: (+) Brake Switch Shut Down Input   H13      LT GREEN (+) BRAKE SWITCH
Orange Wire: (-) 500mA Grounded Output When Armed H12       NOT USED 
Orange / White Wire: ( -) 20 0mA Grounded Output When Disarmed  H11      NOT USED 
   
H1 6 PIN HEAVY GAUGE WIRE HARNESS   
Red: Remote Start Power 1 YELLOW         IGNITION HARNESS
Red: Remote Start Power 2  GREEN/ VIOLET         IGNITION HARNESS
Violet: Starter (+) Output      GREEN (12V START ONLY) IGNITION HARNESS
Pink: Ignition 2 (+) Output   RD/BLK (12V ON)       IGNITION HARNESS
Yellow: Ignition 1 (+) Output  RD/LT GRN - WHT / YELLOW (12V ON)        IGNITION HARNESS
Brown: Acc/Heater (+) Output         GRAY / YELLOW (12V ACC)    IGNITION HARNESS
   
H2 5 PIN WIRE HARNESS   
RED / White: Parking Light Relay Power Input   
White: Parking Light Relay Output   
Black: System Main Ground (-) GROUND 
Brown: Siren (+) Output           TO THE SIREN 
Red: 12v + Battery Power            CONS 12V 
super03duty 
Member - Posts: 24
Member spacespace
Joined: December 28, 2012
Location: Michigan, United States
Posted: December 30, 2012 at 9:10 AM / IP Logged  

Finnaly.  Let me know what you think and please give me some input on the wires i am missing

kreg357 
Platinum - Posts: 7,785
Platinum spaceThis member has made a donation to the12volt.com. Click here for more info.spaceThis member has been recognized as an authority in Electrical Theory. Click here for more info.spaceThis member has been recognized as an authority in Mobile Security and Convenience. Click here for more info.spacespace
Joined: January 30, 2009
Location: Pennsylvania, United States
Posted: December 30, 2012 at 7:02 PM / IP Logged  

SYSTEM WIRES PIN#      TRUCK WIRE LOCATION

H10. 20 PIN CONNECTOR  
Black / White Wire: (-) Neutral Safety Switc h Input        H1       GROUND
Black / Violet Wire: (-) 200 mA Channel 6 Programmable Output       H2       NOT USED
Pink Wire: 2-Step Unlock /Factory Disarm /Sensor By-pass    H3       PINK/LTGREEN           KICK PANEL
White Wire: (-) 200mA Dome Light Control Output        H4      BLK/LT BLUE     PASS KICK PANEL
Black / Red Wire: (-) 200 mA Channel 5 Programmable Output          H5      NOT USED
Bl ack / Green Wire: ( -) 20 0mA Chann el 4 Programmable Output   H6        NOT USED
Gray Wire: (-) 200mA Channel 2 (Trunk) Output   H7       NOT USED
Brown / White Wire: (-) 200mA Horn Output (P rogrammable) H8        BLUE STEERING COLUMN
Yellow Wire: (-) 200mA Ig nition 3 Control Output           H9       NOT USED
Blue / Black Wire: (-) 200mA Accessory 2 Control Output          H10     To extra Relay Pin 85   *** See wiring below
Blue Wire:(-) Zone 2 Negative Hood/Trunk trigger         H20        Not Used        
White / Green Wire: (-) Diesel Wait-To-Start Input          H19     VLT/OR-WT/LTGN
White / Blue Wire: (-) Instant Start and Turn Off Input     H18      Not Used
Green Wire : Zone 3 (-) Negative Door Pin Trigger         H17     NOT USED
Violet Wire: Zone 3 (+) Positive Door Trigger      H16     BLK/BLUE (+) KICK PANEL
White / Red Wire: Tachometer Signal Input        H15      WHT/PINK (-)         BCM
White / Black Wire: (-) Negative Hood Pin Safety Shut Down    H14       HOOD SWITCH
White / Violet Wire: (+) Brake Switch Shut Down Input   H13      LT GREEN (+) BRAKE SWITCH
Orange Wire: (-) 500mA Grounded Output When Armed            H12       NOT USED
Orange / White Wire: ( -) 200mA Grounded Output When Disarmed       H11      NOT USED
  
H1 6 PIN HEAVY GAUGE WIRE HARNESS  
Red: Remote Start Power 1 YELLOW         IGNITION HARNESS
Red: Remote Start Power 2 GREEN/ VIOLET         IGNITION HARNESS
Violet: Starter (+) Output      GREEN (12V START ONLY) IGNITION HARNESS
Pink: Ignition 2 (+) Output   RD/BLK (12V ON)       IGNITION HARNESS
Yellow: Ignition 1 (+) Output RD/LT GRN or WHT / YELLOW (12V ON)          IGNITION HARNESS
Brown: Acc/Heater (+) Output         GRAY / YELLOW (12V ACC)    IGNITION HARNESS
  
H2 5 PIN WIRE HARNESS  
RED / White: Parking Light Relay Power Input          with Red to +12V
White: Parking Light Relay Output     Brown @ Headlight Switch
Black: System Main Ground (-)      GROUND
Brown: Siren (+) Output   TO THE SIREN
Red: 12v + Battery Power CONS 12V
  
H7                   451M
1. Blue Wire  ( - ) Lock Pulse     1N4001 w/band towards RS900              Blue
       ( + ) Unlock Pulse
3. Green Wire  ( - ) Unlock Pulse  1N4001 w/band towards RS900          Green
          (+) Lock Pulse

Extra ACC2 Relay

Relay Pin 85 to RS900 H10 Pin 10 Blue / Black Wire
Relay Pin 86 and 87 to +12V constant
Relay Pin 30 to F350 Acc2  BLUE/LT GREEN @ ignition harness
Relay Pin 87a not used - insulate

Soldering is fun!
super03duty 
Member - Posts: 24
Member spacespace
Joined: December 28, 2012
Location: Michigan, United States
Posted: December 30, 2012 at 7:54 PM / IP Logged  

Great!!! Thanks alot for your input.

One more question though.  I have 2 Acc wires in my harness at the ignition. Why cant i use both? why the relay?

kreg357 
Platinum - Posts: 7,785
Platinum spaceThis member has made a donation to the12volt.com. Click here for more info.spaceThis member has been recognized as an authority in Electrical Theory. Click here for more info.spaceThis member has been recognized as an authority in Mobile Security and Convenience. Click here for more info.spacespace
Joined: January 30, 2009
Location: Pennsylvania, United States
Posted: December 30, 2012 at 8:21 PM / IP Logged  

Not sure I understand the question. 

The R/S unit can supply two Ignitions, one Starter and one Accessory ( @  +12V  30 Amp ).  Your truck has two Ignitions, one Starter and two Accessories.  The extra relay is so the trucks second Accessory has power during a remote start.

Soldering is fun!
super03duty 
Member - Posts: 24
Member spacespace
Joined: December 28, 2012
Location: Michigan, United States
Posted: December 30, 2012 at 9:27 PM / IP Logged  

The truck has 2 acc wires.

acc 1 is gray / YELLOW

acc 2 is blue/light green

The RS system has 2 acc wires

H10 #10 is the blue/black wire labeled ACC2

H1 #6 is the brown wire labeled ACC1 

My question is if there are 2 of each why cant i use them?  Why do i have to run a relay? I feel like such a moron with this project.  What has always made sense to me about electrical has gone out the window with this thing.  This is the newest truck Ive ever owned and Im still learning all the little stupid things ford did with it.  I relplaced the motor in this thing by myself and im strugling with a fricken remote start!!!!

From what I am reading on your last post is that you have to manually power the Acc 2 in the ignition harness with the relay.

kreg357 
Platinum - Posts: 7,785
Platinum spaceThis member has made a donation to the12volt.com. Click here for more info.spaceThis member has been recognized as an authority in Electrical Theory. Click here for more info.spaceThis member has been recognized as an authority in Mobile Security and Convenience. Click here for more info.spacespace
Joined: January 30, 2009
Location: Pennsylvania, United States
Posted: December 30, 2012 at 9:44 PM / IP Logged  

Ah, a little gotcha..

The trucks ignition wires are all high current positive (+) circuits.  The H1 connector outputs high current  (+) positive outputs.  A good match.

The H10 Blue/Black wire is marked as a (-) output.  Not a good match.  Also notice the gauge of this wire as compared to the H1 wires.  We use a relay controlled by the H10 (-) ACC2 wire to supply the trucks Accessory2 wire with the high current (+) positive power it needs.

We learn something new everyday.  f350 diesel remote starter - Page 2 -- posted image.

Soldering is fun!
super03duty 
Member - Posts: 24
Member spacespace
Joined: December 28, 2012
Location: Michigan, United States
Posted: December 31, 2012 at 11:09 AM / IP Logged  

WHERE CAN I MOUNT THE SHOCK SENSOR?  CAN I JUST GROUND THE WIRE FOR THE HOOD SWITCH?  i CANT FIND A SPOT FOR IT THAT THE SWITCH ACUTALLY HITS THE HOOD WHEN IT COMES DOWN.

i HAVE THE DEI 451M'S ON THE WAY FOR THE DOOR LOCKS.  I HAVE PRETTY MUCH EVERYTHING ELSE HOOKED UP.  I DECIDED JUST TO USE  THE BUILT IN TIMER FOR THE WAIT TO START SINCE I CANT FIND THE CORRECT WIRE.  EVERYONE SAYS SOMETING DIFFERENT. 

super03duty 
Member - Posts: 24
Member spacespace
Joined: December 28, 2012
Location: Michigan, United States
Posted: December 31, 2012 at 11:11 AM / IP Logged  
AND WHERE THE HELL IS THE HORN WIRE ON THE STEERRING COLUMN?  I SEE A LIGHT BLUE ONE BUT ITS IN A BUNDLE WITH THE SRS?
kreg357 
Platinum - Posts: 7,785
Platinum spaceThis member has made a donation to the12volt.com. Click here for more info.spaceThis member has been recognized as an authority in Electrical Theory. Click here for more info.spaceThis member has been recognized as an authority in Mobile Security and Convenience. Click here for more info.spacespace
Joined: January 30, 2009
Location: Pennsylvania, United States
Posted: December 31, 2012 at 7:53 PM / IP Logged  

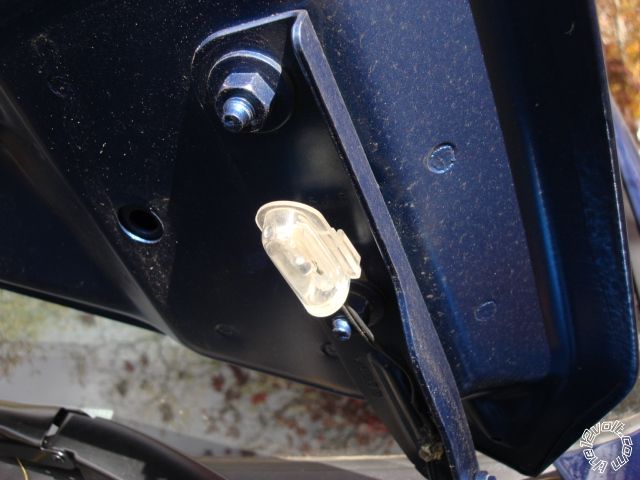
The Hood Pin is a very valuable safety and really should be used.  Sometimes you have to be real creative in finding a

way to mount it.  Here is a recent post on this subject : https://www.the12volt.com/installbay/forum_posts.asp~TID~132487~PN~1

If aren't too worried about the alarm aspect of this switch ( and having the Hood Pin trigger when the hood is lifted 1/2 inch )

you can use a tilt switch mounted on the hinge.  It is easier to locate and mount and it lasts a whole lot longer.  Here is one
mounted in a Dodge Caravan :

f350 diesel remote starter - Page 2 -- posted image.

Ford has a bad habit of running the Horn wire in with the air bag wires.  Be very careful when testing and use only a DMM, never

a test light, in that area.

Soldering is fun!
Page of 4

  Printable version Printable version Post ReplyPost New Topic
You cannot post new topics in this forum
You cannot reply to topics in this forum
You cannot delete your posts in this forum
You cannot edit your posts in this forum
You cannot create polls in this forum
You cannot vote in polls in this forum

  •  
Search the12volt.com
Follow the12volt.com Follow the12volt.com on Facebook
Friday, May 10, 2024 • Copyright © 1999-2024 the12volt.com, All Rights Reserved Privacy Policy & Use of Cookies
Disclaimer: *All information on this site ( the12volt.com ) is provided "as is" without any warranty of any kind, either expressed or implied, including but not limited to fitness for a particular use. Any user assumes the entire risk as to the accuracy and use of this information. Please verify all wire colors and diagrams before applying any information.

Secured by Sectigo
the12volt.com spacer
Support the12volt.com
Top
the12volt.com spacer