the12volt.com spacer
icon

newbie, connector or solder?


Post ReplyPost New Topic
< Prev Topic Next Topic >
howie ll 
Pot Metal - Posts: 16,466
Pot Metal spacespace
Joined: January 09, 2007
Location: United Kingdom
Posted: August 05, 2014 at 2:04 AM / IP Logged  
For ease of accessibility I would go for crimp connectors.
Pop into a local Radio Shack they will have the size, Width wise, either 1/4" (6mm) 4.8 or 3.2 also sold as speaker terminals.
I really only solder when I'm fitting a disconnect plug, molex etc. up line.
ALL of the answers above are correct !!
Having said that, please note that applying excess heat will damage the switch. Also the point about using a good quality crimper. (Not $5 from Walmart).
nat28 
Member - Posts: 32
Member spacespace
Joined: July 15, 2014
Posted: August 05, 2014 at 6:54 AM / IP Logged  
burntkat wrote:
For a newb with questionable soldering skills, probably wanting to minimize tooling costs, and to maximize serviceability- most definitely use solderless terminals. See my post immediately prior this one regarding proper crimping tools and techniques.
Also, invest in some heatshrink and cover the connector after assembly, to avoid any errant shorts.
Thanks for the input. I do have a good crimping tool, however, I like that ratcheting crimper that you indicated.
2013 Subaru Outback Limited
2005 Toyota Sequoia
nat28 
Member - Posts: 32
Member spacespace
Joined: July 15, 2014
Posted: August 05, 2014 at 7:01 AM / IP Logged  
oldspark wrote:
Agreed - especially re heatshrink tubing.
There are crimps for 2mm spades (terminals) tho I'm not sure if these are designated as 3.x mm (3.3mm?).
[ There are also 4.8mm and the all common 6.4mm aka 1/4", & 9mm etc. ]
I also recently wrote here that despite nearly 40 years of crimping it was only a few months ago I finally bought a proper ratchet crimping tool - and even that was a substitute for a refund as opposed to a fiscally acceptable desire.
But good crimps are essential. I'd strongly recommend a "proper" & good quality tool whether borrowed or invested.
Unfortunately, I have not been able to find spade terminals this small anywhere.
2013 Subaru Outback Limited
2005 Toyota Sequoia
howie ll 
Pot Metal - Posts: 16,466
Pot Metal spacespace
Joined: January 09, 2007
Location: United Kingdom
Posted: August 05, 2014 at 7:39 AM / IP Logged  
Radio Shack, Farnell, Mouser, RS Components in the UK/Europe etc. Google is your friend!
Custom_Jim 
Copper - Posts: 210
Copper spacespace
Joined: November 28, 2003
Location: Missouri, United States
Posted: August 05, 2014 at 11:16 AM / IP Logged  
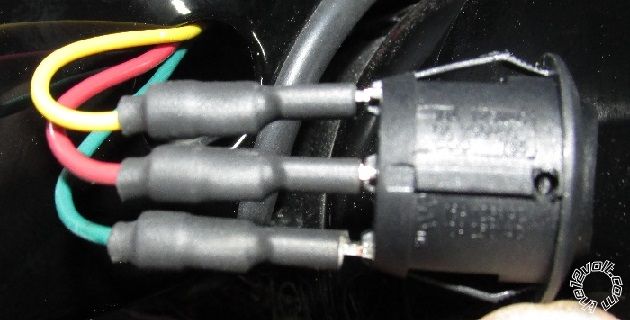
I just got done doing some switches like yours and opted to put connectors on them for easier replacement later if needed.
The connector size was a 0.205". They were really tight pushing onto the tabs of the switch but it was not due to the width of the connector but the terminal was made to go onto a thinner metal.
On mine I put some heat shrink over the connector.
https://www.flickr.com/photos/121766713@N04/14650236099/ newbie, connector or solder? - Page 2 -- posted image.
1968 Chevy II Nova Garage Find 2012
1973 Nova Custom
1974 Spirit of America Nova
1973 Nova Pro-Street
nat28 
Member - Posts: 32
Member spacespace
Joined: July 15, 2014
Posted: August 05, 2014 at 11:39 AM / IP Logged  
Thanks for the image. After searching, I've been able to find .110" connectors and .187" connectors (as well as standard .250"). I guess .205" is another size to look for!
2013 Subaru Outback Limited
2005 Toyota Sequoia
howie ll 
Pot Metal - Posts: 16,466
Pot Metal spacespace
Joined: January 09, 2007
Location: United Kingdom
Posted: August 05, 2014 at 11:42 AM / IP Logged  
If you're using the standard LED three terminal rotary switch (as in Custom_Jim's photo the connectors are .187", 6mm (.250") will also fit just.
Custom_Jim 
Copper - Posts: 210
Copper spacespace
Joined: November 28, 2003
Location: Missouri, United States
Posted: August 05, 2014 at 11:51 AM / IP Logged  
howie ll wrote:
If you're using the standard LED three terminal rotary switch (as in Custom_Jim's photo the connectors are .187", 6mm (.250") will also fit just.
Looking at my reply I DID use the 0.187 connectors and not the 0.205 ones. Boy it's hell getting old.
1968 Chevy II Nova Garage Find 2012
1973 Nova Custom
1974 Spirit of America Nova
1973 Nova Pro-Street
burntkat 
Copper - Posts: 143
Copper spaceThis member has made a donation to the12volt.com. Click here for more info.spacespace
Joined: October 26, 2003
Location: South Carolina, United States
Posted: August 05, 2014 at 11:57 AM / IP Logged  
nat28 wrote:
burntkat wrote:
For a newb with questionable soldering skills, probably wanting to minimize tooling costs, and to maximize serviceability- most definitely use solderless terminals. See my post immediately prior this one regarding proper crimping tools and techniques.
Also, invest in some heatshrink and cover the connector after assembly, to avoid any errant shorts.
Thanks for the input. I do have a good crimping tool, however, I like that ratcheting crimper that you indicated.
My pleasure.
For $30, I was very surprised at the quality of the tool and output from it.
"Always listen to experts. They'll tell you what can't be done, and why. Then do it. - Robert A. Heinlein"
burntkat 
Copper - Posts: 143
Copper spaceThis member has made a donation to the12volt.com. Click here for more info.spacespace
Joined: October 26, 2003
Location: South Carolina, United States
Posted: August 05, 2014 at 12:00 PM / IP Logged  
Custom_Jim wrote:
I just got done doing some switches like yours and opted to put connectors on them for easier replacement later if needed.
The connector size was a 0.205". They were really tight pushing onto the tabs of the switch but it was not due to the width of the connector but the terminal was made to go onto a thinner metal.
On mine I put some heat shrink over the connector.
https://www.flickr.com/photos/121766713@N04/14650236099/ newbie, connector or solder? - Page 2 -- posted image.
That's exactly what I would have done.
Protip: get a small flat-blade "tweaker" screwdriver and use it to spring open the sides of the connector's mating surface a bit. This greatly eases insertion.
(H/T Archer: "What, are we just done with the 'phrasing' thing now, or what?")
"Always listen to experts. They'll tell you what can't be done, and why. Then do it. - Robert A. Heinlein"
Page of 3

  Printable version Printable version Post ReplyPost New Topic
You cannot post new topics in this forum
You cannot reply to topics in this forum
You cannot delete your posts in this forum
You cannot edit your posts in this forum
You cannot create polls in this forum
You cannot vote in polls in this forum

  •  
Search the12volt.com
Follow the12volt.com Follow the12volt.com on Facebook
Thursday, March 28, 2024 • Copyright © 1999-2024 the12volt.com, All Rights Reserved Privacy Policy & Use of Cookies
Disclaimer: *All information on this site ( the12volt.com ) is provided "as is" without any warranty of any kind, either expressed or implied, including but not limited to fitness for a particular use. Any user assumes the entire risk as to the accuracy and use of this information. Please verify all wire colors and diagrams before applying any information.

Secured by Sectigo
the12volt.com spacer
Support the12volt.com
Top
the12volt.com spacer