the12volt.com spacer
icon

2013 Nissan Versa with no immobilizer


Post ReplyPost New Topic
< Prev Topic Next Topic >
howie ll 
Pot Metal - Posts: 16,466
Pot Metal spacespace
Joined: January 09, 2007
Location: United Kingdom
Posted: November 10, 2017 at 6:55 PM / IP Logged Link to Post Post Reply Quote howie ll
Looking at the Code diagram that isn't a lock module unless you can operate the locks from a key in the door in that case the smaller module is the keyless entry, the code is the RF control unit and it should should be wired for NEG lock output,violet and violet black to ground, green/black (lock) and blue/black (unlock) to the smaller module. The idatalink unit won't do the locks use the green (lock) and blue (unlock) from the Viper directly to the original green/black and blue/black going to the smaller module and retain it.
howie ll 
Pot Metal - Posts: 16,466
Pot Metal spacespace
Joined: January 09, 2007
Location: United Kingdom
Posted: November 10, 2017 at 6:57 PM / IP Logged Link to Post Post Reply Quote howie ll
Oh bloody heck we crossed paths again!
So what's new AKA great minds etc.
We just repeated each other Kreg!
Almost word for word, how's that for transatlantic cooperation?
rraider1 
Member - Posts: 28
Member spacespace
Joined: May 05, 2016
Location: Texas, United States
Posted: November 10, 2017 at 8:40 PM / IP Logged Link to Post Post Reply Quote rraider1
Thanks Kreg, I found that earlier and grabbed it so I can figure out how it's wired when I untape it all.
If I unlock the drivers door with the key it only unlocks that door. If I use the "manual" lock button on the driver's door it locks all the doors.
rraider1 
Member - Posts: 28
Member spacespace
Joined: May 05, 2016
Location: Texas, United States
Posted: November 10, 2017 at 9:11 PM / IP Logged Link to Post Post Reply Quote rraider1
While I'm doing this, a solenoid was installed so the trunk can be unlocked by pushing a button on the dash. The solenoid is grounded in the trunk so I assume the trigger is positive. The Viper trunk unlatch is -200ma. Would I need to do a low input to high output relay and then a negative to positive relay to use the viper to unlatch the trunk?
howie ll 
Pot Metal - Posts: 16,466
Pot Metal spacespace
Joined: January 09, 2007
Location: United Kingdom
Posted: November 11, 2017 at 4:10 AM / IP Logged Link to Post Post Reply Quote howie ll
First check the switch! There may be an existing relay, NEVER ASSUME!
Viper red/white to relay 85 20 amps fused 12 volt constant to 86 and 87, 30 to switch out put. 1N4004 diode across 85 and 86,
band to 86.
You're now seeing my point about not bothering with the idatalink part aren't you.
rraider1 
Member - Posts: 28
Member spacespace
Joined: May 05, 2016
Location: Texas, United States
Posted: November 11, 2017 at 9:10 AM / IP Logged Link to Post Post Reply Quote rraider1
I should have explained better. There's a fused positive wire running directly from the fuse box to the switch and then a wire from the switch to the trunk. I'll check the trunk for a relay but I didn't see one when I looked at it previously.
The green/black (lock) and blue/black (unlock) are running from the CA2051 to the smaller module so I'll wire as you instructed above.
Thanks again fr all the help.
rraider1 
Member - Posts: 28
Member spacespace
Joined: May 05, 2016
Location: Texas, United States
Posted: November 11, 2017 at 10:35 AM / IP Logged Link to Post Post Reply Quote rraider1
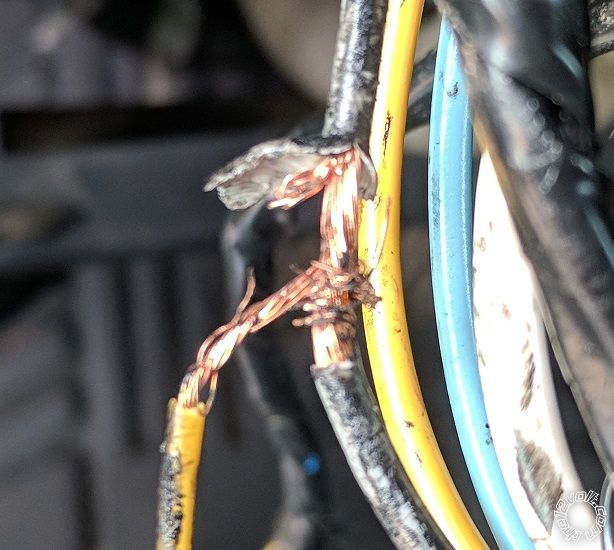
Wow, this is the "professional" shop's connection to the ignition wire on the Code system. No solder, frayed the wire they were tying into, just pathetic. I have the reciept from the install and parts and labor were over $500. I'm sure the rest of their connections will be the same.
2013 Nissan Versa with no immobilizer - Page 2 -- posted image.2013 Nissan Versa with no immobilizer - Page 2 -- posted image.
howie ll 
Pot Metal - Posts: 16,466
Pot Metal spacespace
Joined: January 09, 2007
Location: United Kingdom
Posted: November 11, 2017 at 11:37 AM / IP Logged Link to Post Post Reply Quote howie ll
Yuk, and wire the trunk solenoid as I explained above.
rraider1 
Member - Posts: 28
Member spacespace
Joined: May 05, 2016
Location: Texas, United States
Posted: November 11, 2017 at 1:50 PM / IP Logged Link to Post Post Reply Quote rraider1
howie ll wrote:
You're now seeing my point about not bothering with the idatalink part aren't you.
Yes, however my least favorite part of doing these is tying into wires at the bcm. I don't know why, it just makes me nervous and the bcm in this car is hard for me to get to. So, the iDatalink module will save me some of that.
Now I'm looking at how to run my wires from the engine bay to the interior and I'm not sure how i'm going to do that. Looks like there's one large bundle of wires in a grommet I can kind of get to. Hopefully I can punch through the side of the grommet without messing anything up.
howie ll 
Pot Metal - Posts: 16,466
Pot Metal spacespace
Joined: January 09, 2007
Location: United Kingdom
Posted: November 11, 2017 at 1:55 PM / IP Logged Link to Post Post Reply Quote howie ll
Stanley knife to cut a slit gently poke a long screwdriver through, WD-40 on the end with some your wires raped securely, that's one method.
Welding rod with a hook to carry the wires is another, done a few of the Euro version, no real problems there.
Page of 3

  Printable version Printable version Post ReplyPost New Topic
You cannot post new topics in this forum
You cannot reply to topics in this forum
You cannot delete your posts in this forum
You cannot edit your posts in this forum
You cannot create polls in this forum
You cannot vote in polls in this forum

  •  
Search the12volt.com
Follow the12volt.com Follow the12volt.com on Facebook
Saturday, April 20, 2024 • Copyright © 1999-2024 the12volt.com, All Rights Reserved Privacy Policy & Use of Cookies
Disclaimer: *All information on this site ( the12volt.com ) is provided "as is" without any warranty of any kind, either expressed or implied, including but not limited to fitness for a particular use. Any user assumes the entire risk as to the accuracy and use of this information. Please verify all wire colors and diagrams before applying any information.

Secured by Sectigo
the12volt.com spacer
Support the12volt.com
Top
the12volt.com spacer