the12volt.com spacer
icon

2001 Jeep Cherokee, Viper 5806V


Post ReplyPost New Topic
< Prev Topic Next Topic >
firefighter1466 
Member - Posts: 33
Member spacespace
Joined: January 30, 2021
Location: Virginia, United States
Posted: January 31, 2021 at 9:45 PM / IP Logged  
So in response to:
One of the nice things about a Viper Alarm system is the Starter Kill and Anti-Grind feature. If the Viper system is locked and the alarm is on, if the car was broken into and a duplicate key was used to start the engine, the Starter Kill feature would prevent cranking. With the Anti-Grind feature, it will prevent engaging the starter during key-take-over. To achieve these features, the vehicles Starter wire is cut and the Vipers two Starter wires and spliced into the circuit. Everything works as normal with a key start but the Viper adds these extra features. If you did not want to cut the vehicles Starter wire, just omit the Vipers Green wire and only connect the Vipers Violet wire to the vehicles uncut Starter wire.
- If I want to use this feature, how would I do that? I'm assuming based on your notes above I would cut the yellow wire in the middle, and on the side leading to the key I would connect the green wire and on the side towards the vehicle I would connect the purple wire?
The Viper has the ability to output either a (+) or a (-) Parking Light output on the White wire. This is determined by an internal 10 Amp fuse that is used as a jumper setting. On the top side on the Viper controller is a small sliding access cover. The fuse is beneath that cover.
- I just opened that sliding access, which surprisingly was not very easy to slide, haha. Looks as though the fuse wasn't on there at all it was in a "hold" area to the side. I removed it and placed it on the + and center.
If all of this stands as noted, would you mind looking this over to make sure I'm not missing anything? There may be more questions to come, but I feel this may be enough to make me confident enough to start tapping into wires. I've got the dash pulled all the way apart so everything is accessible.
2001 Jeep Cherokee, Viper 5806V - Page 2 -- posted image.
Jon
kreg357 
Platinum - Posts: 7,783
Platinum spaceThis member has made a donation to the12volt.com. Click here for more info.spaceThis member has been recognized as an authority in Electrical Theory. Click here for more info.spaceThis member has been recognized as an authority in Mobile Security and Convenience. Click here for more info.spacespace
Joined: January 30, 2009
Location: Pennsylvania, United States
Posted: January 31, 2021 at 10:21 PM / IP Logged  
Re Parking Light jumper/fuse - usually they are just bouncing around after rough shipping.
Re Starter Kill - yep, just cut the vehicles starter wire in an easily accessible place and make the Viper wire connections. It's best to solder and use heat shrink tube for long term reliability.
Please consider using a Hood Pin. It is possible to make a bracket/support out of a piece of stainless steel secured on existing fender mounting bolts that would hold the hood pin and not add any holes to the vehicle. If the mercury or ball bearing tilt switch is acceptable, search EBay on AU46 or Directed 8613 or 8613. It's an important safety feature.
You will have to do a Tach Learn procedure if going in Tach Mode to learn the tach signal.
The wire chart looks correct. You can join the Viper Chassis Ground wire with the Neutral Safety wire at the Viper and just run the one Black wire to the vehicles frame ground.
Soldering is fun!
firefighter1466 
Member - Posts: 33
Member spacespace
Joined: January 30, 2021
Location: Virginia, United States
Posted: January 31, 2021 at 10:29 PM / IP Logged  
Re Starter Kill - I do not know how to solder, I've got heat shrink and crimps. I've also got some posi connectors like you'd use for audio wiring (next project), that I can steal and use for this if you feel that would hold up better. Both wires go in and it screws them together and holds them.
Re Hood Pin - I do not mind using the hood pin - can you explain in more detail how and where it needs to be mounted. I'm just not sure how to get it setup correctly, and don't want to drill multiple holes. In addition, how do I get the wire from inside the vehicle to under the hood without additional drilling. Everything looks pretty well sealed and wrapped under my column.
Re Tach Learn - I don't guess I have a choice if I want reliable engine starts like you mentioned.. How would I go about this procedure? Would this be after everything else is wired up and completed?
Re Wire Chart - Noted on the wires.
Jon
kreg357 
Platinum - Posts: 7,783
Platinum spaceThis member has made a donation to the12volt.com. Click here for more info.spaceThis member has been recognized as an authority in Electrical Theory. Click here for more info.spaceThis member has been recognized as an authority in Mobile Security and Convenience. Click here for more info.spacespace
Joined: January 30, 2009
Location: Pennsylvania, United States
Posted: February 01, 2021 at 8:35 AM / IP Logged  
Re Starter Kill - I do not know how to solder, I've got heat shrink and crimps. I've also got some posi connectors like you'd use for audio wiring (next project), that I can steal and use for this if you feel that would hold up better. Both wires go in and it screws them together and holds them.
Sorry, can't help much here. I always solder everything. I really haven't used or tested any other methods. As a side note, during a recent install on a RAM 2500, I had to repair a butt crimp connector in the door sill harness from a stereo upgrade because I moved it slightly to gain access to a door pin wire and it just separated. Here is a link to a video from Bulldog security showing R/S install instructions. In the video, starting at 4:44 and going through 6:50, it details how to make wire connections without soldering.   http://www.bulldogsecurity.com/bdnew/remoteStartervideo500.html I would suggest using a high quality electrical tape like Scotch Super 33+. I have found that other brands will dry out and unravel in a few years, causing big problems.
Re Hood Pin - I do not mind using the hood pin - can you explain in more detail how and where it needs to be mounted. I'm just not sure how to get it setup correctly, and don't want to drill multiple holes. In addition, how do I get the wire from inside the vehicle to under the hood without additional drilling. Everything looks pretty well sealed and wrapped under my column.
With a tilt hood pin, I check for clearance when closed on the vehicles driver side hood hinge. There are usually two bolts securing the hood to the hinge. I remove one bolt and reinstall it with the tilt switch. The switch can be bent down to adjust when it actuates and kills the R/S'ed engine. No holes to drill, no extra fasteners to buy and they don't rust and seize up like regular hood pins. The only down side is that for proper operation, they must be adjust so the the hood is opened half way to trigger which isn't ideal for alarm systems. Here is another photo of this :
2001 Jeep Cherokee, Viper 5806V - Page 2 -- posted image.
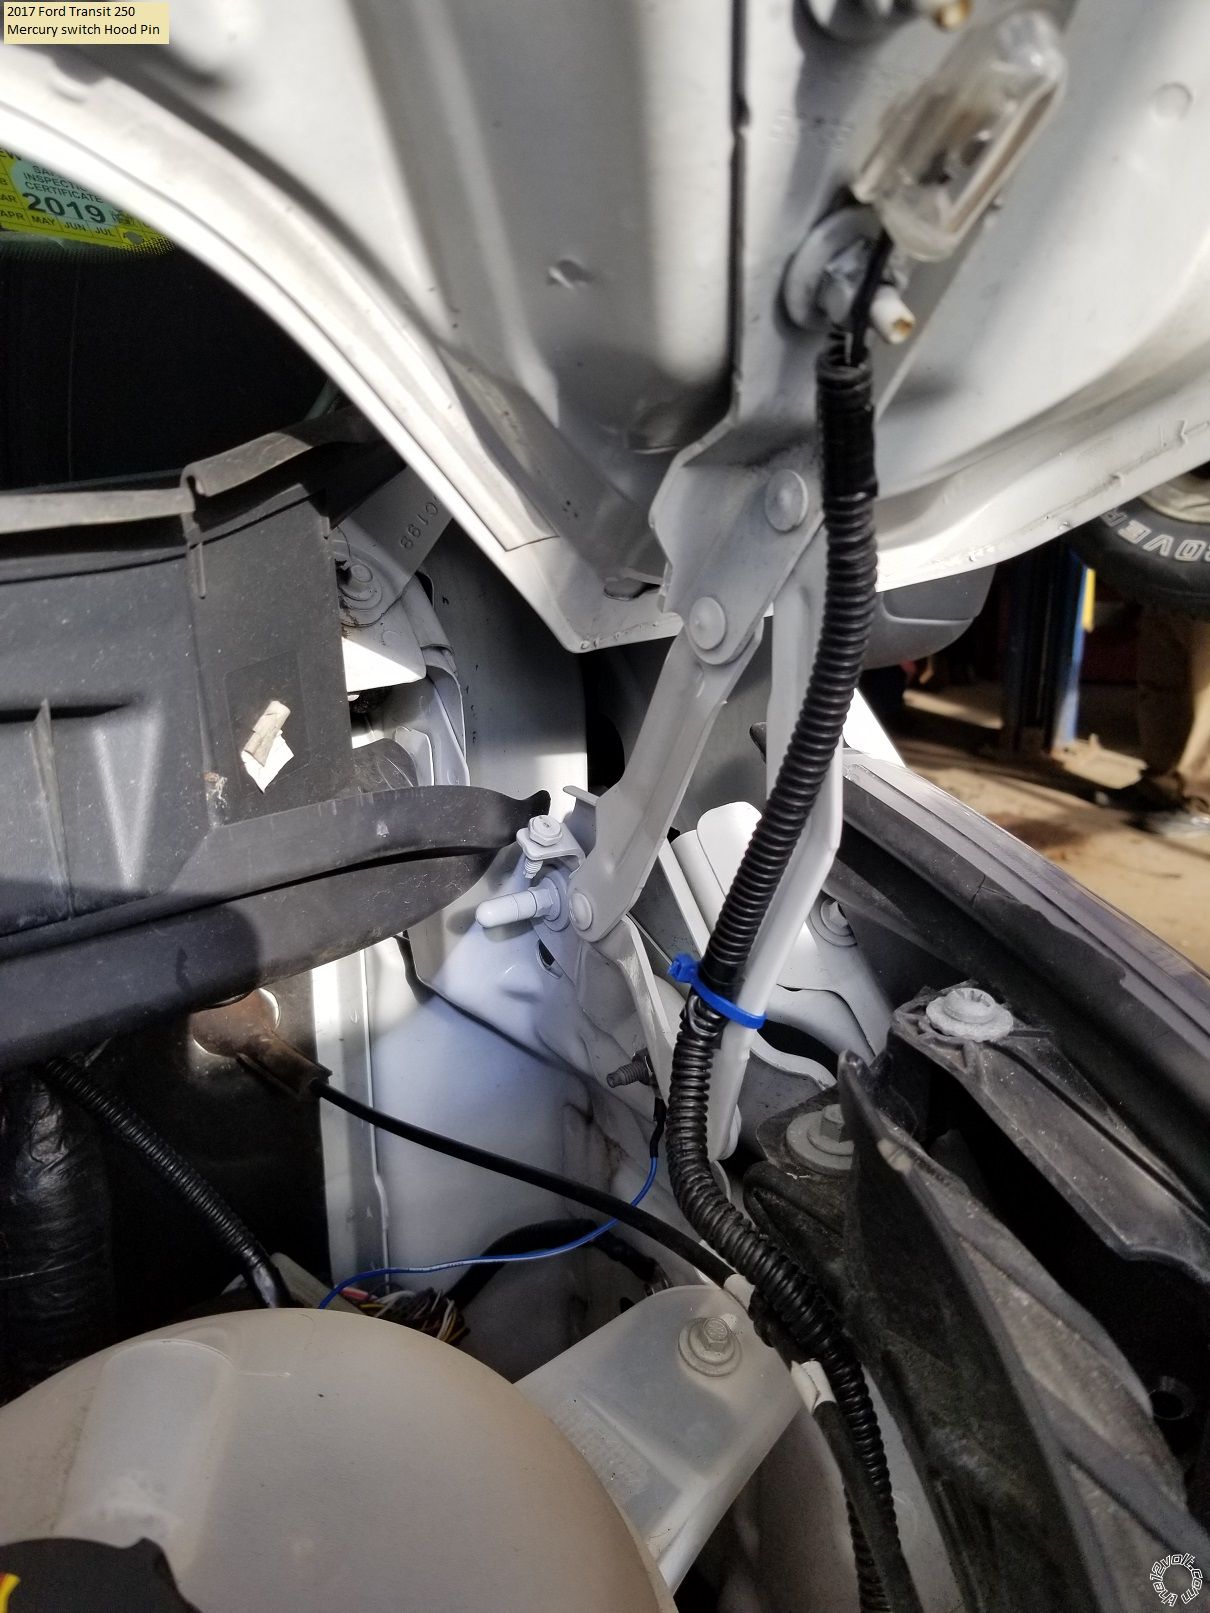
The hood pin that came in the kit is spring loaded and triggers when fully extended. If your vehicle had a corner where there were bolts holding a fender on one side and another on the radiator side, you could use those two bolt to secure a piece of stainless steel between and mount the hood pin through that. The only issue would be the hood contact area and pin adjustment.
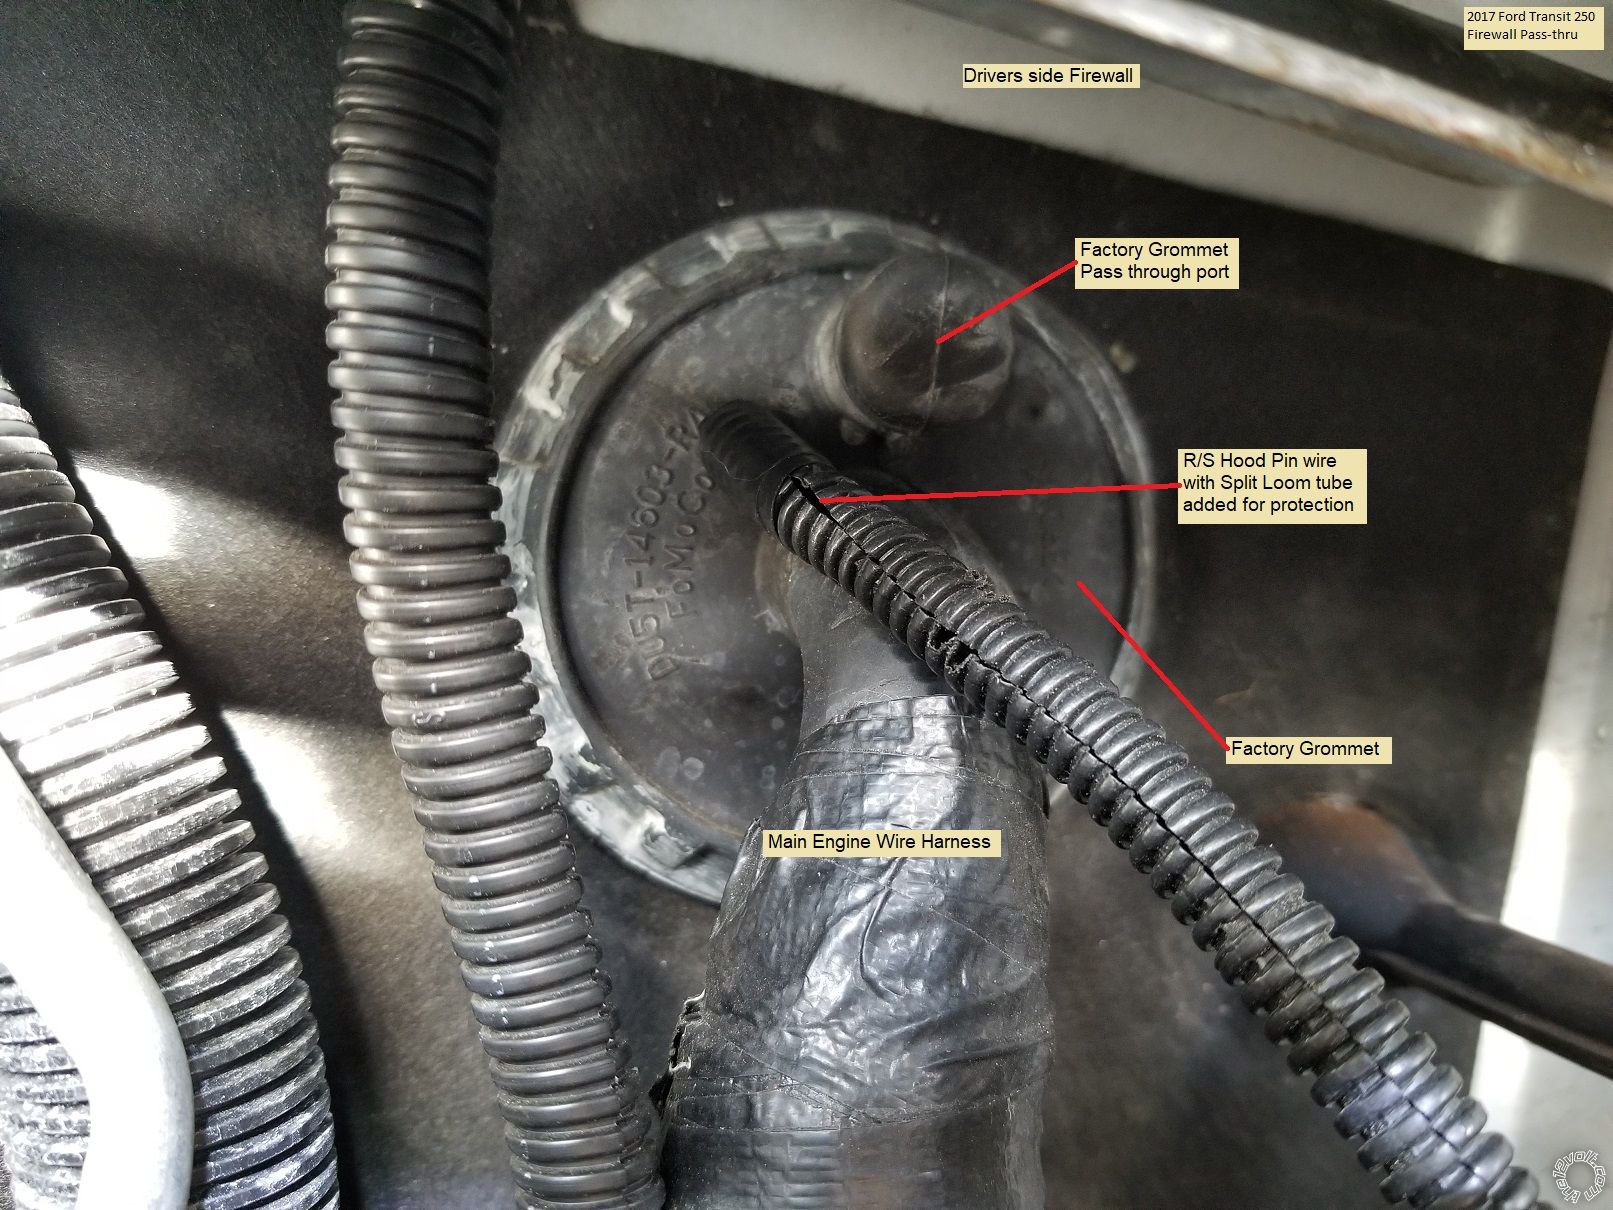
Getting a wire through the firewall can be difficult on some cars. Some cars have an unused grommet in the firewall and the wire(s) can be pushed through them. Some cars have a big grommet with a large wire harness. If there is some space on the side of the wire harness and the hole, you can use a coat hanger to punch through the rubber grommet material and pass your wire(s) through. Just be careful that you don't damage any wires on the other side. Even the grommet that is used to pass the hood release cable through the firewall is acceptable. Use a flashlight and check the drivers side firewall from the engine side for any possible grommet locations, then find them on the inside. Every car is different. Your system has a siren that should be mounted in the engine compartment and the Brown wire ( along with the Hood Pin wire ) needs to be run.
2001 Jeep Cherokee, Viper 5806V - Page 2 -- posted image.
Re Tach Learn - I don't guess I have a choice if I want reliable engine starts like you mentioned.. How would I go about this procedure? Would this be after everything else is wired up and completed?
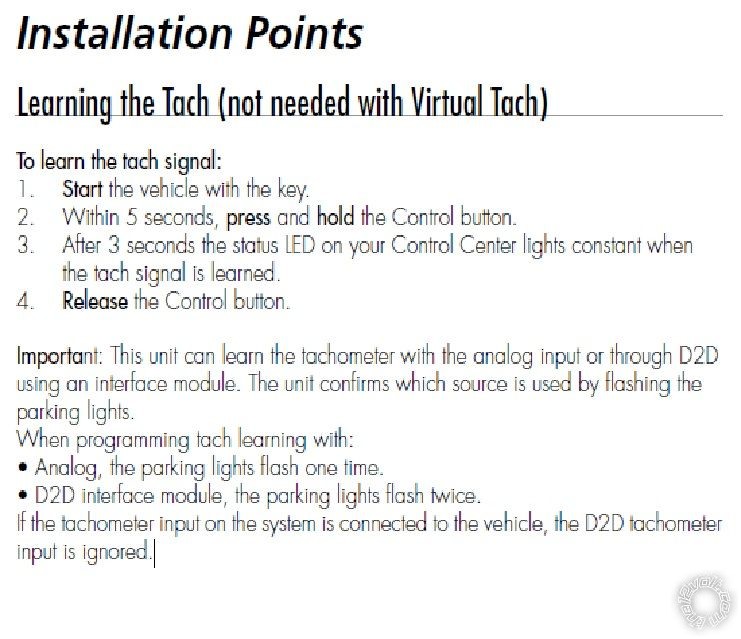
The brief install guide included with the 5806V has the Tach Learn process listed. Here it is in case you can't find it :
2001 Jeep Cherokee, Viper 5806V - Page 2 -- posted image.
Soldering is fun!
firefighter1466 
Member - Posts: 33
Member spacespace
Joined: January 30, 2021
Location: Virginia, United States
Posted: February 01, 2021 at 2:10 PM / IP Logged  
Gotcha - got a question in reference to my above chart.
2001 Jeep Cherokee, Viper 5806V - Page 2 -- posted image.
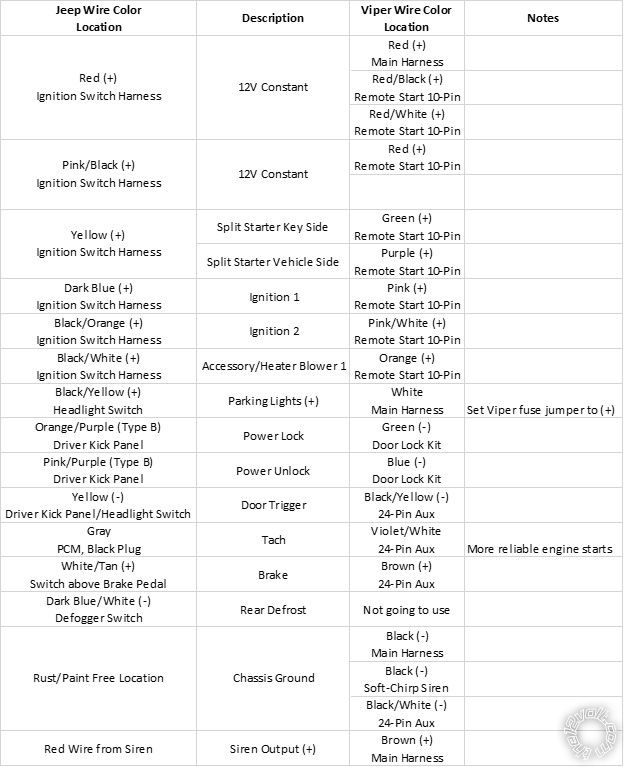
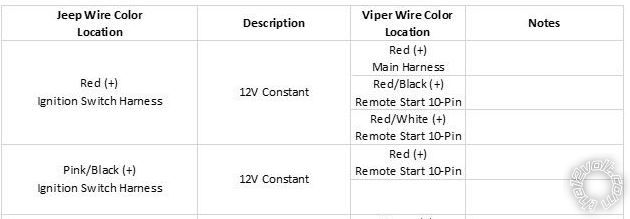
There's 2 12v Constants in this harness? I'm to wire that one thing definitely to the pink/black and the others to the red?
How should I go about wiring multiple things from the remote start to the same thing on the harness in the vehicle? Can they be wired together then to the vehicle or do they need to be spliced into different areas of the harness?
Jon
kreg357 
Platinum - Posts: 7,783
Platinum spaceThis member has made a donation to the12volt.com. Click here for more info.spaceThis member has been recognized as an authority in Electrical Theory. Click here for more info.spaceThis member has been recognized as an authority in Mobile Security and Convenience. Click here for more info.spacespace
Joined: January 30, 2009
Location: Pennsylvania, United States
Posted: February 01, 2021 at 2:29 PM / IP Logged  
I would split it up 2 and 2 to each +12V constant vehicle wire. Balance the load better. So Red/Black and Red/White to Red. Red and Red to Pink/Black. They are all fused so strip about 1" of insulation from the vehicle wire and make the two connections. I might be tempted to combine the thin Red into the thick Red near the end of the wire run and just make one connection with the end of the thick Red.
Did the Bulldog video help?
Soldering is fun!
firefighter1466 
Member - Posts: 33
Member spacespace
Joined: January 30, 2021
Location: Virginia, United States
Posted: February 01, 2021 at 4:17 PM / IP Logged  
It did I'm currently using that method now to wire everything up.
Quick question - what should I do for wires that are not being used at all? Should they be taped up? Cut off?
Jon
kreg357 
Platinum - Posts: 7,783
Platinum spaceThis member has made a donation to the12volt.com. Click here for more info.spaceThis member has been recognized as an authority in Electrical Theory. Click here for more info.spaceThis member has been recognized as an authority in Mobile Security and Convenience. Click here for more info.spacespace
Joined: January 30, 2009
Location: Pennsylvania, United States
Posted: February 01, 2021 at 4:26 PM / IP Logged  
I usually cut them to about 2" and then bundle them together using heat shrink tube to insulate the cut ends.
Soldering is fun!
firefighter1466 
Member - Posts: 33
Member spacespace
Joined: January 30, 2021
Location: Virginia, United States
Posted: February 01, 2021 at 10:03 PM / IP Logged  
Hoping you're still awake trying to finish this thing up tonight. Do you suppose this is the right yellow wire in the "Driver Kick Panel/Headlight Switch" for the Door Trigger? It's a thick wire, the yellow wire in the headlight switch is pretty thin. The harness I'm hooking up is pretty thin, but then again it looks like I've had to mix and match heavier gauge wires with thinner wires throughout this process some anyway.
2001 Jeep Cherokee, Viper 5806V - Page 2 -- posted image.
Jon
firefighter1466 
Member - Posts: 33
Member spacespace
Joined: January 30, 2021
Location: Virginia, United States
Posted: February 01, 2021 at 10:13 PM / IP Logged  
Also for the White/Tan above the brake, there are 2 going into the same slot in the harness connector. Do I need to tie into both of them, or just one will suffice? I would think one since they're going in together.
Jon
Page of 6

  Printable version Printable version Post ReplyPost New Topic
You cannot post new topics in this forum
You cannot reply to topics in this forum
You cannot delete your posts in this forum
You cannot edit your posts in this forum
You cannot create polls in this forum
You cannot vote in polls in this forum

  •  
Search the12volt.com
Follow the12volt.com Follow the12volt.com on Facebook
Thursday, April 25, 2024 • Copyright © 1999-2024 the12volt.com, All Rights Reserved Privacy Policy & Use of Cookies
Disclaimer: *All information on this site ( the12volt.com ) is provided "as is" without any warranty of any kind, either expressed or implied, including but not limited to fitness for a particular use. Any user assumes the entire risk as to the accuracy and use of this information. Please verify all wire colors and diagrams before applying any information.

Secured by Sectigo
the12volt.com spacer
Support the12volt.com
Top
the12volt.com spacer