the12volt.com spacer
icon

copying trim panel


Post ReplyPost New Topic
< Prev Topic Next Topic >
xkuco 
Member - Posts: 29
Member spacespace
Joined: March 14, 2006
Location: United States
Posted: March 28, 2006 at 10:51 AM / IP Logged  
i know im probably retarded for asking this but whats 1001 bd's????? and could u take a picture of the panel off to see how u mounted the piece ive been following this project just trying to learn thanks man
Velocity Motors 
Moderator - Posts: 12,488
Moderator spaceThis member has made a donation to the12volt.com. Click here for more info.spaceThis member has been recognized as an authority in Electrical Theory. Click here for more info.spaceThis member has been recognized as an authority in Fabrication. Click here for more info.spaceThis member has been recognized as an authority in Mobile Audio and Video. Click here for more info.spaceThis member has been recognized as an authority in Mobile Security and Convenience. Click here for more info.spacespace
Joined: March 08, 2002
Location: Manitoba, Canada
Posted: March 28, 2006 at 11:23 AM / IP Logged  

tbone31 wrote:
perfect thanks alot man. im just starting to make up my amplifier racks they are gonna be mounted on each side on the rear pillars in this location. 
they are 1001bd's one on each side. ive got the mdf secured onto the panel by dowel rods, and im gonna stretch the fabric tommorow, do you think it will look better sitting on the plate, or kinda sunk in? if you understand if not ill try and post some pics of what i mean.

I've always been a fan of flush mounting the equipment if all possible. Mounting on just the plate look unfinished to me unless cost factor is involved and the customer doesn't want to pay for the extra. In your case I would flush mount the RF's but the shape of the amp is going to give you some grief.

Jeff
Velocity Custom Home Theater
Mobile Audio/Video Specialist
Morden, Manitoba CANADA
Velocity Motors 
Moderator - Posts: 12,488
Moderator spaceThis member has made a donation to the12volt.com. Click here for more info.spaceThis member has been recognized as an authority in Electrical Theory. Click here for more info.spaceThis member has been recognized as an authority in Fabrication. Click here for more info.spaceThis member has been recognized as an authority in Mobile Audio and Video. Click here for more info.spaceThis member has been recognized as an authority in Mobile Security and Convenience. Click here for more info.spacespace
Joined: March 08, 2002
Location: Manitoba, Canada
Posted: March 28, 2006 at 11:27 AM / IP Logged  

xkuco wrote:
i know im probably retarded for asking this but whats 1001 bd's????? and could u take a picture of the panel off to see how u mounted the piece ive been following this project just trying to learn thanks man

The 1001BD's are Rockford Fosgate's monoblock amplifier's

Jeff
Velocity Custom Home Theater
Mobile Audio/Video Specialist
Morden, Manitoba CANADA
xkuco 
Member - Posts: 29
Member spacespace
Joined: March 14, 2006
Location: United States
Posted: March 28, 2006 at 12:45 PM / IP Logged  
oh ok u still gonna take off the piece to take pictures of coarse if u have too take it off to finish it is what im saying????
tbone31 
Member - Posts: 40
Member spacespace
Joined: March 07, 2006
Location: Canada
Posted: April 19, 2006 at 10:48 PM / IP Logged  
hey sorry guys, been real busy went out east for a while, then had to study for exams well today was a nice day so i got started on the interior mold, i dunno if im doing this the right way but im sure you guys can tell me. the amplifier racks are coming along nicely they are gonna look sick.
and xkuco sorry i got carried away and covered the racks before taking pics of how they are mounted.
basically i made a rack to fit my amp out of wood. i then used dowel rods to set it to the angle i wanted it to be at. then i wraped them in cloth and went from there.
copying trim panel - Page 2 -- posted image.
tbone31 
Member - Posts: 40
Member spacespace
Joined: March 07, 2006
Location: Canada
Posted: April 19, 2006 at 10:54 PM / IP Logged  
oh tommorow i will take some pics of the amp racks mounted so you can get an idea of how they will work.
so do I go ahead and pull the mold out in the morning and then start by building a skelaton to get the shape I want? also should i lay a layer of glass of the wood or just the joints? any advice apreciated thanks guys.
tbone31 
Member - Posts: 40
Member spacespace
Joined: March 07, 2006
Location: Canada
Posted: April 20, 2006 at 8:26 PM / IP Logged  
allright well i kept going figured i was okay, stupid me never finished the mounting rings or else i would have started to mount them then get an idea of how the box will look, spent alot of time also figuring out how im going to run my power wire and stuff might have to cut into the metal....
mold came out perfect no spills i was pumped.
copying trim panel - Page 2 -- posted image.
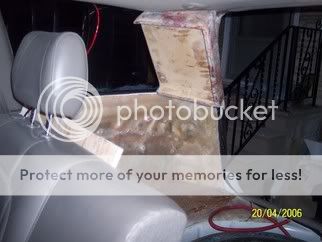
heres how the amp looks and where it will go
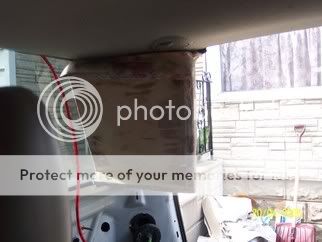
copying trim panel - Page 2 -- posted image.
side shot
copying trim panel - Page 2 -- posted image.
picture of mold trimmed and amp rack placement, any tips on where to run the wires??
crazyoldcougar 
Copper - Posts: 185
Copper spacespace
Joined: March 03, 2006
Location: Canada
Posted: April 20, 2006 at 8:27 PM / IP Logged  

i would leave it in to build the skeleton...the more you pull it in and out the better the chances of it warping...how many layers of glass you have down on the back side there?? aim for 7 or more...

next step is to set your speaker rings...angles and what not..after you have thos located you can figure out what you need for skeletal structure..you may not need any...for the most part they are going to come off the speaker and work outward...unless you want some funky shapes in the face of your box...but like i said you may be able to just stretch fabric over it and be done with it..

no need to coat the wood...there will be the most microscopic air leakage through the wood...but it is nothing to worry about...just make sure the joints are built up..2" overlap should be sufficient...i have even gone so far as to "caulk" the joint between MDF and glass with kitty hair then lay a layer or two of mat over it...

Fiberglass Guru.
tbone31 
Member - Posts: 40
Member spacespace
Joined: March 07, 2006
Location: Canada
Posted: April 20, 2006 at 8:34 PM / IP Logged  
sorry one of the pics didnt post, can you edit posts if so how, so far i have five layers of glass and it passes the thumb test should i go to 7?
heres the pic that didnt post think i will have enough room to port for 32-35 hz? my subs say for ported 1.75ft3 to 4.00ft3 ?
copying trim panel - Page 2 -- posted image.
tbone31 
Member - Posts: 40
Member spacespace
Joined: March 07, 2006
Location: Canada
Posted: April 23, 2006 at 12:14 AM / IP Logged  
i guess ill keep posting my progress here is there any way to edit the title of this post? anyways
copying trim panel - Page 2 -- posted image.
got the rings mounted it was hard to get them lined up so they were at the same angle even though they are mounted at diffent heights.
copying trim panel - Page 2 -- posted image.
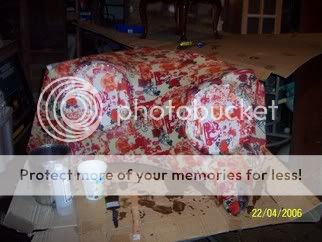
after a few small mods i wrapped the box in fleece i was happy that i got no wrinkles at all i plan on smoothing the lines from the amp down to the box so it looks seamless but will be two different parts and here it is soaked in resin
copying trim panel - Page 2 -- posted image.
and here it is with 2 layers of glass..
copying trim panel - Page 2 -- posted image.
untill tommorow
Page of 4

  Printable version Printable version Post ReplyPost New Topic
You cannot post new topics in this forum
You cannot reply to topics in this forum
You cannot delete your posts in this forum
You cannot edit your posts in this forum
You cannot create polls in this forum
You cannot vote in polls in this forum

  •  
Search the12volt.com
Follow the12volt.com Follow the12volt.com on Facebook
Saturday, April 20, 2024 • Copyright © 1999-2024 the12volt.com, All Rights Reserved Privacy Policy & Use of Cookies
Disclaimer: *All information on this site ( the12volt.com ) is provided "as is" without any warranty of any kind, either expressed or implied, including but not limited to fitness for a particular use. Any user assumes the entire risk as to the accuracy and use of this information. Please verify all wire colors and diagrams before applying any information.

Secured by Sectigo
the12volt.com spacer
Support the12volt.com
Top
the12volt.com spacer