the12volt.com spacer
icon

full hatch enclosure?


Post ReplyPost New Topic
< Prev Topic Next Topic >
boostedrst 
Member - Posts: 28
Member spacespace
Joined: August 02, 2006
Location: United States
Posted: August 02, 2006 at 4:19 AM / IP Logged  

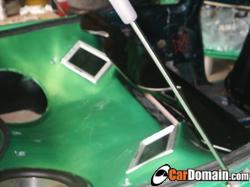
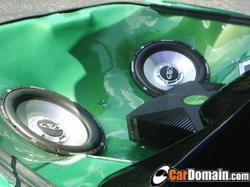
i have build a bunch of fiberglass sub boxs b4 but i want to try something different . how would i go about making something like this (in pic) .? 

full hatch enclosure? -- posted image.

full hatch enclosure? -- posted image.

kmapro 
Member - Posts: 6
Member spacespace
Joined: July 19, 2006
Location: United States
Posted: August 02, 2006 at 9:26 AM / IP Logged  

I would build MDF boxes to hold the subs first and get them in place like I wanted them.

Then I would start out by removing the foam/rubber gasket that surrounds the trunk (seal). Stretch my fleece out like I wanted it, put the seal back on (to hold the fleece) and then apply resin.

After the first resin shot cured, i would take the seal back off and throw it away - get a new seal, they are relatively inexpensive.

Remove the entire structure, and add fiberglass to the inside for strength. By adding the glass inside, you will cut way down on your sanding when it is all done.

** you may have to frame up a little more under the top piece with MDF - depending on the shape and layout.

austincustoms 
Copper - Posts: 232
Copper spacespace
Joined: November 15, 2005
Location: United States
Posted: August 02, 2006 at 11:11 AM / IP Logged  

What he said, but I would do at least 3 layers before you try to remove it.  This may give  you a better idea.

https://www.the12volt.com/installbay/forum_posts.asp?tid=79682&KW=mustang

tackbradley 
Member - Posts: 16
Member spacespace
Joined: May 15, 2006
Location: United States
Posted: August 02, 2006 at 12:14 PM / IP Logged  
wouldnt it be really difficult to remove? would you slim the inside a bit? like the bottom.
~Jason
(516) Drum Co.
supersix4 
Copper - Posts: 71
Copper spacespace
Joined: July 11, 2006
Location: United States
Posted: August 02, 2006 at 12:35 PM / IP Logged  

boostedrst, do you plan to drive this car every day??

Yep - it's more difficult to remove, say, for access to the SPARE TIRE! IF it's even still under there! D'oh! That kind of an install is nice for a show car, or something that you drive very infrequently. And when you do drive it, you have a chase car trailing. For a daily driver - no thanks. If you go for something like that, be sure to sign up for AAA service! You know how kharma works ... you could be the guy who's NEVER had a flat tire before ... you decide to go for a nice Fiberglass job like that ... to do the install, you ditch the spare & tools ... then, during the second or third roadtrip you take the car on ... BAMMO ... flat tire out in the middle of no-where. What a PITA. And to top it all off, your girl now KNOWS you're a complete tool ... making her sit at the side of the hot highway, waiting for a tow truck to come & fix your flat ... how un-manly!! LOL!! Like I said ... D'oh!

boostedrst 
Member - Posts: 28
Member spacespace
Joined: August 02, 2006
Location: United States
Posted: August 02, 2006 at 1:41 PM / IP Logged  
thanx for the tips on building it . any more tips would be greatly appriciated . btw i have no spare or trunk room as it is . i do have aaa too . i also have 2 cars so the car doesnt get driven on long trips . i would thimk it would be easy to remove cuz in the pic there is no frame left underneath .
supersix4 
Copper - Posts: 71
Copper spacespace
Joined: July 11, 2006
Location: United States
Posted: August 02, 2006 at 3:08 PM / IP Logged  

Generally, something like this is not easy to remove. It is built into the car. Remember, the subs are actually installed into boxes that are hidden underneath all that cool lookin' fiberglass. The fiberglass is purely ornamental - it has nothing to do with how the car sounds. Well ... if it's too thin, or touches the interior someplace where it shouldn't, it  might vibrate ... so I suppose it could have an impact on the way the car sounds. Also, those boxes are BOLTED to the car, if it's installed correctly. Those bolts are generally accessed thru the sub mounting holes. Sooo, to remove this assembly, first you remove the subs from the boxes. Then you unbolt the boxes from the car. Then you get a buddy or two to help lift the heavy beast out of the car ... since it is heavy & you don't wanna mess up that smooth paint job, right?

Also, bear in mind that some cars have very small trunk Lids/Hatches but fairly large trunks/cargo floors ... what this means is that if you build something into the trunk/hatch area, the trunk/hatch opening in the car may be too small to allow removal - I've seen this plenty of times. Think about it.

I understand that this won't be a daily driver, so don't get me wrong here - I dig this work. Looks great when finished nicely. It just has a tremendous impact on a vehicles day-to-day praticality - and it requires alot of care & consideration.

Building it is the easy part. Living with it can be a pain, especially since it doesn't generally have a positive impact on the SQ.

austincustoms 
Copper - Posts: 232
Copper spacespace
Joined: November 15, 2005
Location: United States
Posted: August 02, 2006 at 5:09 PM / IP Logged  

Even after 2 blow outs, and a flat, I still don't carry a spare with me.  I don't know why, I just don't.

I built a fiberglass box into the back pass. corner of some guys Subaru Outback.  He didn't want me to cut the sub floor, so instead, he had me screw it to the floor with phillips screws, and the sub to the box with the same screws.  I guess he plans to take the sub out, then unscrew it from the floor when he needs his spare tire.  I bet I see him again after his first flat.

sawhit4 
Copper - Posts: 64
Copper spacespace
Joined: June 22, 2006
Location: United States
Posted: August 02, 2006 at 7:38 PM / IP Logged  
theres always the option of finding another spot to put the spair.  I drive a 77 ranchero ( the ford version of the elcamino)  and behind the bench seat there was a small area that recessed under the bed of the truck to hold the spair and jack stand.  It was just screaming for a sub, so i made a fiberglass cover to cover and incorporate a sub and amp.  I was faced with the same problem with not having a spair, and after my first blow out i decided to fix that.  The car came with a full size spair and a huge outdated bumper jack.  I got rid of that and bought a more modern jack and a donut.  Since the donut was smaller i mounted it under the gas tank, and the jack fits behind the fiberglass piece in the passenger compartment.  Only three screws hold the fiberglass piece to the car, and only two need to be removed to get to the jack.  Basically if you think it through and do it right, you can probably find a way to make it work. 
boostedrst 
Member - Posts: 28
Member spacespace
Joined: August 02, 2006
Location: United States
Posted: August 02, 2006 at 8:23 PM / IP Logged  

i havent had the spare in over 2 years . doesnt really matter to me . i have a lowered eclipse , i cant even get a jack under the car without driving it up on 2x4's .i think im going to try it . the only part im still a little confused on is building the frame . the enclosure in the pic is supposivly very easy to remove according to the guy who build it . for some reason tho he wont tell me how he built it tho

Page of 2

  Printable version Printable version Post ReplyPost New Topic
You cannot post new topics in this forum
You cannot reply to topics in this forum
You cannot delete your posts in this forum
You cannot edit your posts in this forum
You cannot create polls in this forum
You cannot vote in polls in this forum

  •  
Search the12volt.com
Follow the12volt.com Follow the12volt.com on Facebook
Friday, March 29, 2024 • Copyright © 1999-2024 the12volt.com, All Rights Reserved Privacy Policy & Use of Cookies
Disclaimer: *All information on this site ( the12volt.com ) is provided "as is" without any warranty of any kind, either expressed or implied, including but not limited to fitness for a particular use. Any user assumes the entire risk as to the accuracy and use of this information. Please verify all wire colors and diagrams before applying any information.

Secured by Sectigo
the12volt.com spacer
Support the12volt.com
Top
the12volt.com spacer